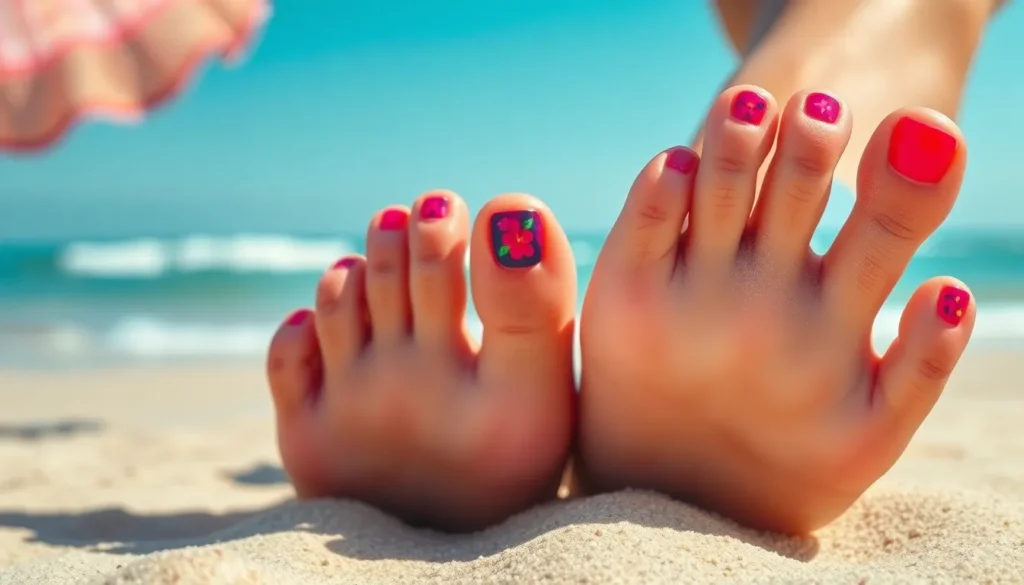
We’ve all been there – staring down at our bare toes wondering how to transform them from basic to absolutely stunning. Whether you’re prepping for sandal season or planning a beach getaway, your toenails deserve just as much attention as your fingernails.
Toenail art isn’t just a trend – it’s become a powerful form of self-expression that lets you showcase your personality from head to toe. From minimalist designs that whisper elegance to bold patterns that scream confidence, there’s a perfect toenail look waiting for every style preference and occasion.
We’re about to jump into the most creative and eye-catching toenail ideas that’ll have you excited to show off your feet. Get ready to discover designs that range from effortlessly chic to absolutely show-stopping, plus insider tips that’ll help you achieve salon-quality results right at home.
Classic French Pedicure Ideas for Timeless Elegance
French pedicures remain the gold standard for sophisticated toe nail art. These elegant designs offer versatility while maintaining a polished appearance that works for any occasion.
Traditional White Tips with Clear Base
Traditional white tip French pedicures create the ultimate timeless look for your toes. We recommend using a sheer pink or nude base coat followed by crisp white tips that mirror the natural nail shape. The key to achieving salon quality results lies in using thin nail art brushes or French tip guides to ensure even application across each toenail.
Clean lines make all the difference in this classic style. We suggest applying the white polish in two thin coats rather than one thick layer to prevent streaking or uneven coverage. Professional nail technicians often use a steady hand technique where they rest their painting hand on a stable surface to maintain control throughout the application process.
Maintenance becomes simple with this tried and true design. We find that traditional French pedicures typically last 2-3 weeks with minimal touch ups needed only at the tip area where normal wear occurs first.
Colored French Tips for Modern Twist
Colored French tips transform the classic design into contemporary nail art that reflects current trends. We love experimenting with bold hues like coral pink, navy blue, or metallic silver to replace traditional white tips while keeping the clear or nude base intact. This approach allows you to match your pedicure to exact outfits or seasonal color palettes.
Seasonal variations work beautifully with this modern interpretation. We often choose warm oranges and reds for fall, cool blues and greens for summer, or soft pastels for spring celebrations. The versatility of colored tips means you can coordinate with everything from beachwear to formal evening attire.
Application techniques remain similar to traditional methods but offer more creative freedom. We recommend testing color combinations on a nail wheel first to ensure the tip shade complements your chosen base color harmoniously.
Reverse French Pedicure Designs
Reverse French pedicures flip the traditional design by placing color at the nail base instead of the tips. We create this striking look by applying a thin colored stripe along the cuticle area while keeping the rest of the nail clear or in a complementary neutral shade. This technique draws attention to the nail bed and creates an unexpectedly chic appearance.
Geometric precision elevates reverse French designs beyond simple color placement. We often incorporate thin metallic lines, small dots, or subtle glitter accents to enhance the base color application. These details require steady hands but create professional looking results that rival expensive salon treatments.
Color coordination becomes crucial for reverse French success. We pair deeper shades like burgundy or forest green with nude bases for sophisticated contrast, while bright colors like electric blue or hot pink work best with clear or white bases to maintain visual balance across all ten toenails.
Bold and Bright Toe Nail Color Ideas

Ready to make a statement with your pedicure? Bold colors transform ordinary toenails into eye-catching works of art that demand attention.
Vibrant Summer Neon Shades
Electric pink delivers maximum impact for pool parties and beach vacations. We recommend applying two thin coats of hot pink polish like OPI’s “Strawberry Margarita” for optimal coverage and longevity. Neon orange creates a sunset inspired look that pairs perfectly with bronze skin tones during summer months.
Lime green offers an unexpected pop of color that complements white sandals and casual summer outfits. Bright coral combines pink and orange undertones to create a universally flattering shade that works on all skin tones. Electric blue makes a bold statement for those who want to stand out at summer festivals and outdoor events.
Highlighter yellow brings sunshine to your feet while creating a playful contrast against dark pedicure tools and accessories. Magenta provides a sophisticated twist on traditional pink while maintaining that vibrant summer energy we all crave.
Rich Jewel Tones for Fall
Deep emerald green captures the essence of autumn while providing a luxurious alternative to traditional fall colors. We suggest pairing emerald polish with gold accent details or metallic topcoats for added elegance. Sapphire blue creates a regal appearance that complements fall fashion trends and darker clothing palettes.
Ruby red offers timeless sophistication that transitions seamlessly from fall into winter holiday seasons. Amethyst purple combines mystery with glamour while providing a unique alternative to standard burgundy shades. Garnet delivers rich burgundy tones with subtle red undertones that perfectly complement autumn wardrobes.
Topaz orange brings warmth to cooler months while maintaining the boldness that jewel tones are known for. These deeper shades require careful application techniques including base coats and topcoats to achieve that professional salon finish.
Pastel Colors for Spring Vibes
Soft lavender creates a dreamy springtime look that pairs beautifully with floral patterns and light fabrics. We love how mint green evokes fresh spring gardens while providing a subtle yet noticeable color choice. Baby pink offers classic femininity with a gentle approach to bold color that works for any occasion.
Powder blue brings sky inspired tranquility to your toenails while maintaining enough vibrancy to qualify as a statement shade. Peach creates warmth without overwhelming intensity and complements most skin undertones naturally. Butter yellow provides cheerful spring energy while remaining sophisticated enough for professional settings.
Cotton candy pink combines playfulness with elegance for those who want bold color without harsh contrast. These softer shades work exceptionally well when applied in multiple thin layers to achieve even coverage and prevent streaking or bubbling.
Artistic Nail Art Designs for Creative Expression

Moving beyond solid colors and classic French tips, we can explore intricate artistic designs that transform your toenails into miniature canvases. These creative nail art techniques allow for personalized expression while showcasing your artistic flair.
Floral Patterns and Nature Motifs
Botanical designs bring natural beauty to your toenail art with delicate petals and organic shapes. We recommend starting with simple daisy patterns using white dots for petals and yellow centers on a nude base coat. Cherry blossoms create an elegant spring look when painted with soft pink petals on a clear background. Tropical hibiscus flowers work beautifully on summer pedicures with vibrant red or orange blooms against turquoise bases.
Leaf patterns offer versatility through different seasonal interpretations like autumn maple leaves in gold and burgundy tones. Vine designs can wrap around the nail edges for a whimsical garden effect. Small rose buds painted in corners add romantic touches to any base color. We suggest using thin nail art brushes and dotting tools to achieve precise botanical details that capture nature’s intricate beauty.
Geometric Shapes and Lines
Mathematical precision meets modern aesthetics through structured geometric nail art patterns. Triangle formations create ever-changing visual interest when arranged in alternating colors like navy blue and white. Chevron patterns provide bold directional movement across the nail surface using metallic gold lines on dark backgrounds. Diamond shapes offer sophisticated elegance when outlined in silver against deep purple bases.
Stripes remain a versatile choice for geometric designs with horizontal lines creating width illusions and vertical lines adding length. Grid patterns work exceptionally well on big toes where there’s adequate space for detailed line work. Negative space designs incorporate the natural nail as part of the geometric pattern through strategic color placement. We recommend using nail tape or stencils to achieve crisp geometric lines that maintain professional quality standards.
Abstract Art and Watercolor Effects
Freeform artistic expression allows unlimited creativity through abstract nail art techniques and fluid color blending. Watercolor effects create dreamy, soft appearances when colors bleed into each other naturally on wet base coats. Marble patterns mimic luxurious stone textures using swirled combinations of white, gray, and gold polish. Splatter techniques produce modern art vibes with contrasting colors flicked across neutral backgrounds.
Galaxy designs transport your toenails to cosmic realms using dark blues with silver glitter stars and nebula effects. Ombre transitions blend two or more colors seamlessly from light to dark tones. Paint drop effects create organic shapes when colorful polish dots are allowed to spread naturally. We suggest experimenting with different brush techniques and polish consistencies to achieve unique abstract patterns that reflect your personal artistic vision.
Seasonal Toe Nail Ideas for Year-Round Style

Seasonal toenail designs keep our pedicures fresh and relevant throughout the year. We can easily adapt our toenail art to match the changing seasons and holidays.
Winter Holiday and Festive Themes
Snowflake patterns transform our toenails into winter wonderlands with delicate white designs on icy blue or silver bases. We create these intricate patterns using nail stamps or freehand techniques with thin brushes. Traditional Christmas colors like deep red and emerald green paired with gold accents give us that festive holiday spirit.
Holiday glitter gradients add sparkle to our winter looks with champagne gold fading into deep burgundy. We apply the glitter at the nail tips and blend downward for that perfect ombre effect. Silver and white combinations work beautifully for New Year’s celebrations and winter parties.
Candy cane stripes bring playful holiday cheer to our big toes using alternating red and white diagonal lines. We use nail tape to achieve crisp, clean stripes that look professionally done. Mint green and white combinations offer a fresh twist on the traditional candy cane color scheme.
Summer Beach and Tropical Designs
Ocean wave designs capture the essence of summer with flowing blue and white patterns that mimic rolling waves. We blend different shades of blue from navy to turquoise for depth and movement. Adding tiny white foam details with a dotting tool completes the realistic ocean effect.
Palm tree silhouettes create instant vacation vibes on coral or sunset orange bases. We paint simple black palm tree shapes on our big toes while keeping the other nails in coordinating solid colors. Tropical sunset gradients from yellow to pink to orange make perfect backgrounds for these designs.
Seashell and starfish motifs bring beach treasures to our toenails with pearl white shells on sandy beige bases. We use small brushes to paint realistic shell textures and add tiny pearls for extra elegance. Coral pink starfish designs paired with ocean blue create stunning tropical contrasts.
Fall Harvest and Autumn Leaves
Maple leaf patterns celebrate autumn’s beauty with warm orange and red designs on neutral nude bases. We create realistic leaf shapes using thin brushes and blend multiple fall colors for authentic seasonal appeal. Golden yellow highlights add dimension to our autumn leaf artwork.
Pumpkin spice themes embrace fall flavors with warm burnt orange bases and cute pumpkin designs on accent nails. We paint small pumpkins with green stems and add subtle shading for three dimensional effects. Cinnamon brown and cream accents complete the cozy autumn aesthetic.
Harvest moon designs capture fall’s romantic atmosphere with deep burgundy bases and golden moon phases. We create crescent moon shapes using gold polish and add tiny stars for magical nighttime scenes. Copper and bronze metallic accents enhance the rich autumn color palette perfectly.
Glitter and Sparkle Toe Nail Ideas for Special Occasions

Transform your toenails into dazzling focal points that capture light and attention for weddings, parties, and celebrations. We’ll show you how to achieve stunning glitter effects that elevate any special occasion look.
Full Glitter Coverage Techniques
Full glitter coverage creates maximum sparkle impact across your entire toenail surface. Apply a base coat to protect your natural nail and ensure smooth polish adhesion. Choose chunky holographic glitter for concerts and festivals or fine cosmetic glitter for elegant events like galas and weddings.
Dense glitter application requires exact layering methods to achieve even coverage. Start with two thin coats of your base color in silver, gold, or clear polish. Press loose glitter into wet polish using a fan brush or makeup sponge for complete coverage. Seal everything with two layers of high-quality top coat to prevent glitter from catching on hosiery or socks.
Textured glitter polishes offer easier application than loose glitter formulations. Build up color gradually with three to four thin coats rather than attempting full coverage in one application. Allow each layer to dry completely between applications to prevent bubbling and ensure a smooth finish.
Accent Nail Glitter Applications
Accent nail techniques focus glitter attention on exact toes for balanced sparkle distribution. Apply glitter to your big toes only while keeping other nails in complementary solid colors like nude, blush pink, or classic red. This approach works perfectly for formal events where subtle glamour is preferred over bold statements.
Strategic glitter placement creates visual interest without overwhelming your overall look. Choose every other toe for glitter application in alternating patterns or focus on just the big toe and pinky toe for symmetrical design. Consider seasonal color combinations like rose gold glitter with burgundy base for fall weddings or silver glitter with navy blue for winter celebrations.
Gradient glitter applications transition from heavy to light coverage across multiple toes. Start with full glitter on your big toe then decrease intensity on each subsequent nail using dabbing motions with a makeup sponge. This creates a flowing effect that draws the eye naturally from toe to toe.
Ombre Glitter Fade Effects
Ombre glitter techniques blend sparkle seamlessly from nail base to tip for sophisticated dimension. Begin with your chosen base color in two thin coats then apply glitter polish starting at the nail tip. Use a damp makeup sponge to dab and blend the glitter downward creating a natural fade effect toward the cuticle area.
Reverse ombre applications place the heaviest glitter concentration at the nail base. Apply glitter polish near the cuticle area then blend upward toward the nail tip using light dabbing motions. This technique creates an elegant sunrise effect that catches light beautifully in strappy sandals and open-toe shoes.
Multi-tonal ombre effects combine different glitter colors for complex visual depth. Layer rose gold glitter at the base transitioning to champagne glitter in the middle and finishing with silver glitter at the tips. Use a clean damp sponge between each color application to ensure smooth blending without muddy color mixing.
Minimalist Toe Nail Ideas for Subtle Sophistication

Minimalist toenail designs offer refined elegance without overwhelming visual impact. These understated approaches complement any outfit while maintaining polished sophistication.
Single Color Matte Finishes
Matte polish transforms ordinary colors into modern masterpieces with velvety texture that catches light beautifully. We recommend choosing neutral tones like dusty rose, warm taupe, or soft sage green for versatile sophistication. Apply two thin coats of your chosen polish followed by a matte topcoat to achieve that perfect non-glossy finish.
Preparation becomes crucial when working with matte formulas since they highlight surface imperfections more than glossy alternatives. Buff toenails smooth and push back cuticles completely before application. Consider these popular matte shade combinations for effortless elegance:
| Color Family | Recommended Shades | Best Season |
|---|---|---|
| Nudes | Mushroom, Latte, Cream | Year-round |
| Pastels | Lavender Gray, Mint, Blush Pink | Spring/Summer |
| Earthy Tones | Sage, Clay, Cocoa | Fall/Winter |
Thin Line and Dot Designs
Delicate lines create sophisticated patterns using minimal elements for maximum visual impact. Draw single vertical stripes down the center of each toenail using a fine brush and contrasting polish color. Position thin horizontal lines across the nail bed at varying heights for geometric interest without overwhelming the design.
Dot patterns offer playful sophistication through strategic placement and size variation. Create three small dots near the cuticle area using a dotting tool or bobby pin tip. Arrange five tiny dots in a curved line following the natural nail shape for subtle movement. Choose metallic colors like rose gold or silver for dots against neutral base colors.
Practice these techniques on practice wheels before applying to toenails for better precision. Use steady hand movements and allow each element to dry completely between applications. Clean brushes immediately after use to maintain sharp lines for future designs.
Negative Space Nail Art
Negative space designs showcase natural nail color as part of the artistic composition rather than covering it completely. Cut thin strips of tape to create clean geometric shapes like triangles or half moons on prepared toenails. Paint around the tape with your chosen polish color then remove tape carefully while polish remains slightly wet.
Curved negative space looks particularly elegant on toenails with their naturally rounded shape. Apply small circular stickers near the nail base before painting the remaining surface. Remove stickers after the second coat dries to reveal perfect circles of natural nail underneath.
- Half moon designs at the cuticle area
- Diagonal stripes leaving alternating sections bare
- Small geometric cutouts near nail tips
- Curved lines that follow natural nail contours
Trendy Pattern Ideas for Fashion-Forward Looks

Pattern designs elevate toenail art beyond simple colors and create statement looks that showcase personal style. Fashion forward patterns transform your pedicure into a conversation starter and artistic expression.
Animal Print Inspirations
Leopard spots remain the most popular animal print choice for toenails because they’re versatile and eye catching. We recommend starting with a nude or tan base coat then using a small dotting tool to create irregular brown spots. Add black outlines around each spot for authentic leopard definition and dimension.
Zebra stripes offer bold contrast that works especially well on big toes as accent nails. Create these patterns using black and white nail polish with thin striping brushes or nail tape for clean lines. Apply white base coat first then add curved black stripes that follow your nail’s natural shape.
Snake skin patterns provide sophisticated texture through overlapping scale designs. Use metallic gold or silver as your base then create diamond shaped scales with darker shades like bronze or charcoal. Layer the scales from cuticle to tip for realistic reptilian texture.
Tiger stripes bring fierce energy to your pedicure with orange base coats and bold black angular lines. Paint diagonal stripes that vary in thickness and spacing for natural tiger authenticity. Consider using this pattern on just one accent toe per foot for balanced visual impact.
Marble and Stone Effects
Classic marble veining creates elegant sophistication using white base coats with gray and black marbling lines. We suggest using a feathering brush or plastic wrap to blend colors while they’re still wet. The key is keeping veins irregular and organic looking rather than perfectly straight.
Rose gold marble combines warm metallic tones with soft pink and cream swirls for feminine luxury. Apply a light pink base then add rose gold foil or metallic polish in organic swirling patterns. Use a dry brush to softly blend the metallic elements into the base color.
Turquoise stone effects mimic natural gemstones through layered blue and green tones with metallic accents. Start with a deep teal base then add lighter aqua streaks and gold veining for authentic stone appearance. Finish with matte top coat to enhance the stone like texture.
Granite speckled patterns use sponging techniques to create natural stone texture with multiple color layers. Apply gray base coat then dab black white and silver polish with a makeup sponge for random speckled effects. Build up layers gradually for realistic granite depth and complexity.
Tie-Dye and Rainbow Patterns
Spiral tie dye designs capture retro vibes through circular color blending that radiates from nail centers. We create these effects using wet nail polish and toothpicks to swirl colors together before they dry. Choose three to four complementary colors for best visual cohesion.
Horizontal rainbow stripes showcase full color spectrums in organized bands across each toenail. Use thin striping brushes to paint clean lines in rainbow order from red through violet. Keep stripe widths consistent for professional appearing results and sharp color transitions.
Watercolor tie dye blends achieve soft dreamy effects through color bleeding techniques using alcohol or nail polish thinner. Apply different colored dots then use a brush dampened with alcohol to blend and blur the edges together. This creates organic flowing patterns that resemble watercolor paintings.
Ombre rainbow fades transition multiple colors smoothly from light to dark or across the color spectrum. Start with lightest shade at the cuticle then gradually blend darker or different hues toward the nail tip. Use makeup sponges to achieve seamless color transitions and professional gradient effects.
Easy DIY Toe Nail Ideas for Beginners

Starting your toenail art journey doesn’t require professional skills or expensive tools. We’ll guide you through simple techniques that create stunning results with basic supplies you likely already have at home.
Simple Polka Dot Techniques
Polka dots transform plain toenails into playful masterpieces using everyday household items. We recommend starting with a bobby pin as your dotting tool since it creates perfect circles every time. Dip the rounded end into your chosen polish color and gently press it onto your dried base coat.
Create uniform dots by maintaining consistent pressure and spacing across each toenail. We suggest practicing the motion on a piece of paper first to get comfortable with the technique. Large dots work best on big toes while smaller dots complement the remaining toenails beautifully.
Vary your dot sizes using different tools like toothpicks, pencil erasers, or the head of a straight pin. We find that alternating between two complementary colors creates visual interest without overwhelming the design. White dots on a coral base or gold dots on navy blue offer elegant contrast options.
Clean your dotting tool between colors to prevent muddy mixing and maintain crisp edges. We recommend having a small cup of acetone nearby for quick tool cleaning. This extra step ensures each dot maintains its intended color and clarity.
Basic Stripe Designs
Stripe patterns offer endless creativity while remaining beginner friendly with the right approach. We suggest using nail striping tape or regular scotch tape to achieve perfectly straight lines. Apply your base color first and allow it to dry completely before adding tape guidelines.
Create vertical stripes by placing tape lengthwise down the center of each toenail. We recommend using contrasting colors like black stripes on white or silver stripes on deep purple. Paint over the exposed area and remove the tape while the polish is still slightly wet for clean edges.
Horizontal stripes work beautifully across the width of your big toenails. We find that three thin stripes or one bold central stripe creates the most balanced look. Navy and white combinations evoke nautical themes while rainbow stripes celebrate summer vibes.
Experiment with diagonal stripes for a ever-changing geometric appearance. We suggest starting from one corner and angling toward the opposite corner for visual movement. Metallic gold or rose gold diagonal stripes over neutral bases add sophisticated flair to any outfit.
Quick Gradient Methods
Gradient effects create professional looking ombre transitions using simple sponge blending techniques. We recommend using a makeup sponge or small piece of kitchen sponge for the smoothest color transitions. Apply two or three polish colors side by side on the sponge surface.
Dab the color loaded sponge gently onto your toenail starting from the tip. We find that multiple light layers create smoother gradients than trying to achieve the effect in one application. Allow each layer to dry slightly before adding the next for better color payoff.
Blend warm colors like coral into peach into cream for sunset inspired gradients. We suggest cool color combinations like navy into teal into mint green for ocean themed designs. Purple into pink into white creates dreamy cotton candy effects perfect for spring.
Finish gradient nails with a high quality top coat to smooth any texture from sponging. We recommend applying two thin coats of top coat rather than one thick layer. This technique eliminates any bumps while improving the gradient’s seamless appearance and extending wear time.
Conclusion
We’ve covered everything from timeless French tips to bold geometric patterns and seasonal designs that’ll keep your toes looking fabulous year-round. Whether you’re drawn to subtle minimalist styles or eye-catching glitter effects there’s a perfect toenail design waiting for you to try.
The beauty of toenail art lies in its versatility and accessibility. With simple tools like nail tape bobby pins and household sponges you can create professional-looking designs right at home. Don’t be afraid to experiment with different techniques and color combinations.
Your toes deserve the same creative attention as your fingernails so embrace the opportunity to express your personal style from head to toe. Start with beginner-friendly designs and work your way up to more intricate patterns as your confidence grows.
Frequently Asked Questions
What makes toenail art different from fingernail art?
Toenail art focuses on the larger canvas of toenails, making it perfect for bold designs and patterns. Unlike fingernails, toenails are typically displayed during sandal season, beach trips, and special occasions. The bigger surface area allows for more intricate designs like florals, geometric patterns, and detailed artistic expressions that might be challenging on smaller fingernails.
How long does a French pedicure typically last?
A properly applied French pedicure can last 2-3 weeks with good care. The longevity depends on factors like nail growth, daily activities, and maintenance. Using a quality base coat, precise application techniques, and a good top coat helps extend wear time. Toenails grow slower than fingernails, making pedicures generally more durable than manicures.
What are the best colors for summer toenail designs?
Summer calls for vibrant, eye-catching colors like electric pink, neon orange, coral, and bright turquoise. These bold shades complement sun-kissed skin and summer fashion. Tropical themes with hibiscus patterns, ocean blues, and palm tree designs also capture the season’s essence. Bright colors photograph beautifully against beach and poolside backdrops.
Can I create professional-looking toenail art at home?
Yes! Start with basic techniques like polka dots using bobby pins, simple stripes with nail tape, or gradient effects with makeup sponges. Invest in quality base and top coats, use proper nail prep, and practice steady hand movements. Begin with minimalist designs and gradually work up to more complex patterns as your skills develop.
What tools do I need for DIY toenail designs?
Essential tools include quality nail polish, base and top coats, nail tape for clean lines, dotting tools or bobby pins for dots, makeup sponges for gradients, and thin brushes for detail work. A good nail file, cuticle pusher, and toe separators are also helpful. Many stunning designs can be created with household items and basic supplies.
How do I make glitter toenail polish last longer?
Apply a strong base coat, then use thin layers of glitter polish rather than one thick coat. Seal with a high-quality top coat and reapply the top coat every few days to prevent chipping. For removable glitter, try the foil method: soak cotton pads in acetone, place on nails, wrap with foil, and wait 10-15 minutes before gently pushing off.
What are the most popular seasonal toenail trends?
Winter features snowflakes, deep jewel tones, and holiday metallics. Spring embraces soft pastels, floral patterns, and fresh mint greens. Summer showcases bright neons, tropical themes, and ocean-inspired designs. Fall celebrates warm oranges, burgundy, maple leaf patterns, and harvest moon themes. Each season offers unique color palettes and design inspirations.
How do I create perfect geometric toenail designs?
Use nail tape or striping tape to create clean, straight lines for triangles, chevrons, and stripes. Plan your design first, apply base color, let dry completely, then place tape for geometric sections. Paint over tape while it’s slightly wet for cleanest removal. Practice steady hand movements and use thin brushes for precision work on smaller details.


