We’ve all been there – staring down at our bare toes and wondering how to transform them into stunning works of art. Toe nail art has exploded in popularity as more people discover the joy of expressing creativity through their pedicures. Whether you’re preparing for sandal season or simply want to treat yourself to something special, decorating your toenails opens up endless possibilities for self-expression.
From simple geometric patterns to intricate floral designs, toe nail art ideas range from beginner-friendly options to advanced techniques that’ll make you feel like a professional nail artist. The best part? Your toes provide the perfect canvas for experimenting with bold colors and designs you might hesitate to try on your fingernails.
We’ll explore creative designs that work beautifully on shorter nail beds, share techniques that ensure your artwork lasts longer, and provide inspiration for every skill level. Get ready to discover your new favorite way to add personality to your pedicure routine.
Classic French Pedicure With a Twist
We’re elevating the traditional French pedicure with modern variations that transform this timeless look into something fresh and exciting. These creative approaches maintain the elegance of classic French tips while adding personality to your toe nail art.
Rainbow French Tips
Creating vibrant rainbow French tips brings a playful burst of color to your toes. We start with a clear or nude base coat and apply thin strips of different colored polishes across each nail tip. Working from left to right, use colors like coral, yellow, mint green, sky blue, and lavender for a soft rainbow effect.
Applying each color in thin layers prevents the tips from looking bulky or uneven. We recommend using a striping brush or thin nail art brush to create clean lines between each color. Finishing with a glossy top coat blends the colors seamlessly and adds durability to your rainbow design.
Glitter French Border
Transforming the classic white tip with glitter creates an instantly glamorous look perfect for special occasions. We replace the traditional white polish with fine glitter in silver, gold, or rose gold shades. Positioning the glitter along the natural smile line of each nail maintains the French pedicure’s sophisticated structure.
Layering different glitter sizes adds depth and dimension to your toe nail art. We apply a base of fine glitter first, then accent with larger glitter pieces for texture. Sealing everything with two coats of clear top coat ensures the glitter stays put and creates a smooth finish.
Geometric French Design
Incorporating geometric shapes into French tips creates a modern artistic statement on your toes. We use tape or nail stencils to create sharp triangular tips, diagonal lines, or chevron patterns instead of the curved French smile. Choosing contrasting colors like black and white or navy and gold emphasizes the geometric elements.
Experimenting with negative space designs allows the natural nail to show through geometric cutouts in the tip area. We create triangular or diamond shaped windows in colored polish for a contemporary twist. Maintaining clean lines is essential, so we remove tape while the polish is slightly wet to prevent peeling.
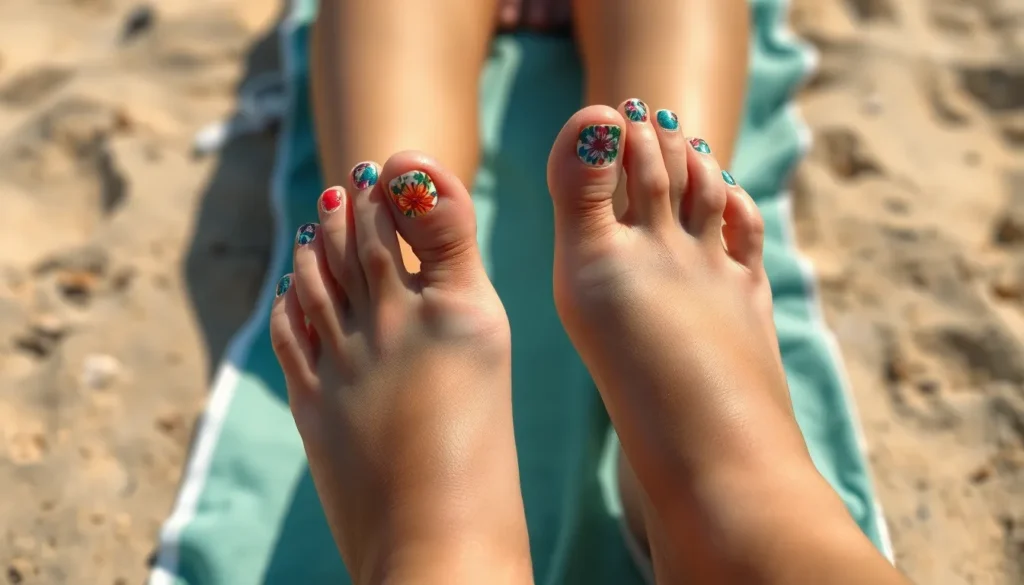
Floral Toe Nail Art Patterns

Floral patterns bring natural beauty and feminine charm to your pedicure routine. These botanical designs range from intricate detailed artwork to simple single bloom accents that complement any summer outfit.
Delicate Rose Designs
Rose patterns create romantic and timeless toe nail art that works beautifully for special occasions. We recommend starting with a soft pink or nude base coat and using a thin brush to paint small rose petals in deeper pink or red shades. Dotting tools help create the center of each rose by adding tiny yellow or white dots for realistic detail.
Gradient rose effects add dimension to your design by blending light and dark pink tones together. Start with the lightest shade at the petal edges and gradually work inward with deeper colors. Small green leaves painted around each rose complete the natural look and add visual balance to your toes.
Tropical Hibiscus Motifs
Hibiscus flowers bring vibrant island vibes to your toe nail art with their bold colors and distinctive petal shapes. These large blooms work best on big toes where there’s ample space for the dramatic five petal design. Bright oranges, hot pinks, and deep reds create authentic tropical appeal that pairs perfectly with summer sandals.
Layering techniques make hibiscus petals appear three dimensional and realistic. We suggest painting the base petal shape first, then adding darker shades along the edges and lighter tones in the center. Long stamens extending from the flower’s center add authentic botanical detail using thin brush strokes in yellow or orange.
Minimalist Daisy Accents
Daisy designs offer clean and simple floral options perfect for beginners or those preferring subtle nail art. White petals surrounding yellow centers create classic daisy looks that complement any outfit or occasion. These small flowers work well scattered across multiple toes or featured as single accent pieces.
Two tone daisy variations add modern flair to traditional designs by using unexpected color combinations. Pastel petals in lavender, mint green, or soft peach create contemporary interpretations of classic daisies. Black and white combinations provide striking contrast for bold minimalist statements that photograph beautifully on social media.
Beach-Inspired Summer Toe Art

Transform your toenails into a coastal paradise with designs that capture the essence of seaside adventures.
Ocean Wave Designs
Ocean wave patterns bring the mesmerizing motion of the sea directly to your toes. Start with a gradient base using navy blue at the cuticle that transitions to turquoise and white at the tip. Create flowing wave shapes using a thin brush with white polish, adding foam details with dotting tools for realistic texture. Layer different shades of blue including cerulean and teal to achieve depth in your wave design. Apply a matte topcoat over select areas to contrast with glossy sections, mimicking the natural interplay of light on water surfaces.
Seashell and Starfish Patterns
Seashell motifs offer elegant sophistication perfect for beach themed pedicures. Paint your base coat in sandy beige or soft coral, then use a fan brush to create scalloped shell patterns with iridescent polish. Add tiny pearls or rhinestones to the center of each shell for luxurious detail. Starfish designs work beautifully on big toes using burnt orange or deep purple as your primary color. Create five pointed shapes with dimensional paint, then highlight each arm with golden accents for a sun kissed appearance.
Sunset Gradient Effects
Sunset gradients capture the magical colors of evening sky reflections on ocean waters. Begin with a yellow base at the cuticle area, blending upward through orange to deep pink at the nail tips. Use a makeup sponge to dab and blend colors while polish remains wet for seamless transitions. Add silhouette details like palm trees or sailboats using black polish and a fine liner brush. Finish with gold foil accents placed strategically to represent sun rays dancing across the water surface.
Geometric and Abstract Nail Designs

Geometric patterns bring modern sophistication to toe nail art, offering clean lines and bold compositions that make striking visual statements. Abstract designs let you experiment with artistic freedom while creating unique masterpieces on your toenail canvas.
Color Block Patterns
Bold color blocks transform your toenails into miniature art galleries. We recommend starting with a neutral base like white or nude, then adding rectangular or square sections in contrasting colors. Neon pink paired with electric blue creates an eye-catching combination that’s perfect for summer festivals.
Asymmetrical color blocking adds contemporary flair to traditional patterns. Try dividing each toenail differently using tape as your guide for crisp, clean lines. Metallic shades like rose gold and copper work beautifully against matte black backgrounds.
Two-tone diagonal splits offer sleek simplicity with maximum impact. We suggest using complementary colors such as coral and mint green, or classic combinations like navy and cream. Apply each color to opposite corners and blend where they meet for a seamless transition.
Triangle and Diamond Shapes
Sharp triangular designs create ever-changing movement across your toe nails. Start with a solid base color, then use striping tape to create precise triangular sections. Fill alternating triangles with metallic polish or leave them as negative space for a minimalist approach.
Diamond patterns add glamorous geometry to your pedicure routine. We recommend creating small diamond shapes using dotting tools or nail art brushes with contrasting colors. Silver diamonds on a deep purple base create an elegant evening look.
Chevron triangles bring playful energy to geometric nail art. Layer multiple chevron patterns in graduated sizes using three complementary shades. Start with the largest chevron at the base and work toward smaller patterns near the tip.
Marble Effect Techniques
Water marble techniques produce stunning abstract swirls and patterns. Drop different colored polishes into room temperature water, then swirl gently with a toothpick to create organic patterns. Dip your nail through the design and clean excess polish from your skin immediately.
Dry brush marble effects offer more control over your abstract designs. We suggest using a fan brush with minimal polish to create soft, feathery strokes across your base color. Layer multiple colors for depth and dimension in your marble pattern.
Alcohol ink marbling creates unique, unpredictable abstract art. Apply a light base coat, then drop alcohol ink onto the wet surface and watch it spread naturally. Each application produces completely different patterns, making every nail a one-of-a-kind masterpiece.
Animal Print Toe Nail Inspirations

Animal prints bring wild sophistication to our toe nail art collection. These fierce patterns transform ordinary pedicures into statement pieces that capture nature’s most captivating designs.
Leopard Spot Designs
Classic golden leopard spots create the perfect balance of elegance and edge for our toenails. We recommend starting with a nude or champagne base color and adding irregular black spots using a dotting tool or small brush. Bronze accents around each spot enhance the authentic leopard appearance and add dimensional depth to the design.
Rosé gold leopard variations offer a modern twist on traditional patterns. Apply a blush pink base coat and create spots using copper or rose gold polish for a softer interpretation. This combination works beautifully with both casual and formal footwear choices.
Black and white leopard prints deliver dramatic contrast perfect for bold fashion statements. Use white as the base color and apply black spots of varying sizes across each toenail. Silver highlights on select spots create additional visual interest and mirror the sophisticated monochrome trend.
Zebra Stripe Patterns
Bold black and white zebra stripes make striking toe nail art that commands attention. We create these patterns by applying white base polish and using thin striping brushes to paint irregular black lines. Varying the width and spacing of stripes mimics authentic zebra markings and prevents the design from looking too uniform.
Colorful zebra interpretations allow for creative expression while maintaining the classic stripe pattern. Pink and black combinations work especially well for summer pedicures, while navy and silver stripes offer elegant options for evening looks. These variations keep the recognizable zebra aesthetic while adding personal flair.
Vertical stripe placement on big toes creates the most authentic zebra appearance. We position stripes diagonally across smaller toes to accommodate their shape and size. This strategic placement ensures each nail contributes to the overall zebra effect while maintaining visual balance across the entire foot.
Snake Skin Textures
Realistic snake skin textures require layering techniques that build complex patterns gradually. Begin with a neutral base color like beige or gray, then use a makeup sponge to dab on darker shades in organic shapes. Brown, black, and bronze colors create authentic reptilian depth when blended carefully.
Scale patterns emerge through careful dotting and blending motions that mimic natural snake skin. We recommend using multiple brush sizes to create varied scale dimensions across each toenail. Smaller scales work best on pinky toes, while larger patterns suit big toes perfectly.
Metallic snake skin designs elevate the texture with glamorous finishes that catch light beautifully. Gold and copper foils applied over the base pattern create luxurious effects reminiscent of designer accessories. These metallic accents transform simple snake patterns into sophisticated nail art worthy of special occasions.
Seasonal Holiday Toe Art Ideas

Holiday celebrations provide perfect opportunities to showcase festive toe nail art that captures the spirit of each special occasion. We’ll explore creative seasonal designs that transform your pedicure into a holiday masterpiece.
Christmas Themed Designs
Candy cane stripes create the most recognizable Christmas toe nail pattern using alternating red and white diagonal lines. We recommend starting with a white base coat and using striping tape to achieve perfectly straight candy cane patterns. Apply red polish between the tape sections and remove while the polish remains slightly wet for clean edges.
Snowflake patterns bring winter magic to your toenails through delicate white designs over dark blue or black backgrounds. We use a thin nail art brush or dotting tool to create intricate snowflake shapes with white acrylic paint. Each snowflake design should feature six symmetrical points radiating from a central dot for authentic winter appeal.
Christmas tree motifs transform your big toenails into miniature holiday forests using green triangular shapes with brown trunk bases. We suggest adding tiny gold dots as ornaments and a yellow star at the top using nail art pens. Smaller toenails can feature simple green triangles or red and gold accent dots to complement the main design.
Holly and berry accents combine deep green holly leaves with bright red berries for classic Christmas elegance. We create holly leaf shapes using a small brush loaded with forest green polish and add three small red dots to represent berries. Gold glitter topcoat adds extra holiday sparkle to complete the festive look.
Halloween Spooky Patterns
Spider web designs create eerie Halloween atmosphere using black lines radiating from corner points on orange or purple base colors. We start by painting diagonal lines from one corner and add curved connecting lines to form the web pattern. A small black dot in the corner represents the spider for added spookiness.
Pumpkin faces turn your big toenails into carved jack o’lanterns using orange base polish with black triangle eyes and jagged smiles. We apply two coats of bright orange polish and use a thin brush to paint traditional pumpkin face features. Green stems at the nail base complete the pumpkin transformation.
Bat silhouettes against moonlit backgrounds create dramatic Halloween nail art using yellow or white circles with black bat shapes. We paint a large yellow circle as the moon backdrop and add small black bats flying across the design. Multiple bats on smaller nails create a coordinated spooky effect.
Witch hat accents feature black triangular shapes with purple or silver bands around the base on dark backgrounds. We use black polish to create pointed triangle shapes and add thin metallic bands using striping brushes. Stars and moon phases on remaining nails enhance the witchy aesthetic.
Valentine’s Day Hearts
Classic red hearts showcase timeless romance using bright red heart shapes over pink or nude backgrounds. We create symmetrical hearts using a dotting tool to make two dots and drag downward to form the heart point. Multiple heart sizes across all toenails create a coordinated romantic look.
Ombre heart gradients blend pink and red tones within individual heart shapes for modern Valentine’s appeal. We apply light pink polish first and use a makeup sponge to dab darker pink and red at the heart edges. This technique creates beautiful color transitions within each heart design.
Gold heart outlines offer elegant Valentine’s sophistication using thin metallic borders around heart shapes. We paint solid colored hearts first and use gold striping polish to outline each shape carefully. This technique works beautifully over nude, pink, or burgundy base colors.
Heart French tips modernize classic French pedicures by replacing white tips with pink or red heart shapes. We apply nude or clear base polish and use heart shaped stencils at the nail tips. Pink hearts create soft romantic appeal while red hearts make bold Valentine’s statements.
Minimalist and Elegant Toe Designs

Sometimes less really is more when it comes to toe nail art. These understated designs prove that elegant simplicity can make just as powerful a statement as bold, complex patterns.
Single Accent Nail Art
Single accent nail designs create sophisticated focal points without overwhelming your entire pedicure. We recommend choosing just one toe on each foot, typically the big toe, to showcase a special design element while keeping the remaining nails in a complementary solid color.
Delicate floral accents work beautifully on a neutral base like nude or soft pink. Paint a small rose, cherry blossom, or simple leaf design on your big toe using a thin nail art brush. This technique allows you to experiment with intricate details on a manageable scale.
Geometric accent shapes offer modern sophistication through clean lines and precise angles. Try a single triangle, circle, or diamond shape in contrasting colors like white on black or gold on navy blue. These shapes create visual interest without requiring advanced artistic skills.
Glitter gradient accents add sparkle strategically to one toe per foot. Apply your base color to all toes, then create a gradient effect from the cuticle to mid-nail on your accent toe using fine glitter polish. This creates a subtle ombre effect that catches light beautifully.
Negative Space Patterns
Negative space designs use your natural nail as part of the overall pattern, creating modern art with strategic polish placement. These designs work best on well-maintained natural nails or with a clear base coat to enhance the natural nail appearance.
Geometric cutouts involve taping off sections of your nail before applying color, leaving natural nail spaces that form shapes like triangles, half-moons, or stripes. Remove the tape while the polish is still slightly wet for clean, crisp lines that showcase both color and natural nail.
Minimalist line work creates elegant patterns using thin strips of tape or nail art brushes. Paint horizontal, vertical, or diagonal lines across your nails, leaving strategic gaps that reveal your natural nail underneath. This technique works especially well with neutral colors like beige, soft gray, or dusty rose.
Half-moon negative space involves painting only the tip portion of your nail, leaving the cuticle area natural. This reverse French manicure style looks particularly elegant in soft pastels or classic colors like burgundy or navy blue.
Subtle Metallic Accents
Subtle metallic touches elevate simple designs without appearing flashy or overdone. We prefer using metallic accents sparingly to maintain the elegant, minimalist aesthetic while adding just enough glamour.
Thin metallic lines create sophisticated detail when applied over solid base colors. Use gold, silver, or rose gold striping tape or a fine brush to add single lines across your nails horizontally, vertically, or diagonally. These lines work particularly well on darker base colors like deep purple or forest green.
Metallic French tips update the classic French pedicure with a modern twist. Replace traditional white tips with thin metallic lines in gold, silver, or copper. Keep the lines precise and uniform for a polished, professional appearance.
Small metallic dots add texture and interest without overwhelming the design. Use a dotting tool or the round end of a bobby pin to create evenly spaced metallic dots along your cuticle line or nail tips. This technique works beautifully with nude or soft pink base colors, creating a subtle studded effect that catches light elegantly.
Bold and Bright Color Combinations

Eye-catching toe nail art reaches new heights when we embrace vivid colors that make a statement. These ever-changing combinations turn our pedicures into vibrant works of art that command attention.
Neon Gradient Blends
Neon gradient blends create electrifying toe nail art that captures summer’s energetic spirit. We start with a bright pink base and slowly fade into electric yellow for a sunset inspired effect. Coral to orange transitions work beautifully for evening events, while blue to green gradients evoke tropical ocean vibes.
Creating smooth neon gradients requires a makeup sponge and patience. We apply the lighter color first as our base coat, then dab the darker shade with the sponge to create seamless blending. Electric purple fading to hot pink delivers maximum impact for festival season, and lime green melting into turquoise offers a fresh summer look.
Professional nail artists recommend using gel polish for neon gradients since it provides better color saturation. We can enhance the effect by adding a glossy top coat that makes colors appear more vibrant. Vertical gradients work especially well on big toes, while horizontal fades suit shorter nails perfectly.
Contrasting Color Blocks
Contrasting color blocks transform our toenails into bold geometric masterpieces that showcase confident style. We pair opposite colors on the color wheel for maximum visual impact, such as royal blue with bright orange or hot pink with electric green. These sharp contrasts create modern art effects that photograph beautifully on social media.
Design execution becomes simple when we use tape to create clean lines between color sections. We apply the first color and let it dry completely before taping and adding the second shade. Purple and yellow combinations deliver regal sophistication, while red and turquoise blocks evoke retro summer vibes.
Asymmetrical color blocking adds contemporary flair to traditional pedicures. We can split each nail diagonally with contrasting shades or create different block patterns across all ten toes. Black paired with any neon color creates dramatic impact, and white combined with bright coral offers fresh springtime appeal.
Ombre Fade Techniques
Ombre fade techniques produce stunning toe nail art that seamlessly transitions between multiple bright colors. We blend three or more shades to create rainbow effects that celebrate color diversity and artistic expression. Starting with yellow at the cuticle area and fading through orange to deep red creates a fire inspired gradient.
Professional ombre application requires working quickly while polish remains wet. We apply all colors in thin strips across the nail, then use a clean brush to gently blend the edges together. Ocean inspired ombres transition from turquoise to navy blue, while sunset fades move from coral through purple to deep magenta.
Reverse ombre techniques start with the darkest color at the base and fade to lighter shades at the tips. We can create galaxy effects using deep purple fading to silver, or tropical vibes with forest green blending to bright lime. Adding fine glitter over the fade enhances the dimensional effect and catches light beautifully.
Glitter and Sparkle Toe Art

Glitter and sparkle elements elevate toe nail art into dazzling masterpieces that catch light beautifully. These shimmering designs create stunning focal points perfect for special occasions or adding glamour to everyday looks.
Full Glitter Coverage
Full glitter coverage transforms your entire toenail into a sparkling canvas of light and color. We recommend applying a base coat followed by two thin layers of glitter polish for even distribution and maximum sparkle. Fine holographic glitter creates subtle shimmer while chunky hexagonal glitter delivers bold statement looks.
Glitter Application Techniques:
| Technique | Result | Best For |
|---|---|---|
| Dabbing method | Even coverage | Dense glitter application |
| Brush strokes | Textured finish | Layered sparkle effects |
| Sponge application | Gradient density | Ombre glitter looks |
Silver and gold glitter polishes work universally with any outfit while colored glitters like emerald green or sapphire blue create seasonal sophistication. We suggest sealing full glitter coverage with two coats of high quality top coat to prevent chipping and extend wear time.
Glitter Accent Tips
Glitter accent tips offer the perfect balance between elegance and sparkle without overwhelming your entire toe. Position glitter at just the tips of your toenails using tape or nail guides for clean precise lines. This technique works exceptionally well over nude or clear base colors.
Popular Glitter Tip Variations:
- Thin glitter lines create delicate sparkle borders
- Chunky glitter tips deliver bold metallic statements
- Gradient glitter fade blends sparkle seamlessly into base color
- Double glitter tips layer two complementary glitter shades
Rose gold glitter tips complement warm skin tones beautifully while silver creates cool sophisticated looks. We love combining glitter tips with matte base colors for striking contrast that makes the sparkle pop even more dramatically.
Holographic Finishes
Holographic finishes create mesmerizing rainbow effects that shift and change with movement and lighting. These specialized polishes contain microscopic particles that reflect light into prismatic colors across your toenails. We find holographic finishes work best over dark base colors like black or navy blue.
Holographic Application Methods:
- Single coat holo provides subtle rainbow shimmer
- Layered holo effects intensify the prismatic display
- Holo accent nails create focal points among solid colors
- Holo French tips modernize classic pedicure styles
Linear holographic polishes create strong rainbow lines while scattered holographic formulas produce softer sparkle effects. We recommend applying holographic finishes in thin layers and avoiding thick coats that can appear cloudy or dull the prismatic effect.
DIY Toe Nail Art Tools and Techniques

Creating stunning toe nail art at home requires the right tools and proper techniques. We’ll guide you through everything needed to achieve salon quality results from your own space.
Essential Nail Art Supplies
Nail polish collection forms the foundation of any toe art toolkit. We recommend starting with a basic color palette that includes classic reds, neutral nudes, bold blacks, and crisp whites. Gel polishes work exceptionally well for toe art because they offer superior color saturation and extended wear time.
Precision brushes enable detailed artwork on your toenails. Thin liner brushes create delicate lines and intricate patterns, while flat brushes work perfectly for color blocking and geometric designs. Dotting tools in various sizes help create polka dots, flowers, and other circular elements with consistent shapes.
Nail art pens and markers provide excellent control for beginners attempting detailed designs. These tools eliminate the need for steady brush control while offering vibrant pigments that adhere well to nail surfaces. Fine tip pens work best for writing letters or creating thin outlines.
Striping tape and stencils guarantee clean lines and professional looking geometric patterns. We use these tools for creating French tips, triangular designs, and complex abstract compositions. Vinyl nail guides offer reusable options for repeated pattern creation.
Base and top coats protect your natural nails while extending the life of your artwork. Quality base coats prevent staining from dark pigments, while glossy or matte top coats seal your designs and add desired finishes.
Step-by-Step Application Methods
Preparation sets the stage for long lasting toe nail art. We start by removing old polish completely, then push back cuticles gently using a cuticle pusher. Filing toenails into desired shapes and buffing away ridges creates smooth canvases for artwork.
Base coat application requires thin, even coverage across each toenail. Allow the base coat to dry completely before proceeding with color application. This step typically takes 2-3 minutes per foot depending on the product formula.
Color layering builds vibrant, opaque coverage through multiple thin coats rather than one thick application. We apply the first coat in three strokes: center, left side, then right side of each nail. The second coat fills in any gaps and intensifies the color depth.
Detail work happens after the base color dries completely. Use steady hand movements and rest your painting hand on a stable surface for better control. Start with larger design elements first, then add smaller details and finishing touches.
Sealing techniques lock in your artwork for maximum durability. Apply top coat in the same three stroke pattern used for base colors, ensuring complete coverage over all design elements. Some designs benefit from two thin top coat layers for extra protection.
Maintenance and Longevity Tips
Touch up strategies extend the life of your toe nail art between full applications. We keep matching polish colors handy for quick fixes on chips or worn edges. Small detail brushes allow precise touch ups without disturbing surrounding artwork.
Daily protection prevents premature wear and damage to your designs. Wear closed toe shoes during heavy activity, and apply cuticle oil regularly to keep nail beds healthy. Avoid using toenails as tools for opening packages or scratching surfaces.
Removal preparation makes future nail art sessions easier and healthier for your nails. Soak cotton pads in acetone free nail polish remover and press them against each nail for 30 seconds before gently wiping away polish. This method prevents excessive scrubbing that can damage nail surfaces.
Storage organization keeps your nail art supplies in optimal condition for consistent results. Store polishes upright in cool, dry places away from direct sunlight. Clean brushes immediately after use with appropriate solvents to maintain their shape and performance quality.
Conclusion
We’ve explored countless ways to transform your toenails into stunning canvases of self-expression. From classic French tips with modern twists to bold animal prints and seasonal celebrations each technique offers unique opportunities to showcase your personal style.
Whether you’re drawn to minimalist elegance or eye-catching neon gradients there’s a toe nail art style that perfectly matches your personality. The beauty lies in experimenting with different techniques and finding what makes you feel confident and creative.
With the right tools and a little practice you can achieve salon-quality results from the comfort of your own home. Remember that nail art is all about having fun and expressing yourself so don’t be afraid to mix techniques or create your own unique combinations.
Your toes deserve just as much attention as your fingernails so embrace the opportunity to get creative with your next pedicure. Start with simple designs and gradually work your way up to more complex patterns as your skills develop.
Frequently Asked Questions
What is toe nail art and why is it popular?
Toe nail art is a creative form of self-expression using your toenails as a canvas for various designs, patterns, and colors. It has gained popularity because it allows for bold, experimental looks without the professional constraints of hand nail art. It’s especially trendy during sandal season when feet are more visible.
What are the best designs for toe nail art beginners?
Beginners should start with simple patterns like single accent nails, basic French tips, or solid color blocks. Polka dots using dotting tools, simple stripes with tape, and minimalist geometric shapes are also great starter options that don’t require advanced techniques but still look stylish.
How long does toe nail art typically last?
Toe nail art generally lasts 2-4 weeks longer than fingernail art because toenails experience less daily wear and tear. Using gel polish and proper sealing techniques can extend the life even further. Proper preparation and quality base coats also contribute to longer-lasting designs.
What tools do I need for DIY toe nail art?
Essential tools include basic nail polish colors, precision brushes, dotting tools, nail art pens, striping tape, and stencils. You’ll also need a good base coat, top coat, nail file, and acetone for cleanup. These supplies allow you to create most popular toe nail art designs at home.
Can I do toe nail art on short toenails?
Absolutely! Short toenails are actually ideal for many designs, especially minimalist patterns, small geometric shapes, and simple color combinations. Focus on designs that complement the nail’s natural shape rather than overwhelming it with complex patterns that require more space.
What are the most popular toe nail art trends?
Current popular trends include modern French pedicures with colorful tips, geometric patterns, marble effects, animal prints, and seasonal holiday themes. Beach-inspired designs, floral motifs, and glitter accents are also trending, along with minimalist negative space patterns for elegant looks.
How do I make my toe nail art last longer?
To extend toe nail art life, start with clean, properly prepped nails, use a quality base coat, apply thin polish layers, and seal with a top coat. Protect your feet with appropriate footwear, avoid harsh chemicals, and perform gentle touch-ups as needed.
What’s the difference between gel and regular polish for toe art?
Gel polish offers better color saturation, longer wear time, and more vibrant finishes compared to regular polish. It requires UV/LED curing but provides superior durability for intricate toe nail art designs. Regular polish is easier to remove and more budget-friendly for experimenting with different looks.


