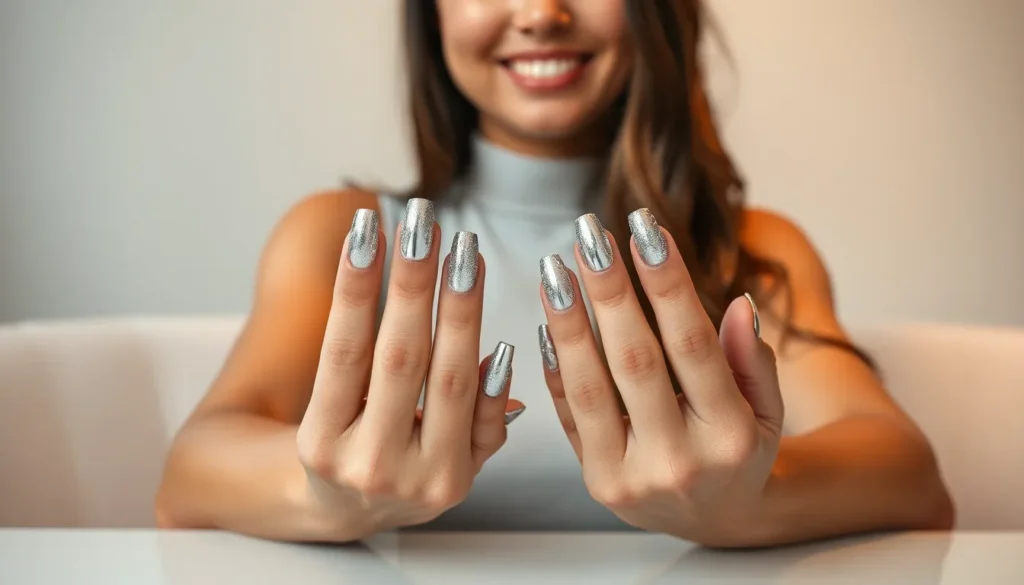
Silver nails are having a major moment and we’re absolutely obsessed with this versatile metallic trend. Whether you’re looking for subtle shimmer or bold statement nails this timeless color works for every occasion and complements all skin tones beautifully.
We’ve curated the most stunning silver nail designs that’ll transform your manicure game completely. From minimalist chrome finishes to intricate glitter patterns and elegant accent nails there’s something for every style preference and skill level.
Ready to discover why silver is the ultimate nail color choice? We’ll show you how to achieve salon-worthy results at home while exploring creative techniques that make your nails the perfect accessory for any outfit or event.
Classic Silver Chrome Nail Ideas
Chrome silver nails remain the gold standard for achieving that perfect metallic mirror effect. These timeless designs offer versatility and sophistication that works for both everyday wear and special occasions.
Mirror Finish Chrome Nails
Mirror finish chrome creates the most reflective silver nail look possible. This technique requires a black base coat followed by chrome powder application for maximum shine. We recommend using a gel base to ensure the chrome adheres properly and lasts longer.
Apply the chrome powder while the base coat remains tacky for best results. Professional nail technicians often use a silicone tool or eyeshadow applicator to buff the powder into the nail surface. The finished look should reflect light like an actual mirror.
Seal your mirror chrome with a no wipe top coat to maintain the reflective quality. Regular top coats can dull the mirror effect, so investing in specialized chrome sealers ensures your nails stay blindingly shiny. This finish pairs beautifully with both short and long nail shapes.
Brushed Silver Texture
Brushed silver texture adds subtle dimension while maintaining classic appeal. This finish mimics brushed metal surfaces by creating fine linear patterns across the nail. We achieve this look using specialized brushed metal polishes or dry brush techniques with regular silver polish.
Create the brushed effect by dragging a fan brush through wet silver polish. Start at the cuticle and pull toward the tip in straight, parallel lines. The key is working quickly before the polish begins to set.
Layer different silver tones for added depth in your brushed design. Combine light silver with darker gunmetal shades to create realistic metal texture. This technique works exceptionally well on almond and coffin shaped nails where the length showcases the brushed pattern.
Matte Silver Polish
Matte silver polish transforms traditional chrome into sophisticated elegance. The lack of shine creates a modern, understated look that complements both casual and formal outfits. We find matte silver particularly stunning on shorter nail lengths where the texture becomes the focal point.
Apply matte silver in thin, even coats to avoid streaking or bubbling. Most matte formulas require two to three coats for full opacity. Allow each layer to dry completely before applying the next to prevent texture issues.
Combine matte and glossy silver elements for contemporary nail art. Try glossy silver accent stripes on matte bases or vice versa. This contrast creates visual interest while keeping the overall design cohesive and wearable for any occasion.
Silver French Manicure Variations
 2")
Silver transforms the classic French manicure into a modern metallic statement that elevates any look. These sophisticated variations offer fresh takes on the timeless design while maintaining its elegant appeal.
Traditional Silver French Tips
Silver french tips replace the conventional white with stunning metallic polish for an instantly elevated look. We recommend starting with a neutral nude or clear base coat to create the perfect foundation. Apply the silver polish in thin, precise strokes along the nail tips using a fine brush or french manicure guide strips.
Chrome powder creates the most reflective silver tips when applied over a tacky black base coat. This technique produces mirror like shine that catches light beautifully throughout the day. Seal the design with a high quality top coat to prevent chipping and maintain the lustrous finish.
Glitter silver polish offers a sparkling alternative that adds texture and dimension to traditional tips. Choose fine glitter formulas for subtle shimmer or chunky glitters for dramatic evening looks. Layer two thin coats rather than one thick application to ensure even coverage and smooth texture.
Reverse Silver French
Reverse silver french flips the classic design by placing metallic polish at the nail base instead of the tips. This modern twist creates visual interest while maintaining sophistication for professional settings. Start by applying your chosen base color across the entire nail surface.
Paint a curved silver line at the cuticle area using a small detail brush or striping tool. We suggest practicing the curved motion on paper first to perfect your technique. Allow each layer to dry completely before adding additional coats or top coat protection.
Ombre reverse french blends silver polish gradually from the base toward the center of the nail. Use a makeup sponge to dab and blend the metallic color for smooth transitions. This technique works especially well with holographic silver polishes that shift color in different lighting.
Double Silver French Lines
Double silver french lines feature two parallel metallic stripes for a bold geometric statement. Position the first line at the traditional tip location and add a second line approximately 2mm below. Use nail tape or striping guides to ensure perfectly straight, even lines across all nails.
Varying silver shades creates depth and visual interest in double line designs. Combine matte silver with glossy chrome or pair light silver with gunmetal gray tones. This contrast technique adds sophistication while maintaining the cohesive metallic theme.
Negative space double french incorporates clear areas between the silver lines for a minimalist approach. Leave the middle section of the nail unpainted or apply only a clear base coat. This design works particularly well on longer nails where the proportions create better balance.
Silver Glitter and Sparkle Designs
 4")
Silver glitter nails bring instant glamour and eye-catching sparkle to any manicure. These dazzling designs work perfectly for special occasions or when you want to add some luxurious shine to your everyday look.
Full Glitter Silver Nails
Full glitter coverage creates a show-stopping manicure that catches light from every angle. We recommend starting with a clear base coat to protect your natural nails before applying your silver glitter polish. Fine silver glitter particles provide subtle sparkle while chunky hexagonal glitters deliver dramatic impact.
Application techniques for full coverage include dabbing the polish rather than brushing to avoid streaking. Multiple thin coats work better than one thick application because they prevent clumping and ensure even distribution. We suggest using a makeup sponge to press glitter into any bare spots for complete coverage.
Popular silver glitter varieties include holographic particles that create rainbow reflections, matte silver pieces for textured appeal, and mixed sizes combining fine dust with larger accents. Top coat application becomes crucial with full glitter nails since it smooths the surface and locks in every sparkly element.
Silver Glitter Accent Nails
Accent nails featuring silver glitter provide the perfect balance between subtle elegance and statement sparkle. We typically apply glitter to one or two nails per hand while keeping the remaining nails in complementary solid colors like nude, black, or clear polish.
Strategic placement options include ring fingers for traditional accent placement, thumbs for maximum visibility, or alternating patterns across multiple fingers. Index finger accents work especially well for those who gesture frequently during conversations.
Design combinations pair silver glitter accents with matte silver base colors, chrome finishes, or even soft pastels for contrast. We recommend matching your base color undertones to create cohesive looks that feel intentional rather than random.
Ombré Silver Glitter
Ombré silver glitter designs blend sparkle intensity from heavy concentration at the tips to subtle shimmer near the cuticles. This gradient effect creates sophisticated dimension while maintaining wearable elegance for both casual and formal settings.
Blending techniques involve applying dense glitter at nail tips and using a damp brush to pull color toward the base. We work quickly while polish remains tacky to achieve smooth transitions without harsh lines. Sponge application helps create natural fading effects.
Color combinations include silver to clear gradients for subtle sparkle, silver to black for dramatic contrast, or silver to white for bridal appropriate elegance. Multiple silver tones from platinum to pewter create depth within the same color family.
Professional tips include using tacky base coats that help glitter particles adhere properly and working in thin layers to build gradient intensity gradually. We always finish ombré glitter designs with two coats of high-quality top coat to smooth the transition areas and enhance overall shine.
Silver Geometric Nail Art Ideas
 6")
Geometric patterns offer endless possibilities for creating striking silver nail art that’s both modern and sophisticated. We’ll explore precision techniques that transform your nails into miniature works of art using clean lines and metallic accents.
Silver Striped Patterns
Silver striped patterns create bold visual impact through precise linear designs that elongate the nail bed. We recommend using thin nail art brushes or striping tape to achieve perfectly straight lines across each nail. Professional nail artists suggest applying a base coat first, then using metallic silver polish to paint vertical, horizontal, or diagonal stripes depending on your preferred aesthetic.
Vertical silver stripes work exceptionally well on shorter nails, creating the illusion of length while maintaining elegance. Start from the cuticle and draw steady lines toward the nail tip using consistent pressure. Horizontal silver stripes offer a chic alternative that’s perfect for wider nail beds, creating a balanced geometric look that’s both trendy and timeless.
Mixed direction stripes combine multiple orientations on different nails for an artistic asymmetrical effect. Apply one nail with vertical stripes, the next with horizontal lines, and alternate throughout your manicure. This technique creates visual interest while maintaining cohesion across your entire look.
Metallic Silver Triangles
Metallic silver triangles transform ordinary manicures into angular masterpieces that catch light from every angle. We suggest using nail vinyls or stencils to create sharp, clean triangle edges that professional manicurists achieve in salons. Position triangles at various points on each nail, such as the tip, base, or corner areas for ever-changing visual appeal.
Triangle tips replace traditional French manicure curves with geometric precision, creating a modern twist on classic elegance. Apply your base color first, then use triangle stencils to mask off the tip area before applying metallic silver polish. Corner triangles placed at the nail’s outer edges create sophisticated accent points that draw attention without overwhelming the entire design.
Overlapping triangles in different silver shades add depth and dimension to your geometric nail art. Layer lighter silver triangles over darker metallic bases, or combine chrome and matte silver triangles for textural contrast. This layering technique creates complex visual effects that appear professionally crafted.
Silver Grid Designs
Silver grid designs offer mathematical precision that appeals to minimalist aesthetic preferences while maintaining striking visual impact. We create these patterns using thin nail art brushes to paint intersecting lines that form perfect squares or rectangles across the nail surface. Start with evenly spaced vertical lines, then add horizontal lines to complete your grid pattern.
Classic checkerboard grids alternate between clear nail areas and silver filled squares, creating timeless patterns reminiscent of modern art installations. Apply your base coat, then use small nail art brushes to fill alternating squares with metallic silver polish. Fine line grids use ultra thin silver lines to create delicate mesh patterns that add subtle texture without overwhelming your overall look.
Negative space grids combine clear nail areas with silver geometric sections, allowing natural nail color to peek through designated grid squares. This technique creates breathing room within your design while maintaining geometric integrity. Professional tip: seal your grid design with a high quality top coat to prevent chipping along the intersecting lines.
Silver and White Nail Combinations
 8")
Silver and white create the perfect sophisticated pairing that elevates any manicure with elegant contrast. These complementary shades offer endless possibilities for chic nail art that works beautifully for both everyday wear and special occasions.
Silver Marble Effects
Creating marble patterns with silver and white polish produces stunning natural stone effects that look incredibly luxurious. We recommend starting with a white base coat and allowing it to dry completely before adding the marble technique.
Dropping silver polish onto wet white polish creates organic swirling patterns that mimic real marble veining. Use a thin brush or toothpick to gently drag through the polish while it’s still wet, creating those characteristic marble streaks.
Blending the colors requires a light touch and quick movements to achieve realistic marble textures. Professional nail artists suggest working on one nail at a time to maintain the wet polish needed for proper marble effects.
Water marble techniques offer another approach where you drop alternating colors into water and create patterns before dipping your nail. This method produces unique designs that are impossible to replicate exactly, making each nail truly one of a kind.
White Base with Silver Details
Starting with crisp white polish provides the perfect canvas for intricate silver detailing and accent work. We suggest using two coats of white for complete opacity before adding any silver elements.
Adding delicate silver lines creates elegant geometric patterns or floral designs that stand out beautifully against white backgrounds. Thin brushes or striping tape help achieve precise lines and consistent spacing across all nails.
Incorporating silver dots in various sizes adds playful texture while maintaining sophisticated appeal. Use a dotting tool or the end of a bobby pin to create perfect circles in strategic patterns across the white base.
Designing silver accents like small stars, hearts, or abstract shapes transforms simple white nails into artistic masterpieces. Metallic silver polish works best for these details because it provides better opacity and shine than regular polish.
Creating silver borders around the nail edges or cuticle area frames the white base beautifully. This technique works especially well for special occasions when you want subtle elegance with eye catching metallic elements.
Alternating Silver and White Nails
Alternating colors between fingers creates a striking checkerboard effect that’s both bold and balanced. We recommend painting your thumb, middle finger, and pinky in silver, while keeping your index and ring fingers white.
Mixing finishes adds extra visual interest by combining chrome silver on some nails with matte white on others. This contrast in texture elevates the simple color alternation into something more ever-changing and modern.
Creating patterns across the alternating base colors ties the look together cohesively. Try adding small white dots to silver nails and silver details to white nails for a coordinated appearance.
Balancing the design ensures neither color dominates the overall look while maintaining visual interest. Professional manicurists often suggest using slightly different shades of silver or white to add subtle depth to the alternating pattern.
Maintaining consistency in application and finish quality across all nails keeps the alternating design looking polished and intentional rather than mismatched.
Silver Foil Nail Art Techniques
 10")
Silver foil transforms ordinary manicures into stunning metallic masterpieces with minimal effort. We’ll explore three distinct techniques that create eye-catching texture and dimension.
Crumpled Silver Foil
Crumpled silver foil creates an organic, textured look that adds instant drama to your nails. Start with a completely dry base coat in black or dark silver for maximum contrast. Apply a thin layer of foil adhesive and wait until it becomes tacky but not wet.
Press small pieces of silver foil onto the adhesive using a soft brush or your fingertip. Don’t smooth the foil completely flat – leave some wrinkles and creases for that authentic crumpled effect. The irregular patterns create unique designs on each nail.
Remove excess foil gently by rubbing in circular motions with a clean brush. This technique works best when you vary the foil placement across different nails. Seal your design with two coats of clear top coat to prevent peeling and maintain the metallic shine.
Silver Foil Accents
Silver foil accents provide subtle elegance without overwhelming your overall nail design. Apply foil to exact areas like cuticle lines, nail tips, or geometric shapes for controlled metallic pops. Use thin strips of foil transfer paper for precise application.
Create delicate foil lines by pressing narrow strips along your nail’s natural curves or in straight geometric patterns. The key is restraint – accent foil should complement your base color rather than compete with it. Popular accent placements include French tip variations, half-moon designs, and diagonal stripes.
Layer accent foil over existing nail art to add depth and sophistication. This technique works exceptionally well over matte polishes, where the foil creates striking contrast. Always apply foil to completely dry polish and finish with a protective top coat.
Mixed Metal Foil Designs
Mixed metal foil designs combine silver with gold, copper, or rose gold for luxurious multi-dimensional effects. Start with a neutral base coat that won’t clash with your chosen metal combination. Plan your design layout before applying any foil to ensure balanced color distribution.
Alternate different metal foils in stripes, blocks, or organic patterns across your nail surface. The contrast between silver and warmer metals like gold creates visual interest and complements various skin tones. Consider seasonal preferences – silver and copper for fall, silver and gold for winter celebrations.
Blend metal transitions smoothly by overlapping foil edges slightly and pressing firmly with a silicone tool. This technique prevents harsh lines between different metals. Mixed metal designs work beautifully as accent nails paired with solid metallic polish on remaining fingers.
Silver Stamped and Textured Nails
 12")
Elevating beyond flat metallic finishes, stamped and textured silver nails introduce dimensional artistry that catches light from every angle. These techniques transform your nails into miniature canvases showcasing intricate patterns and tactile surfaces.
Silver Holographic Patterns
Holographic silver polish creates mesmerizing rainbow reflections that shift with movement and lighting conditions. We recommend applying a black base coat to intensify the holographic effect, then using a makeup sponge to dab the holographic polish for maximum sparkle. Top brands like ILNP and Holo Taco offer stunning silver holographic formulas that display brilliant prismatic colors.
Linear holographic finishes produce fine rainbow lines that run parallel across your nail surface, creating a sophisticated stripe effect. These polishes work best in direct sunlight or under bright artificial lighting where the holographic properties truly shine. Apply two thin coats rather than one thick coat to prevent streaking and ensure even coverage.
Scattered holographic particles deliver subtle sparkle throughout the silver base, perfect for everyday wear with magical touches. Mix these polishes with clear top coat to customize the intensity level, creating everything from barely there shimmer to intense holographic displays.
Textured Silver Polish
Sand texture silver polish mimics fine metallic granules for a unique matte finish that feels rough to the touch. Brands like OPI and Zoya create these specialty formulas using micro particles that provide grip and visual interest. Apply without a top coat to maintain the textured surface, or seal with matte top coat for durability.
Sugar texture polish creates crystalline surfaces that resemble frosted silver or metallic sugar crystals. These formulas require careful application in thin layers to prevent clumping, and we suggest using a flat brush for even distribution. The texture becomes more pronounced with multiple coats, building up dimensional effects.
Velvet textured silver delivers plush surfaces that appear soft even though being completely smooth. This optical illusion comes from specially formulated particles that absorb and reflect light differently than standard polish. Clean your brush between coats to prevent texture buildup around the cuticles.
Silver Stamping Designs
Nail stamping plates featuring intricate silver patterns allow you to transfer detailed designs like damask, florals, and geometric motifs onto any base color. We recommend using specialized stamping polish in metallic silver, as regular polish often lacks the opacity needed for crisp transfers. Popular plate brands include MoYou London and Bundle Monster.
Reverse stamping techniques enable colored silver designs where you fill stamped images with different silver shades before transferring to the nail. Apply your base silver to the stamping plate, then use a small brush to add contrasting silver tones within exact pattern areas. Transfer the completed design for multi dimensional effects.
Double stamping layers create complex silver artwork by applying one pattern, then stamping a second complementary design over the first. Choose patterns that work together, such as large florals with delicate lace overlays, ensuring the silver tones contrast enough to distinguish each layer clearly.
Silver Holiday and Special Occasion Ideas
 14")
Silver nails transform into magical canvases during holidays and special celebrations. We’ll explore festive designs that capture the spirit of each occasion with metallic elegance.
Silver Christmas Nail Art
Silver snowflake patterns create enchanting winter wonderlands on our nails. We recommend using a deep navy or forest green base coat to make silver designs pop dramatically. Thin silver striping brushes work perfectly for delicate snowflake branches, while dotting tools add perfect crystal centers.
Metallic silver Christmas trees offer a modern twist on traditional holiday motifs. Start with a clear base coat and use a flat brush to paint triangular tree shapes in silver chrome polish. Add tiny gold dots as ornaments for extra festive sparkle, or incorporate small rhinestones at the tree tops.
Silver and red combination designs capture classic Christmas colors with metallic sophistication. We suggest alternating silver chrome nails with deep crimson accent nails, or creating candy cane stripes using silver and red polish. This color pairing works beautifully for both subtle elegance and bold holiday statements.
Silver holly leaf details showcase intricate artistry perfect for Christmas celebrations. Use a small detail brush to paint silver holly leaves on accent nails, adding tiny red rhinestone berries for authentic holiday charm. These designs look stunning against dark winter base colors like burgundy or midnight blue.
New Year’s Eve Silver Nails
Champagne silver gradients embody the celebratory spirit of New Year’s Eve perfectly. We blend pale gold and silver polishes using makeup sponges to create seamless ombré effects that shimmer like champagne bubbles. Start with a light base and gradually build intensity toward the nail tips.
Silver confetti nail designs capture the excitement of midnight celebrations through scattered metallic elements. Apply various sizes of silver hexagonal glitter over a clear or pale base coat, concentrating heavier coverage near the cuticles. This technique mimics falling confetti and catches light beautifully under party lighting.
Midnight silver and black combinations create sophisticated party ready looks with dramatic contrast. We recommend using matte black as a base with silver chrome accent nails, or creating geometric patterns that alternate between the two finishes. These designs photograph beautifully in party settings.
Silver clock motifs commemorate the countdown to midnight with artistic precision. Paint clock faces on accent nails using silver polish, adding tiny rhinestones to mark the 12 o’clock position. We suggest keeping other nails simple with silver chrome finish to let the clock design shine as the focal point.
Wedding Silver Nail Designs
Bridal silver French manicures offer timeless elegance with modern metallic sophistication. We replace traditional white tips with soft silver chrome polish, creating a subtle shimmer that complements wedding jewelry perfectly. This classic style photographs beautifully in wedding photos and suits any dress style.
Silver pearl accent nails add luxurious texture ideal for bridal celebrations. Apply tiny pearl beads in silver settings to accent nails while keeping others in soft silver chrome. We recommend placing pearls near the cuticle area or creating delicate patterns that won’t interfere with ring placement.
Delicate silver lace patterns recreate the intricate beauty of wedding dress details on our nails. Use thin silver striping polish to paint lace inspired designs over sheer or nude base coats. These patterns work especially well on accent nails, creating romantic details that complement bridal attire.
Silver and white wedding designs combine purity with metallic elegance for perfect bridal looks. We suggest creating marble effects using white and silver polishes, or alternating white base nails with silver chrome accents. This combination provides versatility for various wedding themes while maintaining sophisticated elegance throughout the celebration.
Silver Nail Shape and Length Ideas
 16")
Choosing the perfect nail shape enhances your silver manicure and complements your personal style. Different shapes create unique visual effects with metallic finishes that can dramatically transform your overall look.
Silver Stiletto Nails
Dramatic silver stilettos create the most striking metallic statement for bold fashion choices. These ultra pointed nails maximize light reflection and make chrome finishes appear more intense. We recommend starting with a strong base coat since stiletto shapes require extra structural support.
Chrome powder application works exceptionally well on stiletto shapes because the extended surface area amplifies the mirror effect. Professional nail artists often use black gel polish as a base to enhance the metallic intensity. You’ll need to buff the surface thoroughly before applying chrome powder for the smoothest finish.
Silver glitter gradients look particularly stunning on stiletto nails when applied from the cuticle to the tip. Dense glitter near the base creates visual weight while sparse application at the tips maintains the sharp silhouette. This technique prevents the dramatic shape from appearing overwhelming.
Geometric silver designs gain extra impact on stiletto nails due to the extended canvas area. Vertical silver stripes elongate the already dramatic shape while triangular patterns complement the pointed tip naturally. You can create stunning negative space designs by leaving strategic areas clear for modern minimalist appeal.
Short Silver Square Nails
Short silver square nails offer maximum practicality while maintaining sophisticated metallic elegance. This classic shape works perfectly for everyday wear and professional environments. We find that square shapes make silver chrome appear more refined and less flashy than on longer nails.
Matte silver polish looks exceptionally chic on short square nails because the understated finish matches the practical shape. You can layer different silver textures like sand or sugar finishes for added dimension without overwhelming the compact nail bed. These textured polishes also help hide minor application imperfections.
Silver French tips on square nails create clean geometric lines that appear crisp and modern. The straight edge of square nails makes it easier to achieve perfectly even tip lines. We suggest using striping tape to ensure sharp edges when creating silver French designs.
Metallic silver accent nails work beautifully when combined with neutral base colors on short squares. Choose one or two nails per hand for silver application while keeping others in complementary shades like nude or white. This approach adds sophistication without appearing too bold for conservative settings.
Silver Coffin Nail Designs
Silver coffin nails blend elegance with edginess through their distinctive tapered square tips. This shape offers more surface area than short squares while maintaining better durability than stilettos. The coffin shape naturally flatters most hand types and finger lengths.
Holographic silver polishes create mesmerizing rainbow effects on coffin shaped nails. The flat surface area allows holographic particles to catch light from multiple angles. We recommend applying holographic silver over a black base coat to intensify the color shifting properties.
Silver foil techniques look particularly striking on coffin nails because you have adequate space for creative placement. Crumpled foil pieces can be arranged strategically across the nail bed while maintaining the sleek coffin silhouette. Mixed metal foil designs work especially well when you alternate silver with rose gold or platinum.
Intricate silver stamped patterns showcase beautifully on the extended canvas of coffin shaped nails. Detailed mandala designs and geometric patterns have enough space to display properly without appearing cramped. You can layer multiple stamped elements using different silver finishes for dimensional artwork.
Silver Nail Care and Maintenance Tips
 18")
We’ve explored stunning silver nail designs, and now it’s time to focus on keeping your metallic manicures looking flawless. Proper care and maintenance ensure your silver nails maintain their brilliant shine and last as long as possible.
Proper Base Coat Application
Base coat selection determines the final result of your silver manicure more than most people realize. We recommend using a ridge-filling base coat to create a smooth surface for metallic polishes, as silver formulas tend to highlight imperfections on the nail plate.
Application technique requires thin, even coats that extend slightly beyond the nail edges. Start with clean, dehydrated nails using a nail dehydrator or rubbing alcohol to remove oils and moisture. Apply the base coat in three strokes: one down the center and one on each side of the nail.
Drying time between coats prevents bubbling and ensures proper adhesion of your silver polish. Wait 2-3 minutes before applying your metallic color, as rushing this step can cause the base coat to lift or create an uneven texture.
Specialty base coats work particularly well with chrome and foil finishes. Consider using a black base coat under chrome polishes to intensify the mirror effect, or opt for a sticky base coat when applying silver foils or stamping designs.
Silver Polish Longevity
Application methods significantly impact how long your silver manicure will last. We suggest applying silver polish in 2-3 thin coats rather than one thick layer, as this prevents chipping and extends wear time by up to 5 days.
Top coat selection makes the difference between a good manicure and a great one. Choose a fast-drying top coat specifically designed for metallic polishes, as regular top coats can dull the reflective properties of silver finishes.
Touch-up strategies help maintain your silver nails between salon visits. Keep a small brush and your exact silver shade handy for quick fixes on chips or tip wear, focusing on sealing the edges where most damage occurs.
Environmental factors affect silver polish durability more than other colors. Protect your manicure from harsh chemicals, excessive heat, and direct sunlight, which can cause fading or discoloration in metallic formulas.
Maintenance schedule should include applying fresh top coat every 3-4 days to restore shine and protect the silver underneath. This simple step can extend your manicure’s life by an additional week.
Removal and Nail Health
Gentle removal techniques preserve nail health while effectively removing stubborn silver polishes. Soak cotton balls in acetone-based nail polish remover and press them onto each nail for 30-60 seconds before gently pushing the polish off.
Foil wrapping method works best for glitter and textured silver polishes. Wrap each fingertip with foil after applying the soaked cotton ball, then wait 10-15 minutes for the polish to dissolve completely without aggressive scrubbing.
Post-removal care requires immediate attention to restore moisture and strength to your nails. Apply a nourishing cuticle oil and hand cream within minutes of polish removal to prevent dryness and brittleness.
Recovery period between silver manicures allows your nails to breathe and regain their natural strength. Give your nails 24-48 hours polish-free every few weeks, using a strengthening treatment or clear base coat during this time.
Nail health monitoring helps identify any damage from frequent metallic polish use. Watch for thinning, yellowing, or increased brittleness, and consider switching to gentler, 5-free silver formulas if these issues arise.
Conclusion
Silver nails offer endless possibilities for expressing your unique style while maintaining timeless elegance. We’ve explored everything from classic chrome finishes to intricate geometric patterns that can elevate any look.
The beauty of silver nail art lies in its versatility – you can create subtle everyday manicures or bold statement designs for special occasions. With proper application techniques and quality products you’ll achieve salon-worthy results from home.
Remember that nail health should always be your priority. By following proper care routines and maintenance tips your silver manicures will look stunning longer while keeping your natural nails strong.
Whether you’re drawn to minimalist chrome or elaborate foil designs silver nails remain a sophisticated choice that complements any wardrobe. Start experimenting with these techniques and discover which silver nail style speaks to you.
Frequently Asked Questions
What makes silver nails so popular right now?
Silver nails are trending because they’re incredibly versatile and suit all skin tones. They work for both casual and formal occasions, offering a sophisticated metallic finish that complements any outfit. The variety of techniques available, from chrome to matte finishes, allows for endless creativity and personalization.
How do I achieve a perfect chrome silver nail finish at home?
Start with a black base coat for maximum reflectivity. Apply chrome powder over tacky gel polish using a silicone tool or eyeshadow applicator. Gently buff the powder until you achieve a mirror-like finish, then seal with a no-wipe top coat to maintain the shine and durability.
What’s the difference between matte and glossy silver nail polish?
Matte silver polish creates a sophisticated, understated look with no shine, offering modern elegance. Glossy silver provides a reflective, mirror-like finish that catches light dramatically. You can layer both for unique effects or use matte top coat over glossy polish for customizable finishes.
Can I create silver French manicure variations?
Yes! Try traditional silver French tips instead of white, reverse French with silver at the nail base, or ombré effects. You can also create double silver lines for geometric looks or incorporate negative space designs. These modern twists transform classic French manicures into contemporary metallic statements.
How do I apply silver glitter polish evenly?
Use a clear base coat first, then dab glitter polish rather than brushing it on for even distribution. Apply thin layers, allowing each to dry completely. Finish with a quality top coat to smooth the texture and enhance longevity. This technique prevents clumping and creates professional-looking results.
What nail shapes work best with silver designs?
All shapes complement silver, but each creates different effects. Stiletto nails maximize light reflection for dramatic impact, while short square nails offer practical elegance. Coffin nails blend sophistication with edginess. Choose based on your lifestyle and the visual effect you want to achieve.
How long do silver nail designs typically last?
Silver manicures can last 7-14 days with proper application and care. Use ridge-filling base coats, apply thin polish layers, and finish with fast-drying top coats designed for metallics. Environmental factors and daily activities affect longevity, but proper techniques significantly extend wear time.
What’s the best way to remove silver nail polish?
Use acetone-based remover and soak cotton pads on each nail for 10-15 seconds before gently pressing and sliding off. Avoid aggressive rubbing, which can damage nails. Follow with cuticle oil and moisturizer to restore hydration. Allow nails to recover between manicures for optimal health.
Can I mix silver with other colors?
Absolutely! Silver pairs beautifully with white for marble effects, black for dramatic contrast, or red for festive looks. You can create alternating patterns, ombré gradients, or use silver as accent details. Experiment with different finishes and combinations to express your personal style.
What tools do I need for silver nail art?
Essential tools include thin brushes for precise lines, striping tape for geometric patterns, stencils for shapes, and stamping plates for detailed designs. Silicone tools work best for chrome application, while dotting tools help with accent placement. Quality base and top coats are crucial for professional results.