We’ve all been there – wanting gorgeous nails that last for weeks without chipping or fading. That’s where shellac comes in as a game-changer for nail enthusiasts everywhere. This revolutionary gel-polish hybrid delivers stunning results that bridge the gap between regular nail polish and full gel manicures.
Shellac offers endless creative possibilities while maintaining that perfect glossy finish we all crave. From classic French tips to bold geometric patterns and seasonal designs, there’s a shellac nail idea for every style preference and occasion. The best part? These designs stay flawless for up to two weeks without losing their vibrant color or mirror-like shine.
We’re diving into the most inspiring shellac nail ideas that’ll transform your manicure game completely. Whether you’re a minimalist who loves subtle elegance or someone who gravitates toward eye-catching statement nails, these ideas will spark your creativity and help you achieve salon-quality results that turn heads wherever you go.
Classic French Manicure with a Modern Twist
We’re taking the timeless French manicure and giving it fresh updates that work beautifully with shellac’s durable formula. These contemporary approaches maintain the elegance of traditional French nails while adding personality and current style trends.
Traditional White Tips with Nude Base
Shellac transforms the classic French manicure into a chip resistant masterpiece that lasts up to 14 days. We start with a perfect nude base coat like CND Shellac in “Clearly Pink” or “Romantique” to create that natural, healthy nail appearance.
The white tips get applied with precision using a fine brush, creating clean lines that won’t smudge or fade. Professional nail technicians recommend using “Studio White” shellac for the crispest, most opaque coverage. We’ve found that curing each coat under LED lights for 30 seconds ensures maximum durability and shine.
This timeless combination works perfectly for brides, professionals, or anyone wanting understated elegance. The shellac formula prevents the yellowing that often occurs with traditional polish, keeping your French tips looking fresh throughout wear.
Colored French Tips for a Contemporary Look
Bold colors replace traditional white tips to create eye catching modern French manicures that showcase personal style. We love using vibrant shellac shades like coral pink, sage green, or navy blue for the tip application over neutral bases.
Seasonal color combinations work exceptionally well with this technique. Spring calls for soft pastels like lavender or mint green, while autumn embraces deeper tones such as burgundy or forest green. Summer brings opportunities for bright oranges, tropical blues, and sunny yellows.
Metallic tips create glamorous options for special occasions. Gold and silver shellac formulas provide mirror like finishes that catch light beautifully. Rose gold has become particularly popular, offering warmth that complements most skin tones.
Reverse French Manicure Techniques
This innovative approach places the accent color at the nail base rather than the tips, creating a fresh take on French nail art. We apply the colored shellac in a curved line near the cuticle area, leaving the rest of the nail in a complementary shade or clear finish.
Gradient reverse French manicures blend colors seamlessly from base to tip using sponge application techniques. Start with your chosen color at the cuticle, then blend upward with white or nude tones. Multiple thin layers create smoother transitions than single heavy applications.
Double reverse techniques incorporate two accent colors at the base for added visual interest. We recommend using colors from the same family, such as light and dark blues, or contrasting shades like pink and gold for dramatic effects.
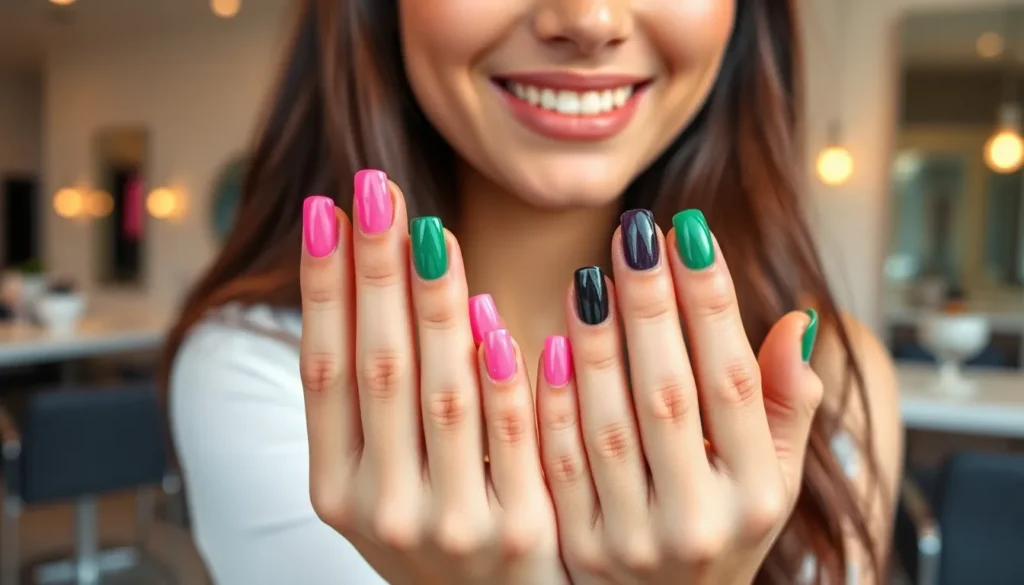
Bold and Vibrant Color Combinations

Shellac’s superior formula makes bold colors pop with unprecedented vibrancy while maintaining their intensity for weeks. Electric hues and rich saturated tones create stunning statement nails that capture attention and express your unique style.
Neon Summer Shellac Shades
Neon shellac colors deliver maximum impact with their electric intensity and UV reactive properties. Electric pink, lime green, and bright orange create eye catching manicures perfect for beach vacations and summer festivals. Coral pink shellac paired with turquoise blue accent nails produces a tropical vibe that complements sun kissed skin tones.
Yellow neon shellac makes a fearless statement when applied to all ten nails or used as accent colors on ring fingers. Hot pink and electric purple combinations work beautifully for gradient effects or color blocking techniques. These vibrant shades require two thin coats for optimal opacity and should be cured for the full recommended time to prevent color bleeding.
Rich Jewel Tones for Fall and Winter
Jewel tone shellac shades bring sophistication and warmth to autumn and winter manicures. Deep emerald green, sapphire blue, and rich amethyst purple create luxurious looks that complement darker seasonal wardrobes. Ruby red shellac paired with gold accent stripes delivers classic holiday elegance.
Burgundy and plum tones offer versatile options that transition seamlessly from office meetings to evening events. Teal shellac combined with copper glitter creates dimensional effects that catch light beautifully in winter sunshine. These deeper hues often require only one coat for full coverage due to their concentrated pigmentation.
Pastel Spring Color Palettes
Pastel shellac shades capture spring’s fresh energy with their soft and cheerful tones. Lavender, mint green, and baby pink create gentle combinations perfect for Easter celebrations and garden parties. Peachy coral paired with soft yellow produces a sunrise inspired gradient that welcomes warmer weather.
Powder blue shellac looks stunning when combined with white accent dots or delicate floral designs. Sage green and dusty rose create sophisticated neutral palettes that complement both casual and professional outfits. These lighter shades may require an additional coat for complete opacity but provide excellent bases for nail art details and embellishments.
Elegant Neutral and Nude Shellac Options

Neutral and nude shellac shades offer timeless sophistication that complements any outfit or occasion. We’ve curated the most refined options that showcase shellac’s superior formula while maintaining understated elegance.
Sophisticated Beige and Taupe Shades
Beige shellac tones create a polished professional look that works seamlessly from boardroom to brunch. Classic mushroom beige provides warm undertones that flatter all skin types, while cool stone beige offers modern minimalism. We recommend applying two thin coats for optimal opacity and curing each layer for 60 seconds under LED lights.
Taupe variations deliver rich depth without overwhelming color intensity. Greige taupe blends gray and beige for contemporary appeal, making it perfect for fall and winter wardrobes. Warm camel taupe adds golden undertones that enhance tanned summer skin beautifully.
Application tips ensure flawless results with these sophisticated neutrals. Start with a quality base coat to prevent staining and extend wear time. Apply shellac in thin, even strokes from cuticle to tip, avoiding the skin around nails.
Creamy Pink and Peach Tones
Soft pink shellac shades provide feminine elegance with universal appeal across all ages and occasions. Ballet slipper pink offers sheer coverage with subtle warmth, while dusty rose adds vintage charm to modern manicures. These delicate hues photograph beautifully for special events like weddings and graduations.
Peach undertones bring warmth and vitality to neutral nail looks without appearing too bold. Creamy coral peach complements summer tans and adds life to pale winter skin tones. Muted apricot provides peachy pink fusion that works year round.
Layering techniques enhance the natural beauty of these gentle tones. Apply one coat for sheer coverage that mimics natural nail color, or build with two coats for more pronounced color payoff. We suggest adding a glossy top coat for extra shine and protection.
Minimalist Clear and Sheer Finishes
Clear shellac applications offer the ultimate minimalist approach while providing strengthening benefits for natural nails. Pure clear formula protects against chipping and adds glossy shine that lasts up to two weeks. This option works perfectly for professional environments with strict grooming policies.
Sheer tinted options provide barely there color enhancement that looks naturally polished. Milky white sheer creates clean, fresh appearance similar to a professional buff and shine service. Pink sheer adds subtle warmth without obvious color commitment.
Maintenance advantages make these minimal finishes ideal for busy lifestyles. Clear and sheer shellac requires minimal touch ups compared to bold colors, and any minor chips remain virtually invisible. We find these options perfect for those new to shellac application or anyone preferring understated nail enhancement.
Stunning Gradient and Ombre Effects

Building on our exploration of shellac’s vibrant potential, gradient and ombre techniques create breathtaking transitions that showcase the formula’s blendability and professional finish.
Two-Color Gradient Techniques
Two-color gradients transform your nails with smooth color transitions that highlight shellac’s superior blending properties. Start by applying your base coat and curing under LED lights for 30 seconds. Choose complementary colors like deep purple transitioning to soft lavender or classic navy blending into sky blue for striking results.
Apply the darker shade to the nail bed first, covering about two-thirds of the nail surface. Work quickly while the shellac remains workable, using gentle strokes to prevent streaking. Position the lighter color at the tip, overlapping slightly with the darker shade to create the blending zone.
Blend the colors using a clean makeup sponge with dabbing motions. Press the sponge gently where the colors meet, creating seamless transitions without disturbing the base layer. Clean your sponge frequently to prevent color muddying and maintain crisp gradient lines.
Popular two-tone combinations include coral to peach for summer vibes, burgundy to rose for elegant evening looks, and mint green to white for fresh spring styles. Each combination requires 2-3 blending sessions before the final cure to achieve professional-quality results.
Multi-Color Ombre Blending
Multi-color ombre designs create stunning rainbow effects using three or more shellac shades. Plan your color sequence before starting, arranging shades from darkest to lightest or following color wheel progressions for harmonious results. Sunset themes featuring orange, pink, and purple create particularly striking effects.
Section your nail into equal zones based on the number of colors you’re using. For three-color designs, divide the nail into thirds, applying each shade to its designated area with precise brush strokes. Work with thin coats to prevent color bleeding and maintain clean transitions.
Blend each color junction separately using small makeup sponges or detail brushes. Start with the darkest junction first, working toward the lighter shades to prevent contamination. Each blending session should last 10-15 seconds before moving to the next section.
Ocean-inspired ombres featuring navy, teal, and seafoam green capture beachy vibes perfectly. Forest themes with deep green, sage, and cream create earthy elegance, while galaxy effects using black, purple, and silver deliver cosmic drama.
Glitter Fade Designs
Glitter fade techniques combine sparkle with gradient effects for maximum visual impact. Begin with your chosen base color, applying two thin coats and curing completely. Select fine glitter polishes that complement your base shade for cohesive results.
Apply glitter concentrate at the nail tips, gradually reducing coverage toward the cuticle area. Use a fan brush or detail sponge to control glitter distribution, creating natural-looking fade patterns. Build coverage slowly with multiple thin applications rather than one heavy coat.
Concentrate glitter density at the free edge for classic fade effects. Start with 100% coverage at the tip, reducing to 50% at mid-nail, and finishing with scattered glitter pieces near the base. This technique works beautifully with rose gold glitter over nude bases or silver sparkles on deep navy.
Reverse glitter fades place maximum sparkle at the cuticle line instead. Apply dense glitter coverage at the nail base, fading toward clear tips for modern contrast. This technique pairs perfectly with jewel-toned bases like emerald or sapphire, creating sophisticated evening looks that catch light beautifully.
Glamorous Metallic and Shimmer Looks

Metallic shellac finishes elevate any manicure with their reflective properties and luxurious appearance. These eye-catching designs create stunning focal points that catch light beautifully throughout the day.
Gold and Silver Accent Nails
Gold accent nails transform ordinary manicures into statement pieces with their warm, radiant finish. We recommend applying gold shellac to the ring finger while keeping other nails in complementary nude or black shades. Two thin coats ensure even coverage without streaking, and the metallic particles distribute evenly when you cure each layer for 60 seconds under LED lights.
Silver shellac accents offer a cool-toned alternative that pairs beautifully with winter wardrobes and formal occasions. Apply silver to your thumb and ring finger for a balanced asymmetrical look, or create alternating patterns across all nails. The reflective quality intensifies under different lighting conditions, making silver accents perfect for evening events.
Combination techniques allow you to mix gold and silver accents within the same manicure for maximum impact. Try gold on one hand and silver on the other, or alternate between fingers for a modern geometric approach. These metallic contrasts work especially well when paired with neutral base colors like beige or soft gray.
Rose Gold and Copper Finishes
Rose gold shellac delivers feminine elegance with its warm pink undertones that complement all skin tones. This trendy metallic shade works beautifully as a full coverage option or as accent nails paired with blush pink or cream bases. We’ve found that rose gold appears more vibrant when applied over a white base coat, which enhances its reflective properties.
Copper finishes provide rich, autumn-inspired tones that create sophisticated seasonal looks. Apply copper shellac in full coverage for dramatic impact, or use it as accent stripes over neutral backgrounds. The deep orange undertones pair exceptionally well with burgundy, forest green, and chocolate brown shades for cohesive color schemes.
Layering techniques enhance the depth of rose gold and copper finishes through strategic application methods. Start with a sheer base in matching undertones, then apply the metallic shade in thin layers to build intensity. This approach prevents streaking while creating dimensional color that shifts beautifully in different lighting conditions.
Holographic and Chrome Effects
Holographic shellac creates mesmerizing rainbow reflections that shift colors as your hands move. These polishes contain fine prismatic particles that split light into spectrum colors, producing an almost magical effect. Apply two thin coats over a black base to maximize the holographic impact, ensuring each layer cures completely before adding the next.
Chrome powder effects achieve mirror-like finishes when applied over specially formulated shellac base colors. We recommend using chrome powder with a no-wipe top coat for the smoothest application and most reflective results. Rub the powder gently with a silicone tool until you achieve complete coverage, then seal with regular shellac top coat.
Specialty application methods help you create unique holographic and chrome designs beyond traditional full coverage looks. Try chrome tips over holographic bases for dimensional French manicures, or create geometric patterns using tape to section off areas for different finishes. These advanced techniques produce professional-quality results that rival high-end salon work.
Creative Nail Art and Pattern Ideas

Shellac’s precision application and smooth finish make it the perfect canvas for intricate nail art designs. We’ll explore how this durable formula holds detailed patterns beautifully for weeks.
Geometric Shapes and Lines
Sharp triangular designs create modern sophistication using contrasting shellac colors. We recommend applying a base coat in nude or clear, then using striping tape to create clean triangular sections before filling with bold colors like electric blue or matte black.
Minimalist line patterns offer elegant simplicity with maximum visual impact. Thin horizontal stripes across the nail bed work perfectly with metallic shellac shades, while vertical lines can elongate shorter nails when applied with precision brushes.
Diamond and chevron motifs bring contemporary edge to traditional manicures. We suggest starting with a light base color, then using nail art brushes to create diamond patterns in complementary shades, ensuring each layer cures completely under LED lights for crisp edges.
Grid and lattice designs showcase shellac’s ability to maintain intricate details over time. These patterns work exceptionally well with negative space techniques, where portions of the natural nail show through geometric cutouts.
Floral and Nature-Inspired Designs
Delicate rose patterns transform nails into miniature garden canvases using shellac’s blendable formula. We create these by starting with a soft pink base, then layering deeper rose tones with dotting tools to build realistic petal textures.
Cherry blossom motifs capture spring’s beauty with pale pink backgrounds and white flower details. These designs require thin brushes for branch work and dotting tools for individual blossoms, with each element cured separately for dimensional effects.
Leaf and vine accents bring natural elegance to autumn manicures using rich green shellac shades. We recommend painting curved vine lines first, then adding individual leaves with varying opacity to create depth and movement.
Botanical silhouettes offer sophisticated nature themes without complex details. Simple fern fronds or eucalyptus branches painted in dark green over light backgrounds create stunning contrast effects.
Abstract Art and Textured Looks
Marble effect patterns showcase shellac’s blending capabilities through swirled color combinations. We achieve these by dropping different colored shellac onto wet base coats, then using toothpicks to create organic marble veining before curing.
Splatter paint designs bring artistic flair to everyday manicures using multiple shellac colors. These work best over light base colors, with darker accent shades flicked onto wet surfaces using fan brushes or straws for controlled splattering.
Textured matte finishes transform glossy shellac into sophisticated velvet surfaces using specialized top coats. We layer these over bold colors like deep burgundy or forest green to create luxurious, touchable textures.
Color blocking techniques create bold artistic statements through strategic color placement. Sharp divisions between contrasting shellac shades like coral and navy blue produce modern art inspired manicures that maintain their crisp lines throughout wear.
Seasonal Shellac Nail Inspirations

We’ve explored various shellac techniques and designs, but nothing captures the spirit of each season quite like themed color schemes that reflect the changing moods throughout the year.
Holiday-Themed Color Schemes
Christmas celebrations call for rich burgundy and deep forest green combinations that capture the festive spirit perfectly. We recommend applying a burgundy base coat followed by delicate gold accent details on the ring finger for an elegant holiday look. New Year’s Eve glamour shines through with midnight black paired with silver glitter gradients that sparkle under party lights. Apply two thin coats of black shellac then blend silver holographic polish from the cuticle to mid-nail for maximum impact.
Valentine’s Day romance comes alive with classic red and soft pink ombre effects that transition seamlessly from passionate to sweet. Start with deep crimson at the base and fade to blush pink at the tips using a makeup sponge technique. Easter pastels feature lavender and mint combinations with subtle pearl shimmer accents that reflect spring’s renewal. Layer sheer lavender over a nude base then add mint green French tips for a fresh seasonal twist.
Halloween drama emerges through orange and black color blocking with matte topcoat finishes that create striking contrast. Paint alternating nails in each color then seal with matte topcoat for a sophisticated spooky effect.
Summer Beach and Tropical Vibes
Coral reef inspirations showcase bright coral and turquoise combinations that mirror tropical waters perfectly. We suggest painting coral as the base color then adding turquoise wave patterns using a thin brush for oceanic movement. Sunset gradients blend orange, pink, and yellow hues that capture golden hour magic on your fingertips. Apply yellow at the cuticle, orange in the middle, and pink at the tips using a blending sponge for smooth transitions.
Palm leaf patterns feature emerald green bases with gold accent lines that evoke tropical paradise vibes. Paint emerald green on all nails then use a striping brush to create delicate gold leaf veins on accent nails. Beachy nude tones combine sandy beige with white wave accents that reflect shoreline elegance. Apply beige shellac as the base then use white polish to paint subtle wave patterns along the nail edge.
Tropical fruit colors bring mango orange and lime green together for vibrant summer energy. Alternate these bold colors across your nails or create geometric patterns that celebrate seasonal abundance.
Cozy Fall and Winter Aesthetics
Autumn foliage captures deep burgundy, burnt orange, and golden amber tones that mirror changing leaves beautifully. We recommend creating an autumn gradient using all three colors, starting with burgundy at the base and transitioning through orange to amber at the tips. Cozy sweater weather features warm taupe and cream combinations with matte finishes that evoke cashmere comfort. Apply taupe shellac then add cream colored cable knit patterns using a dotting tool for textured effects.
Winter wonderland showcases icy blue and silver combinations with holographic accents that sparkle like fresh snow. Paint pale blue as your base then add silver snowflake designs using a thin brush and holographic topcoat. Fireside warmth brings together chocolate brown and copper tones that reflect intimate winter evenings. Layer copper shimmer over chocolate brown for depth and richness.
Holiday spice combines cinnamon red and gold metallics that capture seasonal warmth and celebration. Apply cinnamon red shellac then accent with gold leaf details or geometric patterns for festive sophistication.
Professional Tips for Long-Lasting Results

We’ve explored the creative possibilities of shellac, and now we’ll share the professional secrets that ensure your beautiful designs stay flawless for weeks.
Proper Nail Preparation Techniques
Clean nails thoroughly before starting any shellac application to remove oils and debris that can cause lifting. We recommend using rubbing alcohol or a specialized nail dehydrator on each nail bed and surrounding cuticle area.
Push back cuticles gently using an orange wood stick or metal pusher to create a clean workspace. Overgrown cuticles can trap polish and lead to premature chipping around the nail base.
File nails into your desired shape using a 180/240 grit file, moving in one direction to prevent splits. Square, round, or coffin shapes all work beautifully with shellac formulas.
Buff the nail surface lightly to create slight texture that helps shellac adhere properly. We suggest using a 240 grit buffer in gentle circular motions across the entire nail plate.
Remove all dust particles with a lint free wipe dampened with rubbing alcohol. This final cleaning step ensures nothing interferes with the shellac bond to your natural nail.
Application and Curing Best Practices
Apply base coat thinly across the entire nail, sealing the free edge to prevent water damage. We always cap the tips by running the brush along the nail edge for maximum protection.
Use thin polish layers rather than thick coats to prevent bubbling and ensure proper curing. Two thin color coats provide better coverage and durability than one thick application.
Cure each layer completely under your LED lamp for the manufacturer’s recommended time, typically 30-60 seconds. Proper curing creates the chemical bond that gives shellac its incredible longevity.
Avoid skin contact when applying shellac to prevent allergic reactions and lifting issues. We keep a small brush dipped in acetone nearby to clean any mistakes immediately.
Finish with topcoat applied in the same thin, even manner as your color coats. Cap the free edge again and cure thoroughly for that signature shellac shine and protection.
Maintenance and Removal Guidelines
Moisturize cuticles daily with cuticle oil or hand cream to prevent dryness that can cause shellac edges to lift. We recommend applying oil twice daily for optimal nail health.
Wear gloves when cleaning, gardening, or doing dishes to protect your shellac from harsh chemicals and excessive moisture. Rubber gloves create an effective barrier against damage.
File breaks immediately if you chip a nail, smoothing the rough edge to prevent further damage. Small chips can often be touched up with matching polish if caught early.
Remove shellac properly using acetone and foil wraps after 2-3 weeks of wear. We soak cotton pads in acetone, place them on each nail, and wrap with foil for 10-15 minutes before gently pushing off the softened polish.
Give nails recovery time between shellac applications by using strengthening treatments or simply going polish free for a few days. This rest period helps maintain healthy nail beds for your next beautiful shellac design.
Conclusion
With these diverse shellac nail ideas at your fingertips we’re confident you’ll discover styles that perfectly match your personality and lifestyle. From timeless French manicures to bold metallic finishes the possibilities are truly endless when you embrace shellac’s versatility.
We encourage you to experiment with different techniques and color combinations to create unique looks that reflect your individual style. Remember that proper preparation application and maintenance are key to achieving those stunning professional results that last for weeks.
Whether you’re planning for a special occasion or simply want to elevate your everyday look these shellac designs will help you maintain beautiful polished nails that make a lasting impression.
Frequently Asked Questions
What is shellac and how does it differ from regular nail polish?
Shellac is a gel-polish hybrid that combines the ease of polish application with the durability of gel. Unlike regular polish that chips within days, shellac provides a chip-free, glossy finish that lasts up to two weeks. It requires curing under LED lights and offers superior color vibrancy and longevity.
How long does a shellac manicure typically last?
A properly applied shellac manicure can last up to two weeks without chipping or fading. The longevity depends on proper nail preparation, correct application technique, and following maintenance tips like wearing gloves during household tasks and applying cuticle oil daily.
Can I do shellac nails at home or do I need professional application?
You can apply shellac at home with the right tools, including an LED lamp, base coat, color, and top coat. However, professional application often yields better results due to proper preparation techniques and experience. Home application is possible with practice and attention to detail.
What are the most popular shellac nail designs for beginners?
Beginners should start with classic French manicures, solid neutral colors, or simple gradient effects. These designs are forgiving and easy to master. Nude and beige shades are excellent starting points, while clear or sheer finishes offer a natural look with minimal maintenance requirements.
How do I properly remove shellac without damaging my nails?
Soak cotton balls in acetone and place them on each nail, then wrap with aluminum foil for 10-15 minutes. Gently push off the softened shellac with a cuticle pusher. Never peel or force removal, as this can damage the nail bed. Allow nails recovery time between applications.
What nail preparation is needed before applying shellac?
Proper preparation includes cleaning nails with rubbing alcohol, pushing back cuticles, filing nails to desired shape, and gently buffing the surface. Remove any oils or residue, as clean nails ensure better adhesion. This preparation step is crucial for achieving long-lasting, professional-looking results.
Are there seasonal shellac color recommendations?
Yes! Spring features pastels like lavender and mint green, summer showcases bright corals and turquoise, autumn highlights deep burgundy and burnt orange, while winter embraces icy blues and silver. Holiday themes include rich reds for Valentine’s Day and deep greens for Christmas celebrations.
What’s the difference between gradient and ombre shellac techniques?
Gradient typically involves two colors blending seamlessly from one to another, while ombre can incorporate multiple colors for rainbow effects. Both techniques require blending while the polish is wet, using sponges or brushes to create smooth transitions. Practice is key for achieving professional-looking results.
Can shellac be used for intricate nail art designs?
Absolutely! Shellac’s smooth application and precision make it perfect for geometric patterns, floral designs, and abstract art. The formula allows for detailed work including marble effects, color blocking, and minimalist patterns. Its durability ensures your nail art stays vibrant for weeks.
How often should I give my nails a break from shellac?
It’s recommended to give nails a break every 2-3 applications or after 6-8 weeks of continuous use. During breaks, focus on nail health with cuticle oil, strengthening treatments, and gentle care. This prevents nail thinning and maintains healthy nail beds for future shellac applications.


