Your wedding day deserves perfection down to the smallest detail and your nails shouldn’t be an afterthought. We understand that finding the perfect manicure to complement your bridal look can feel overwhelming with countless styles and trends to choose from.
Whether you’re dreaming of classic French tips timeless elegance or bold statement nails that reflect your personality we’ve got you covered. From delicate florals and subtle shimmer to modern geometric designs and romantic lace patterns there’s a nail design that’ll perfectly match your wedding aesthetic.
We’ll guide you through the most stunning bridal nail trends that’ll have you feeling confident as you say “I do.” These carefully curated ideas will ensure your hands look absolutely flawless in every photo and complement your overall bridal vision beautifully.
Classic French Manicure With a Twist
We’re reimagining the timeless French manicure to give your wedding nails a fresh, modern appeal. This elevated take on the classic design maintains elegance while adding personalized touches that reflect your unique style.
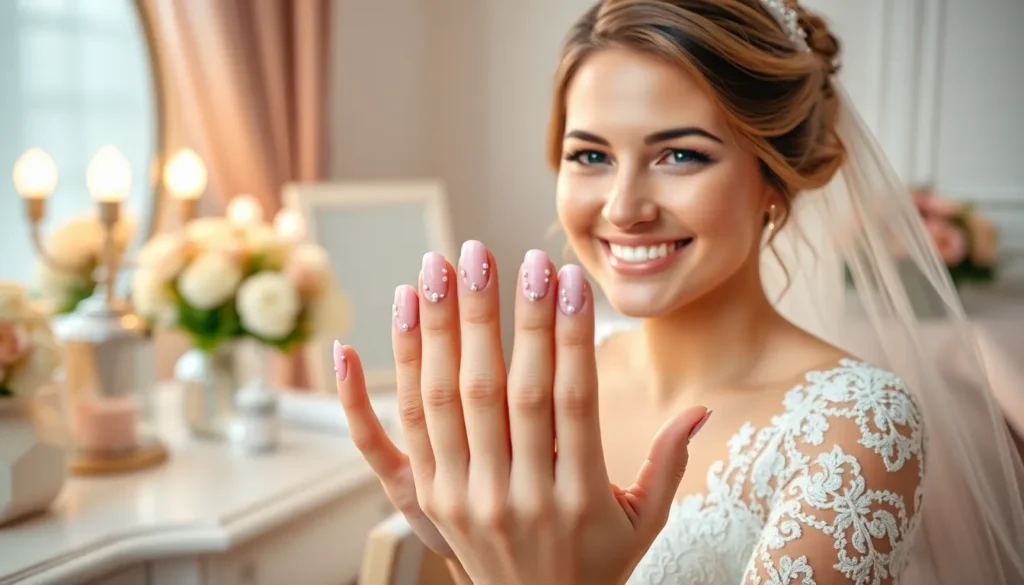
Adding Delicate Lace Patterns
Intricate lace designs transform ordinary French tips into romantic masterpieces perfect for your special day. We recommend using white nail art pens or fine brushes to create delicate floral motifs along the tip line, mimicking the patterns found in wedding veils or dress details.
Professional nail artists often apply these patterns using stamping plates or hand painting techniques that create dimensional effects. The lace elements work beautifully when placed strategically on the ring finger as an accent nail, while keeping the other nails in classic French style.
Timing considerations matter when choosing lace patterns, as these detailed designs typically require 45 to 60 minutes of application time. We suggest scheduling this manicure 2 to 3 days before your wedding to allow for any necessary touch ups.
Incorporating Pearl Accents
Micro pearls add sophisticated texture and catch light beautifully in wedding photography. We place these tiny embellishments along the smile line or create clusters near the cuticle area for maximum visual impact.
Application techniques involve using a small amount of nail glue or top coat to secure pearls in place before sealing with a clear protective layer. The pearls come in various sizes, with 1mm to 3mm options being most popular for bridal applications.
Durability factors make pearl accents ideal for wedding day wear, as they typically last 5 to 7 days when properly applied. We recommend avoiding excessive hand washing or rough activities in the 24 hours following application to ensure longevity.
Using Colored Tips Instead of White
Soft pink tips create a subtle variation that complements most wedding dress shades and skin tones. We often choose blush, rose, or champagne colors that coordinate with your wedding palette while maintaining the classic French silhouette.
Metallic options like gold, silver, or rose gold tips add glamour without overwhelming your overall bridal look. These colors photograph exceptionally well and pair beautifully with jewelry choices, creating a cohesive aesthetic.
Bold color choices such as deep burgundy, navy, or emerald work perfectly for autumn and winter weddings. We apply these darker shades in thin, precise lines to maintain the sophisticated French manicure structure while adding personal flair that matches your wedding theme.
Romantic Floral Nail Art Designs
 1")
Floral motifs bring natural beauty and feminine elegance to your wedding day manicure. These delicate designs capture the essence of your special celebration while creating stunning visual impact.
Hand-Painted Rose Petals
Hand painted rose petals create the most personalized and artistic approach to floral nail art for weddings. We recommend starting with a nude or soft pink base coat that complements your skin tone perfectly. Professional nail artists use fine detail brushes to paint individual rose petals using acrylic paints or gel polishes in various shades of pink, coral, or classic red. The technique involves creating small curved strokes that layer together to form realistic rose blooms.
Detailed rose designs work best on accent nails, typically the ring finger, allowing the intricate artwork to stand out without overwhelming your overall look. Artists often add tiny leaves using sage green or forest green polish to create contrast and depth. The painting process requires 2-3 hours of work but delivers completely unique results that photograph beautifully. We suggest scheduling this service with experienced nail artists who specialize in hand painted designs, as the skill level required is quite advanced.
Pressed Flower Embellishments
Pressed flower embellishments offer authentic botanical beauty that creates genuine texture and dimensional interest on your wedding nails. Real pressed flowers like baby’s breath, small rose buds, or delicate ferns get sealed under layers of clear topcoat for long lasting wear. The application process involves placing the dried flowers onto tacky gel polish using tweezers for precise positioning.
Popular choices include miniature dried roses that echo your wedding bouquet colors or tiny pressed daisies for rustic themed ceremonies. We find that smaller flowers work better than large ones, as they maintain proportion with your nail size. The flowers need complete dehydration before application to prevent color bleeding or deterioration. Professional nail technicians typically charge $15-25 extra per nail for pressed flower applications due to the time intensive nature of the process.
Watercolor Bloom Effects
Watercolor bloom effects capture the soft, dreamy aesthetic of painted florals without requiring advanced artistic skills. This technique uses alcohol based inks or thinned nail polish to create flowing, translucent flower shapes that blend naturally into each other. Artists apply the colors while wet, allowing them to bleed and merge organically across the nail surface.
The process begins with a white or very light base color that serves as the canvas for the watercolor effect. Nail technicians use small brushes or sponges to dab diluted polish onto the nail, creating petal like shapes in soft pastels. Popular color combinations include blush pink and lavender, coral and peach, or classic white and sage green. The finished result resembles delicate watercolor paintings and photographs exceptionally well in natural lighting. We recommend adding a glossy topcoat to intensify the colors and provide protection for your wedding day activities.
Elegant Minimalist Wedding Nails
 2")
We believe minimalist wedding nails offer timeless sophistication that complements any bridal style. These understated designs ensure your hands look polished without competing with your dress or other accessories.
Nude Base With Gold Foil
Nude bases create the perfect canvas for delicate gold foil accents that catch light beautifully. We recommend choosing a nude shade that’s one tone lighter than your natural nail color for the most flattering effect. Apply thin strips of gold foil randomly across 2-3 nails per hand, leaving the remaining nails with just the nude base.
Press the foil gently with a small brush or orange stick to ensure proper adhesion. The key lies in keeping the foil application sparse and organic rather than creating uniform patterns. Seal everything with a high-quality top coat that won’t dull the metallic shine.
Schedule this manicure 24-48 hours before your wedding day since foil can lift if applied too early. We’ve found that this timing allows for any necessary touch-ups while ensuring maximum durability during your celebration.
Simple Geometric Patterns
Geometric designs using thin lines or small shapes add modern elegance without overwhelming your overall look. We suggest limiting patterns to accent nails only, typically the ring finger on each hand. Create clean triangles, thin diagonal lines, or small dots using nail art brushes and contrasting colors.
White or soft gray geometric elements work beautifully against nude or pale pink bases. The contrast should be subtle enough to photograph well but distinct enough to add visual interest. Apply each line with steady, confident strokes for the crispest results.
Practice your chosen geometric pattern on practice wheels or spare nail tips before your wedding week. This preparation ensures you’ll achieve professional-looking results and helps you determine the optimal brush size for your design.
Clean Lines and Negative Space
Negative space designs use strategic bare areas to create sophisticated patterns that appear complex but remain minimal. We recommend starting with a sheer base coat, then using tape or nail vinyls to mask off exact sections before applying your chosen polish color.
Half-moon designs at the cuticle area or vertical strips down the center create striking negative space effects. Remove the tape immediately after applying the final coat to prevent pulling up dried polish. The contrast between polished and natural nail creates an effortlessly chic appearance.
Clear top coat application requires extra attention in negative space designs to ensure even coverage. We apply one thin layer over the entire nail, then a second layer focusing on the polished areas to create uniform shine and protection throughout your wedding festivities.
Glamorous Glitter and Sparkle Options
 3")
Adding sparkle to your wedding nails creates that perfect touch of glamour for your special day. We’ll show you three stunning ways to incorporate glitter and crystals that photograph beautifully and complement your bridal look.
Full Glitter Gradient Nails
Creating a glitter gradient transforms your nails into stunning focal points that catch light with every gesture. Start with a clear base coat, then apply your chosen glitter polish more densely at the nail tips and gradually fade it toward the cuticle area. Gold, silver, and rose gold gradients work exceptionally well for weddings, creating depth without overwhelming your overall aesthetic.
Apply the glitter in thin layers rather than one thick coat to achieve the smoothest finish. Use a makeup sponge to dab and blend the glitter polish, creating that perfect ombre effect from intense sparkle to subtle shimmer. This technique ensures your nails look professionally done and photograph beautifully in your wedding shots.
Seal your gradient with two coats of top coat to prevent glitter from catching on your dress or veil. The additional protection keeps your manicure looking fresh throughout your entire wedding day and reception.
Accent Nail With Crystals
Crystal accent nails add luxury without going overboard on sparkle across all ten fingers. Choose your ring finger on each hand as the accent nail, applying a thin layer of nail glue or specialized crystal adhesive before placing each stone. Swarovski crystals in clear, champagne, or soft pink tones complement most wedding color schemes perfectly.
Position larger crystals near the cuticle area and smaller ones toward the nail tip for balanced visual weight. Use tweezers or a dotting tool to place each crystal precisely, ensuring they’re firmly pressed into the adhesive. This creates a cascading effect that draws the eye without competing with your engagement ring.
Apply crystal accents 24 hours before your wedding to allow proper setting time and test for any loose stones. Pack a small emergency kit with extra crystals and nail glue for quick touch ups if needed during your celebration.
Subtle Shimmer Base Coats
Shimmer base coats provide understated elegance that enhances your natural nail color while adding wedding day sparkle. Choose pearl, champagne, or soft pink shimmer polishes that complement your skin tone and create a luminous finish. These bases work particularly well under sheer colors or as standalone options for minimalist brides.
Layer your shimmer base with complementary nail art like delicate white dots or thin metallic striping tape for added dimension. The subtle sparkle shows through any overlay design, creating depth without overwhelming the overall look. This approach works beautifully with both short and long nail lengths.
Finish with a glossy top coat to amplify the shimmer effect and ensure your manicure photographs well in both natural and artificial lighting. The high shine finish makes your nails appear healthy and perfectly polished in close up shots and candid moments throughout your wedding day.
Vintage-Inspired Nail Ideas for Wedding
 4")
Vintage wedding nails transport us back to the glamorous eras of the past while maintaining modern sophistication. These timeless designs complement vintage-themed weddings perfectly and add historical elegance to any bridal look.
Art Deco Patterns
Geometric lines and bold patterns define this 1920s-inspired nail art that captures the essence of the Jazz Age. We recommend starting with a neutral base color like champagne or soft beige before adding the distinctive angular designs. Creating these patterns requires nail art brushes or striping tape to achieve clean, precise lines that form classic Art Deco motifs.
Popular design elements include chevron patterns, sunburst motifs, and stepped geometric shapes that mirror the architectural style of the era. We suggest using metallic gold or silver polish to outline these patterns, creating striking contrast against your base color. Application technique involves letting each layer dry completely before adding the next geometric element to prevent smudging.
Color combinations work best when we pair deep burgundy or emerald bases with gold accents, or classic black with silver detailing for a more dramatic effect. The key lies in maintaining symmetry across all ten nails while allowing slight variations in pattern placement for visual interest.
Victorian Lace Motifs
Delicate lace patterns bring romantic Victorian elegance to your wedding nails through intricate designs that mirror antique textiles. We achieve these looks using nail stamping plates specifically designed with vintage lace patterns or by hand-painting with fine detail brushes. White or cream polish works beautifully over soft pink or nude bases to create the authentic lace appearance.
Stamping technique requires applying polish to the stamping plate, scraping off excess, then pressing firmly onto the nail for crisp pattern transfer. We recommend practicing this method several times before your wedding day to perfect the pressure and timing needed for flawless results. Hand-painted alternatives offer more customization but require steady hands and patience for the detailed work.
Layering effects enhance the Victorian aesthetic when we combine different lace patterns or add small pearl details at pattern intersections. The finished look should evoke the intricate lacework found on vintage wedding dresses and veils, creating harmony between your nails and overall bridal ensemble.
Antique Gold Details
Rich gold accents transform simple nail designs into vintage treasures that capture the opulence of bygone eras. We apply these details using specialized gold leaf, metallic polish, or gold foil transfer methods depending on the desired intensity and texture. Strategic placement works best when we focus gold elements on accent nails or create delicate borders around each nail.
Gold leaf application involves applying a thin layer of nail glue or special adhesive, then gently pressing the leaf onto the tacky surface before sealing with top coat. This technique creates an authentic antique finish with natural texture variations that mimic aged metal. Foil transfer methods provide more uniform coverage and work well for creating vintage-inspired patterns or filling in stamped designs.
Complementary techniques include combining antique gold with deep jewel tones like sapphire blue or ruby red for a regal Victorian appearance. We can also pair gold details with ivory or champagne bases to create subtle vintage elegance that photographs beautifully under different lighting conditions throughout your wedding day.
Seasonal Wedding Nail Themes
 5")
Seasonal nail designs allow you to celebrate your wedding date while creating a cohesive aesthetic that complements your chosen time of year. Each season offers unique color palettes and motifs that can transform your bridal manicure into a stunning reflection of nature’s beauty.
Spring Pastels and Butterflies
Spring wedding nails embrace soft pastel hues that mirror blooming gardens and fresh beginnings. Lavender, mint green, and blush pink create a dreamy base for delicate butterfly accents that symbolize transformation and new love. We recommend applying a sheer pastel base coat followed by hand-painted butterfly silhouettes using nail art brushes for precise detail work.
Butterfly wing patterns can be achieved through watercolor techniques that blend multiple pastel shades seamlessly. Start with the lightest color and gradually add deeper tones while the polish remains slightly wet for natural color transitions. Small rhinestones placed at butterfly bodies add dimensional sparkle that catches light beautifully in wedding photographs.
Cherry blossom motifs complement butterfly designs perfectly for spring ceremonies. Use dotting tools to create clusters of tiny pink and white flowers along the nail edges, mimicking branches in bloom. This combination creates a romantic garden party aesthetic that works especially well for outdoor spring weddings.
Summer Bright Florals
Summer wedding nails feature vibrant tropical florals that capture the season’s energetic spirit and abundant sunshine. Bold hibiscus flowers in coral and magenta create stunning focal points against bright white or sunny yellow base colors. We suggest using gel polish for these designs to ensure the bright pigments maintain their intensity throughout your celebration.
Tropical leaf patterns in emerald green provide beautiful contrast to bright floral elements. Create palm fronds using striping tape as guides for clean, geometric leaf shapes that frame delicate flower designs. This technique ensures professional-looking results even for beginners attempting detailed nail art.
Sunset gradient backgrounds enhance summer floral designs by mimicking the golden hour lighting of evening receptions. Blend orange, pink, and yellow polishes using makeup sponges for smooth color transitions that serve as the perfect canvas for tropical flower accents. Finish with glossy top coat to amplify the vibrant summer colors.
Fall Autumn Leaves
Fall wedding nails celebrate harvest season with rich burgundy, burnt orange, and golden yellow color schemes that reflect changing foliage. Maple leaf silhouettes painted in metallic copper create sophisticated autumn accents that complement seasonal wedding bouquets. We recommend using nail stamping plates for consistent leaf shapes across all nails.
Ombre effects using fall color palettes create depth and visual interest without overwhelming delicate features. Start with deep burgundy at the nail base and gradually blend to golden yellow at the tips for a stunning sunset leaf effect. This technique works particularly well on almond or coffin nail shapes that provide ample canvas space.
Acorn and oak leaf designs add whimsical touches to fall wedding manicures. Use brown polish to paint tiny acorn caps and golden yellow for oak leaf details, creating a cohesive autumn forest theme. Small gold foil accents highlight leaf veins and add luxury touches that photograph beautifully against fall wedding attire.
Winter Snowflake Designs
Winter wedding nails feature crystalline snowflake patterns that evoke the magical beauty of snow covered landscapes. White and silver polish combinations create elegant frost effects that complement winter wedding gowns perfectly. We suggest using nail art pens to draw intricate snowflake patterns with precise geometric details that mirror real ice crystals.
Holographic top coats transform simple snowflake designs into multi dimensional masterpieces that shift and sparkle like freshly fallen snow. Apply holographic polish over white snowflake patterns to create rainbow prisms that catch light from every angle. This technique works especially well for evening winter receptions with dramatic lighting.
Ice blue and silver gradient backgrounds provide stunning foundations for winter nail art. Create frozen glass effects by layering sheer blue polish over silver chrome base coats, then add white snowflake details for contrast. Small crystal rhinestones placed at snowflake centers create focal points that mirror the sparkle of winter ice formations.
Coordinating Nails With Wedding Colors
 6")
Perfect harmony between your wedding nails and overall color scheme creates a cohesive bridal look that photographs beautifully.
Matching Bridesmaids’ Palette
Creating cohesive nail designs with your bridesmaids strengthens the visual unity of your wedding party. We recommend selecting a base shade that appears in all bridesmaid dresses, then customizing individual accents for each member.
Complementary bridesmaid nail coordination includes:
- Gradient intensity levels – Use the same color family but vary the opacity from light to bold across different bridesmaids
- Accent nail variations – Apply the primary wedding color as an accent on ring fingers while keeping other nails neutral
- Metallic touches – Incorporate gold or silver details that match jewelry selections for a polished appearance
Consider scheduling a group manicure session where everyone receives the same base treatment with personalized finishing touches. This approach ensures consistency while allowing individual expression within your wedding color story.
Complementing Venue Decor
Venue aesthetics provide excellent inspiration for wedding nail color coordination that ties your look to the celebration space. We suggest photographing key decorative elements during venue visits to reference when selecting nail shades.
Popular venue inspired nail combinations include:
| Venue Style | Primary Colors | Recommended Nail Approach |
|---|---|---|
| Garden/Outdoor | Sage green, cream, blush | Soft botanical hues with leaf accents |
| Rustic Barn | Burgundy, gold, ivory | Rich autumn tones with metallic details |
| Modern Ballroom | Black, white, silver | Minimalist designs with geometric patterns |
| Beach Resort | Coral, turquoise, sand | Ocean inspired gradients with shell motifs |
Match architectural details like ornate molding colors or natural stone tones for subtle coordination. Incorporate metallic accents that reflect venue lighting fixtures, whether warm brass or cool silver finishes.
Incorporating Bouquet Shades
Bouquet colors offer the most natural inspiration for wedding nail coordination since your hands will be prominently featured holding these flowers. We recommend requesting flower samples from your florist to ensure perfect shade matching during nail appointments.
Effective bouquet coordination techniques:
- Dominant bloom colors – Select the most prominent flower shade as your primary nail color for seamless integration
- Foliage inspiration – Use eucalyptus green or dusty miller gray as sophisticated base colors with floral accents
- Seasonal flower matching – Incorporate peony pink for spring, sunflower yellow for summer, or deep burgundy dahlia shades for fall
Apply floral nail art that directly mirrors your bouquet composition, using hand painted petals or pressed flower techniques. Consider creating an ombre effect that transitions from bouquet colors at the cuticle to neutral tips, allowing the flowers to appear as natural extensions of your manicure.
Long-Lasting Wedding Day Nail Techniques
 7")
Achieving a flawless manicure that lasts throughout your wedding day requires mastering exact techniques that ensure durability and beauty. These professional methods will help your nails maintain their stunning appearance from ceremony to reception.
Gel Polish Application Tips
We recommend starting with clean, dehydrated nails to create the perfect foundation for gel polish adhesion. Buffing the nail surface lightly removes shine and creates microscopic grooves that help the polish bond effectively. Base coat application should cover the entire nail surface including the free edge to prevent chipping and extend wear time.
Thin layer technique proves essential for achieving salon quality results at home. Apply gel polish in three thin coats rather than one thick layer to prevent bubbling and ensure even coverage. Curing time between each layer should follow manufacturer specifications, typically 30-60 seconds under LED lamps or 2 minutes under UV lamps.
Cap the free edge with each coat of polish to seal the nail tip completely. This technique prevents water damage and extends the manicure’s lifespan significantly. Final top coat application requires careful attention to coverage, ensuring every part of the nail receives protection against daily wear.
| Application Step | Time Required | Professional Tip |
|---|---|---|
| Nail prep | 10 minutes | Use 70% alcohol to dehydrate |
| Base coat | 2 minutes | Cure for full recommended time |
| Color coats | 6 minutes | Apply 3 thin layers |
| Top coat | 2 minutes | Seal free edges thoroughly |
Nail Strengthening Treatments
Protein treatments fortify weak nails and prevent breakage during wedding festivities. Apply strengthening base coats containing keratin or calcium 2-3 times per week leading up to your wedding day. Cuticle oil applications nourish the nail matrix and promote healthy growth while preventing painful hangnails.
Biotin supplements support nail health from within when taken consistently for 6-8 weeks before the wedding. We suggest consulting your doctor before starting any supplement regimen. Hardening formulas create protective barriers on natural nails but should be used sparingly to avoid over-hardening and brittleness.
Nail wraps provide additional strength for severely damaged or weak nails using silk or fiberglass materials. This professional treatment requires salon application but offers superior protection for brides with nail concerns. Regular filing maintains proper nail shape and prevents stress cracks that can lead to breaks.
Proper Cuticle Care
Daily moisturizing keeps cuticles soft and prevents the painful tears that can ruin wedding day photos. Apply cuticle oil or cream every evening, focusing on the nail fold area where dryness typically develops. Gentle pushing techniques using orange wood sticks move cuticles back without causing damage or bleeding.
Professional cuticle removal should occur 2-3 days before the wedding to allow any minor irritation to heal. Never cut cuticles at home as this increases infection risk and can cause irregular regrowth patterns. Exfoliation treatments remove dead skin buildup around the nail area using specialized cuticle scrubs or gentle pumice.
Overnight treatments using intensive cuticle creams or oils repair damaged skin while you sleep. We recommend applying generous amounts and wearing cotton gloves to enhance absorption. Prevention techniques include wearing gloves during cleaning tasks and avoiding harsh chemicals that dry out the delicate cuticle area.
Emergency repair methods for last minute cuticle issues include using clear nail polish to seal small tears and applying antibiotic ointment to prevent infection. Keep cuticle scissors sanitized and sharp for precise trimming if absolutely necessary before the ceremony.
Budget-Friendly DIY Wedding Nail Ideas
 8")
Creating stunning wedding nails doesn’t require expensive salon visits or professional nail artists. We’ve compiled affordable DIY techniques that deliver beautiful results perfect for your special day.
At-Home French Manicure
Start with proper nail preparation by filing nails into your preferred shape and pushing back cuticles gently. Apply a clear base coat to protect your natural nails and create a smooth surface for polish application.
Use tape guides for perfectly straight tips by placing thin strips of tape across each nail about 2-3mm from the tip. Press the edges down firmly to prevent polish from bleeding underneath the tape.
Apply white polish in thin layers using steady brush strokes from one side of the nail to the other. Wait 2-3 minutes between coats and apply a second thin layer for full opacity.
Remove tape immediately after application while the polish is still slightly wet to prevent peeling or chipping. Clean up any imperfections with a small brush dipped in nail polish remover.
Seal with a high-quality top coat for long-lasting wear that withstands wedding day activities. This technique costs under $15 compared to $40-60 at professional salons.
Press-On Nail Alternatives
Choose high-quality press-on nails from reputable brands like Kiss, Dashing Diva, or imPRESS that offer salon-quality results at drugstore prices. Look for sets with multiple sizes to ensure perfect fits for each nail.
Prep your natural nails thoroughly by removing old polish, pushing back cuticles, and lightly buffing the surface. Clean nails with rubbing alcohol to remove oils that could prevent proper adhesion.
Size each press-on nail carefully before application to avoid lifting or premature wear. The press-on should cover your nail from side to side without touching the skin.
Apply firm pressure for 30 seconds per nail and avoid water contact for at least 2 hours after application. Quality press-on nails can last 7-14 days with proper application.
Customize with nail art additions like small rhinestones, nail stickers, or hand-painted details to match your wedding theme. This approach costs $10-20 compared to $80-150 for professional extensions.
Simple Nail Art Tools
Invest in basic dotting tools which create perfect circles, flowers, and geometric patterns with ease. These tools cost $5-8 and replace expensive professional brushes for most wedding nail designs.
Use household items creatively like bobby pins for small dots, tape for clean lines, and sponges for gradient effects. A bobby pin dipped in polish creates uniform dots that rival professional techniques.
Purchase nail art pens in white, gold, and silver for drawing delicate lines, writing initials, or creating lace patterns. These pens offer precise control and cost $3-5 each at beauty supply stores.
Create stamping effects with stencils using cardstock or vinyl stickers cut into desired shapes. Apply base color, place stencil, apply contrasting color, then remove for professional-looking designs.
Build a nail art kit gradually starting with essential tools like cuticle pushers, nail files, and base/top coats. A complete DIY wedding nail kit costs $30-50 compared to multiple salon visits totaling $150-300.
Conclusion
Your wedding day nails deserve the same attention as every other detail of your special celebration. We’ve covered everything from timeless French tips to glamorous glitter designs that’ll make your hands photograph beautifully.
Whether you choose DIY techniques or professional treatments the key is selecting a style that reflects your personality and complements your overall bridal look. Remember that proper preparation and quality application will ensure your manicure stays flawless from ceremony to reception.
Your perfect wedding nails are waiting to be created. Trust your instincts choose techniques that fit your budget and don’t forget to enjoy the process of bringing your bridal vision to life.
Frequently Asked Questions
How long should I schedule my wedding manicure before the big day?
It’s recommended to schedule your wedding manicure 2-3 days before your wedding. This timing allows for any necessary touch-ups and ensures your nails look fresh and perfect. Scheduling too far in advance risks chips or growth showing, while scheduling too close doesn’t leave time for corrections if needed.
What are the most popular wedding nail trends this year?
The most popular wedding nail trends include modern French manicures with lace patterns, romantic floral designs, minimalist nude nails with gold accents, subtle glitter gradients, and vintage-inspired Art Deco patterns. These styles offer versatility while maintaining elegance and sophistication for your special day.
How can I make my wedding nails last all day without chipping?
Use gel polish applied in thin layers, ensure nails are properly cleaned and dehydrated before application, and always finish with a quality top coat. Apply cuticle oil daily leading up to your wedding, and consider professional nail strengthening treatments for added durability.
Should my bridesmaids’ nails match mine exactly?
Bridesmaids’ nails don’t need to match exactly but should complement your overall color scheme. Consider using the same base color with different accent designs, gradient intensity levels, or having them wear a complementary shade that coordinates with your wedding palette for visual unity.
Can I achieve professional-looking wedding nails at home?
Yes, you can create beautiful wedding nails at home using quality base coats, nail art pens, stamping tools, and press-on nails. Key techniques include using tape guides for clean French tips, applying thin polish layers, and investing in good tools for detailed designs.
What nail colors work best for wedding photography?
Classic nude shades, soft pinks, and French manicures photograph beautifully. Avoid overly dark colors that might distract from your dress and rings. Subtle shimmer or pearl accents add dimension without overwhelming the photos, while ensuring your nails complement rather than compete with your overall look.
How do I coordinate my nails with my wedding venue and theme?
Match your nail colors to your venue’s aesthetic – soft pastels for garden venues, metallics for glamorous ballrooms, or rich tones for rustic settings. Consider your bouquet colors and wedding theme when selecting designs, ensuring everything works together for a cohesive bridal look.
What’s the difference between regular polish and gel for weddings?
Gel polish lasts longer (up to two weeks), provides better chip resistance, and maintains high shine throughout your wedding day. Regular polish may require touch-ups and is more prone to chipping during the festivities. For weddings, gel polish is typically the preferred choice for durability.
How can I incorporate seasonal elements into my wedding nails?
Spring weddings can feature soft pastels with butterfly accents, summer allows for tropical florals, fall celebrates rich colors with leaf motifs, and winter showcases elegant snowflake patterns. Choose seasonal colors and motifs that complement your wedding date and overall theme.
What should I do if my nails chip right before the ceremony?
Keep a small nail file and matching polish for emergency touch-ups. For minor chips, file smooth and apply a thin layer of matching polish, followed by top coat. Consider bringing press-on nails as backup or having your nail artist on standby for last-minute repairs.


