As we countdown to midnight and prepare to welcome another year, our nails deserve just as much attention as our party outfits. New Year’s Eve is the perfect opportunity to showcase dazzling nail art that captures the festive spirit and sets the tone for fresh beginnings ahead.
Whether you’re planning an intimate celebration at home or hitting the town for a glamorous night out, the right nail design can elevate your entire look. From glittery gradients that sparkle like fireworks to elegant metallic accents that catch the light, there’s a nail art style for every personality and celebration style.
We’ve curated the most stunning and achievable New Year nail art ideas that’ll have you ringing in the new year with confidence. These designs range from quick DIY options you can master in minutes to more intricate patterns that’ll wow everyone at your celebration.
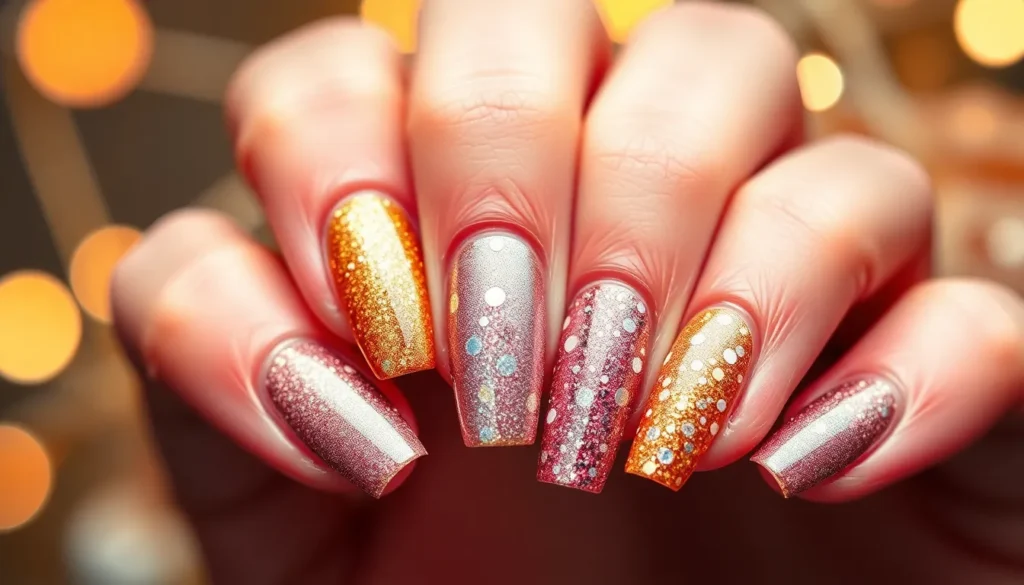
Sparkling Glitter Gradient Nails for Midnight Celebrations
Glitter gradient nails create the perfect sparkle for countdown moments. These shimmering designs catch every light at midnight gatherings.
Gold and Silver Ombre Techniques
Base color application sets the foundation for stunning gradient effects. We recommend starting with a neutral pink or clear base coat before applying your chosen metallic shade. Gold creates warmth and luxury while silver delivers modern elegance.
Sponge blending produces the smoothest gradient transitions. Apply gold polish to one end of a makeup sponge and silver to the other end. Dab the sponge from your nail tip toward the cuticle area with gentle bouncing motions. Repeat this process 3-4 times for optimal opacity.
Brush technique offers more controlled gradient placement. Load a small flat brush with gold glitter polish and sweep from the nail tip downward about halfway. Clean the brush and apply silver polish from the cuticle area upward to meet the gold section. Blend the meeting point with light strokes.
Fine Glitter Application Tips
Layering builds spectacular dimension without clumping. Start with one thin coat of glitter polish and let it dry completely for 2-3 minutes. Apply a second coat focusing on areas where you want maximum sparkle intensity.
Placement creates visual interest through strategic application. Concentrate fine glitter at the nail tips for a classic French gradient look. Alternatively focus glitter at the cuticle base for a reverse gradient effect that’s unexpected yet elegant.
Mixing ratios determine the final glitter density. Combine 2 parts clear polish with 1 part fine glitter for subtle shimmer. Use equal parts for medium coverage or reverse the ratio for maximum sparkle impact.
Sealing Methods for Long-Lasting Shine
Top coat selection determines how long your glitter gradient lasts. We suggest using a thick gel-like top coat that fills in glitter texture gaps. Apply two thin coats rather than one thick application to prevent bubbling.
Capping technique prevents premature chipping at nail edges. After applying your top coat brush the same product over each nail tip edge. This seals the most vulnerable area where chips typically begin.
Drying time affects the final durability of your manicure. Allow 5-7 minutes between each top coat layer and wait 15-20 minutes before captivating in activities. Use quick-dry drops or spray to reduce waiting time without compromising the seal quality.
Elegant Champagne and Gold Nail Designs

Champagne and gold combinations create a sophisticated palette that perfectly balances glamour with understated elegance. These timeless hues offer versatility for any New Year’s celebration while maintaining a refined appearance.
Classic French Tips with Metallic Accents
Transform traditional French manicures by incorporating champagne and gold metallic elements. Replace standard white tips with champagne polish for a modern twist that complements all skin tones. Add thin gold striping tape along the smile line to create definition and visual interest.
Apply gold foil accents to the ring finger for an asymmetrical focal point. Use a fine detail brush to paint delicate gold swirls at the base of each nail. Finish with matte top coat over the base and glossy finish on metallic areas for textural contrast.
Layer different gold tones using striping brushes to create geometric patterns. Start with a light champagne base and build depth with darker gold shades. Seal everything with a high quality top coat for durability throughout your celebrations.
Foil Transfer Techniques
Create stunning metallic effects using gold foil transfer sheets for professional looking results. Apply foil adhesive over your champagne base coat and wait until it becomes tacky. Press gold foil sheets firmly onto the adhesive using a silicone tool or cotton swab.
Remove foil sheets carefully to reveal perfectly transferred metallic patterns. Cut foil into strips for clean lines or tear irregularly for organic textures. Mix different gold foil shades including rose gold and yellow gold for dimensional effects.
Combine foil transfers with nail stamping plates for intricate designs. Apply champagne polish as your base then use clear stamping polish with gold foil for detailed patterns. This technique works exceptionally well for creating lace or damask effects.
Nude Base with Gold Detailing
Start with champagne or nude polish as your canvas for delicate gold artwork. These neutral bases allow gold details to shine without overwhelming the overall design. Paint thin gold lines using striping brushes to create minimalist geometric shapes.
Add gold rhinestones strategically at cuticle lines or nail corners for subtle sparkle. Use dotting tools dipped in gold polish to create perfect circles or dots in various sizes. Build gradient effects by concentrating gold elements toward nail tips.
Create marble effects by dropping gold polish into wet champagne base coat. Use a toothpick to swirl colors together for organic patterns. This technique produces unique results on every nail while maintaining cohesive color harmony across your manicure.
Bold Fireworks-Inspired Nail Art Patterns

Fireworks nail art captures the explosive excitement of New Year’s Eve celebrations with ever-changing patterns that mirror the sky’s spectacular displays. These designs transform your nails into miniature canvases showcasing the energy and vibrancy of midnight festivities.
Burst Design Creation Methods
Start with a dark base color like deep navy, black, or midnight purple to create the perfect backdrop for your firework explosions. Apply two thin coats for even coverage and allow complete drying between layers.
Create the main burst using a fan brush dipped in metallic polish, placing it at your chosen focal point and gently pressing outward in radiating motions. This technique produces natural looking explosion patterns that mimic actual firework displays.
Add smaller secondary bursts using a detail brush loaded with contrasting colors, positioning them strategically around your main design. Layer different sized explosions to create depth and visual interest across the nail surface.
Incorporate streaking effects by dragging a thin brush loaded with glittery polish from the burst center outward, creating those characteristic trailing sparks. Vary the length and direction of these streaks to achieve realistic movement patterns.
Color Combinations for Maximum Impact
| Primary Color | Secondary Color | Accent Color | Effect Created |
|---|---|---|---|
| Deep Navy | Gold | Silver | Classic elegance |
| Black | Hot Pink | Purple | Electric vibrancy |
| Midnight Blue | Copper | Rose Gold | Warm sophistication |
| Charcoal | Neon Green | White | Bold contrast |
Traditional patriotic combinations featuring red, white, and blue create timeless firework designs that celebrate both New Year and national pride. Layer these colors in overlapping bursts for ever-changing visual appeal.
Neon rainbow palettes deliver maximum drama with hot pink, electric blue, lime green, and bright orange creating eye catching displays. These bold combinations perfectly capture the excitement of celebration moments.
Metallic monochrome schemes using varying shades of gold, silver, or copper provide sophisticated alternatives while maintaining the festive firework aesthetic. Mix matte and shimmer finishes within the same color family for added dimension.
Tools for Creating Explosion Effects
Fan brushes remain essential for creating the primary burst patterns, with synthetic bristles offering better control than natural ones. Choose brushes with varying widths to create different sized explosions across your nail design.
Detail brushes with fine tips enable precise placement of smaller bursts and trailing spark effects. Keep multiple brushes dedicated to different colors to avoid unwanted mixing during the design process.
Dotting tools create perfect circular bursts when pressed into wet polish and pulled outward with a twisting motion. Use various sizes to build layered explosion effects that add complexity to your firework patterns.
Striping tape helps create clean geometric burst patterns and can be removed after polish application to reveal sharp lines. Apply tape in radiating patterns from your burst center for professional looking results.
Sponges work excellently for blending multiple colors within a single burst, creating that authentic firework gradient effect. Cut sponges into small pieces and dab different colors outward from the center point.
Sophisticated Black and Gold Statement Nails

Black and gold combinations create the ultimate sophisticated nail look for New Year’s celebrations. We’ll explore luxurious design techniques that elevate your manicure beyond simple color combinations.
Geometric Pattern Ideas
Angular stripes transform black bases into modern masterpieces using gold striping tape or thin brushes. We recommend creating diagonal lines across each nail at varying angles for ever-changing visual interest. Triangular sections work beautifully when we alternate black and gold colors in pyramid shapes or arrow formations.
Hexagonal patterns offer geometric sophistication by outlining shapes with gold polish on black backgrounds. We suggest using nail vinyls or stencils to achieve clean edges and precise geometric boundaries. Negative space designs showcase both colors effectively when we leave strategic sections unpainted and fill others with metallic gold accents.
Grid patterns create structured elegance using thin gold lines to divide black nails into squares or rectangles. We find that varying the grid sizes across different nails adds visual complexity without overwhelming the overall design. Art deco inspired motifs capture vintage glamour through stepped patterns and fan shapes that mirror the roaring twenties aesthetic.
Marble Effect Techniques
Water marbling creates organic black and gold swirls by dropping both polish colors into room temperature water. We gently drag a toothpick through the colors to create marbled patterns before dipping each nail into the design. Dry brush techniques achieve subtle marble veining by loading a fan brush with gold polish and lightly dragging it across black base coats.
Plastic wrap method produces unique marble textures when we press crumpled plastic against wet black polish and dab gold accents over the textured surface. We recommend working quickly before the base color dries to ensure proper blending. Feathering technique involves using a small brush to create delicate gold veins that mimic natural marble formations across black backgrounds.
Sponge blending creates gradient marble effects by dabbing gold polish onto makeup sponges and pressing onto black bases in organic patterns. We find that rotating the sponge creates more realistic marble flow patterns that catch light beautifully under party lighting.
Accent Nail Placement Strategies
Ring finger focus remains the classic choice for statement black and gold designs while keeping other nails in solid colors. We suggest applying intricate patterns or textures exclusively to ring fingers for balanced elegance. Thumb accent works particularly well for geometric black and gold patterns since thumbs provide larger canvases for detailed artwork.
Multiple accent approach involves selecting two nails per hand for sophisticated black and gold treatments while maintaining coordinating solid colors on remaining nails. We recommend choosing non adjacent fingers like the ring finger and index finger to create visual balance across both hands.
Gradient placement creates flow by applying the most elaborate black and gold designs to ring fingers and simpler versions to adjacent nails. We find this technique particularly effective for marble effects that seem to spill naturally from one nail to neighboring fingers. Alternating patterns work when we apply different black and gold techniques to each accent nail while maintaining the same color palette throughout the manicure.
Festive Confetti and Party-Themed Designs

Capturing the playful spirit of New Year’s Eve celebrations becomes effortless with confetti-inspired nail art that brings the party atmosphere directly to your fingertips. These vibrant designs create the perfect transition from sophisticated metallics to fun, celebratory patterns.
Multicolored Dot Patterns
Creating random confetti dots transforms plain nails into festive masterpieces that mirror actual party confetti. Start with a clear or nude base coat, then use a dotting tool or bobby pin to place irregular dots across each nail in varying sizes. Traditional confetti colors include bright pink, electric blue, sunny yellow, lime green, and hot orange for maximum visual impact.
Layering different dot sizes adds depth and authentic confetti movement to your design. Apply larger dots first using the rounded end of a bobby pin, then fill in spaces with smaller dots created by toothpicks or detail brushes. Scatter the dots randomly rather than in organized patterns to mimic how real confetti falls naturally.
Color Distribution Techniques:
| Pattern Type | Primary Colors | Application Method | Finish Effect |
|---|---|---|---|
| Rainbow Scatter | 5-7 bright colors | Random placement | Playful chaos |
| Pastel Confetti | Soft pink, mint, lavender | Clustered dots | Gentle celebration |
| Metallic Mix | Gold, silver, copper | Varying opacity | Luxe party feel |
| Neon Burst | Electric colors | Dense application | High energy |
Sealing multicolored dots requires patience to prevent smudging the various polish layers. Allow each color to dry completely before applying the next, then finish with two thin coats of high-quality top coat for durability.
Sequin Application Methods
Adhering actual sequins to nails creates three-dimensional texture that catches light beautifully during party activities. Choose small sequins ranging from 2-4mm in diameter to maintain comfort while typing or handling objects throughout the evening. Apply a base coat first, then place sequins onto wet polish using tweezers for precise positioning.
Different sequin shapes offer unique visual effects for your New Year’s celebration nails. Round sequins provide classic confetti appearance, while star-shaped options add celestial magic to complement midnight themes. Heart sequins work perfectly for romantic New Year’s Eve dates, and hexagonal shapes create modern geometric appeal.
Sequin Securing Process:
- Base preparation – Apply two coats of your chosen base color
- Wet application – Place sequins while the second coat remains tacky
- Pressure setting – Gently press each sequin to ensure adhesion
- Top coat sealing – Apply thin layers around sequins to prevent lifting
- Edge smoothing – Use a small brush to blend top coat over sequin edges
Removing sequin nails requires gentle soaking rather than aggressive scraping. Wrap each finger in acetone-soaked cotton and aluminum foil for 10-15 minutes to dissolve both polish and adhesive safely.
Party Hat and Balloon Motifs
Drawing miniature party hats transforms nails into tiny celebration scenes that perfectly capture New Year’s festivity. Begin with triangle shapes using striping brushes, then add horizontal stripes in alternating colors like traditional party hat patterns. Tiny dots or stars on the hat tips create whimsical pom-pom effects that enhance the celebratory theme.
Balloon designs bring childhood joy and party atmosphere to sophisticated nail art presentations. Paint oval shapes in various bright colors, then add thin curved lines extending downward to represent balloon strings. Clustering multiple balloons on accent nails while keeping others simple maintains visual balance across your manicure.
Motif Placement Strategies:
- Feature nail approach – Place detailed motifs on ring fingers only
- Accent clustering – Group designs on two adjacent nails
- Scattered placement – Distribute single motifs across random nails
- Gradient complexity – Start simple, build to detailed designs
Adding dimensional elements enhances these playful motifs significantly. Apply small rhinestones to hat tips for sparkle, or use matte top coat on balloon bodies with glossy strings for textural contrast. These subtle details elevate simple drawings into professional-looking party themed nail art that celebrates the joyous spirit of New Year’s Eve festivities.
Minimalist New Year Date and Number Art

Numbers and dates become the star of minimalist New Year nail designs. We’re shifting from elaborate decorations to clean, sophisticated typography that celebrates the significance of the moment.
Typography Design Options
Bold sans-serif numerals create the strongest visual impact on nail surfaces. We recommend using Helvetica-inspired fonts or geometric number styles that maintain readability at small sizes. Script numerals work beautifully for romantic New Year celebrations, particularly when written in metallic gold or rose gold polish.
Stenciled numbers provide consistent results across all ten nails. We suggest investing in nail art stencils specifically designed for numeric characters, ensuring uniform sizing and spacing. Hand-painted numbers offer more personalization but require steady brush control and practice on practice wheels before application.
Mixed typography adds visual interest without overwhelming the design. We often combine bold years like “2025” with delicate script for “Happy New Year” text. Block letters work exceptionally well for short phrases like “CHEERS” or “PARTY” when applied to accent nails.
Digital-inspired fonts reflect modern minimalism perfectly. We create pixelated numbers using small square dots or geometric sans-serif styles that mirror smartphone displays. These contemporary approaches appeal to younger demographics while maintaining sophisticated appeal.
Placement and Sizing Guidelines
Single accent nails showcase date typography most effectively. We typically place “2025” or countdown numbers on ring fingers, allowing other nails to remain neutral or feature subtle complementary designs. This approach creates focal points without overwhelming the overall manicure.
Vertical placement maximizes space utilization on longer nail shapes. We position years vertically along the nail length, particularly effective on coffin or stiletto shapes where horizontal space is limited. Horizontal placement works better on shorter, wider nail beds like oval or square shapes.
Size proportions should occupy 60-70% of the visible nail surface. We ensure numbers remain readable while leaving adequate negative space around edges. Oversized typography can appear cluttered, while undersized text loses impact and readability from normal viewing distances.
Multi-nail sequences tell complete stories across the manicure. We might spell out “H-A-P-P-Y” across five nails on one hand, with “2-0-2-4” on the other hand. This technique requires careful planning to ensure balanced visual weight distribution.
Color Palette Suggestions
Monochromatic schemes emphasize typography over color complexity. We recommend black numbers on white bases for maximum contrast, or white numerals on black backgrounds for dramatic effect. These high-contrast combinations ensure readability while maintaining minimalist aesthetics.
Metallic accents elevate simple number designs without adding visual clutter. We frequently use gold or silver typography on nude or clear bases, creating elegant sophistication perfect for upscale New Year celebrations. Rose gold offers warmth while maintaining modern appeal.
Tonal variations within single color families create subtle depth. We might use charcoal numbers on light gray bases, or navy typography on powder blue backgrounds. These approaches provide contrast while maintaining cohesive color stories throughout the manicure.
Negative space designs let natural nails show through strategic areas. We outline numbers in thin metallic lines while leaving centers transparent, or create stenciled effects where numbers appear as clear sections against colored backgrounds. These techniques reduce visual weight while maintaining impact.
Midnight Sky and Star-Studded Nail Ideas

We’ll transform our nails into a celestial canvas that captures the magic of New Year’s Eve night skies. These midnight sky designs offer an enchanting alternative to traditional party themes while maintaining the glamour perfect for countdown celebrations.
Galaxy Effect Creation
Create stunning galaxy backgrounds using sponge blending techniques with deep navy, purple, and black polishes. Start by applying a black base coat and allow it to dry completely before beginning the galaxy effect. Dab a makeup sponge lightly into dark purple polish and blend it onto two-thirds of each nail, creating organic cloud-like formations that mimic distant nebulas.
Layer multiple colors to achieve depth and dimension in your cosmic design. Apply navy blue over some purple areas using the same sponging technique, leaving portions of the purple visible for natural color variation. Add touches of deep teal or burgundy in select areas to create the rich color variations found in actual galaxy photography.
Finish with strategic glitter placement to represent distant stars and cosmic dust. Use a small detail brush to dab silver and gold glitter in varying sizes across the galaxy base. Concentrate more glitter in lighter colored areas to simulate the bright centers of galaxies, while sparsely placing smaller glitter pieces in darker regions for realistic depth.
Constellation Patterns
Map out constellation designs using white or metallic polish to create recognizable star patterns. Choose simple constellations like the Big Dipper, Orion’s Belt, or Cassiopeia that translate well to the small canvas of fingernails. Use a thin detail brush or dotting tool to place individual stars, varying the sizes slightly for natural appearance.
Connect constellation points with ultra-thin lines using a striping brush or nail art pen. Keep these connecting lines subtle and delicate, using a slightly darker shade than your star color so they don’t overpower the design. Draw lines freehand for a more organic feel, or use nail tape as a guide for perfectly straight connections between star points.
Combine multiple constellations across different nails to create a complete star map design. Place larger constellations like Orion on accent nails while using smaller patterns like the Southern Cross on remaining fingers. This approach allows you to tell a celestial story across your entire manicure while maintaining visual balance and preventing any single nail from appearing overcrowded.
Holographic Polish Applications
Apply holographic top coats over your midnight sky base to create an ethereal rainbow effect that shifts with movement. Choose holographic polishes with fine particle sizes for subtle shimmer, or select chunky holographic glitters for more dramatic light reflection. Apply these coats while your base design is completely dry to prevent smudging underlying artwork.
Layer holographic elements strategically to enhance exact areas of your celestial design without overwhelming the entire nail. Focus holographic application on constellation points to make stars appear more luminous, or apply it selectively to galaxy centers for added dimension. Use a small detail brush to place holographic polish precisely where you want maximum light reflection.
Seal holographic effects with a high-quality top coat that preserves the light-reflecting properties while protecting your design. Choose top coats specifically formulated for nail art that won’t dull the holographic finish. Apply thin, even coats and allow each layer to dry completely before adding the next, ensuring your midnight sky design maintains its celestial sparkle throughout your New Year’s celebrations.
Rose Gold and Copper Trendy Designs

We’re embracing the warmth and sophistication of rose gold and copper tones that perfectly bridge elegant metallics with cozy winter vibes. These lustrous shades create stunning nail art that feels both modern and timeless for your New Year celebrations.
Warm Metallic Color Schemes
Rose gold serves as our foundation color, offering a perfect blend of pink undertones and metallic shimmer that complements all skin tones. We recommend pairing it with deep burgundy or wine shades to create rich contrast that feels luxurious yet approachable.
Copper tones add depth and earthiness to our metallic palette, working beautifully alongside rose gold for a cohesive gradient effect. Mix copper with warm browns or burnt orange shades to create an autumn-meets-winter aesthetic that’s perfect for New Year’s Eve.
Champagne accents elevate the entire design, bridging the gap between our warmer metals and traditional gold. We suggest using champagne as highlighting color on cuticle areas or as delicate striping details across rose gold bases.
Bronze elements ground the palette, providing darker metallic tones that prevent the design from appearing too light or washed out. Apply bronze in geometric patterns or as accent nail base colors to create visual weight distribution.
Textured Finish Techniques
Brushed metal effects create sophisticated texture that mimics real metallic surfaces on your nails. We achieve this by dragging a dry brush through wet metallic polish in one direction, creating subtle linear patterns that catch light beautifully.
Hammered finish techniques add dimension through gentle stippling motions with a makeup sponge dipped in contrasting metallic shades. Press the sponge lightly across rose gold base colors to create organic texture that resembles handcrafted metal jewelry.
Foil application methods deliver mirror-like shine that transforms ordinary polish into stunning metallic statements. We recommend using transfer foil over tacky base coats, pressing firmly with silicone tools to ensure complete adhesion without air bubbles.
Magnetic polish techniques create wave patterns when used with specialized magnets held near wet polish surfaces. These create flowing lines that mimic molten metal textures, particularly striking with copper and rose gold formulations.
Layering Methods for Depth
Base coat preparation ensures smooth application of multiple metallic layers without streaking or clumping. We always start with ridge-filling base coats that create perfectly even surfaces for our metallic polishes to adhere properly.
Gradient layering builds color intensity by applying sheer coats of rose gold followed by concentrated copper applications on nail tips. This creates natural ombre effects that transition seamlessly from light to dark metallic tones.
Strategic accent placement maximizes visual impact without overwhelming the overall design aesthetic. We recommend limiting heavy copper applications to ring finger accent nails while maintaining rose gold consistency across remaining fingers.
Top coat selection affects final appearance significantly, with matte finishes creating subtle luxury while high-gloss formulations amplify metallic shine. Apply thin, even coats to prevent dulling the underlying metallic pigments and ensure longevity throughout your celebrations.
Countdown Clock and Time-Themed Nail Art

Transform your nails into timepieces that celebrate the final moments before the new year arrives. These time-themed designs capture the anticipation and excitement of counting down to midnight.
Clock Face Design Elements
Clock face designs turn your nails into miniature timepieces that symbolize the transition from old year to new. We recommend starting with a neutral base color like cream or light gray to mimic traditional clock faces. Round shapes work best for accent nails, where you can paint delicate clock hands pointing to 11:59 or midnight using thin black or metallic polish.
Hour markers add authentic detail to your clock face manicures. Draw small dots or lines at the 12, 3, 6, and 9 positions using a fine detail brush. Gold or silver polish creates the most realistic effect. For more elaborate designs, paint all twelve hour markers around the nail’s perimeter. This technique works especially well on longer nail shapes that provide more canvas space.
Vintage pocket watch aesthetics elevate your time-themed manicure with sophisticated charm. Apply an antique gold base and add ornate details like decorative borders and roman numerals. Small chains painted across adjacent nails create a cohesive pocket watch theme. Finish with matte top coat to achieve an authentic aged metal appearance.
Roman Numeral Patterns
Roman numeral sequences create elegant time displays that feel both classic and celebratory. Paint “XII” at the top of your accent nail to represent midnight, using metallic gold or silver polish for maximum impact. Smaller numerals like “XI” and “I” can frame the main design on adjacent nails. This approach tells the story of approaching midnight across multiple fingers.
Placement strategies maximize the visual impact of roman numeral designs. We suggest positioning larger numerals on ring fingers as statement pieces, then adding smaller supporting numerals on middle and index fingers. Vertical placement works well for longer nails, while horizontal layouts suit shorter nail shapes. Balance prevents the design from appearing cluttered or overwhelming.
Metallic finishes enhance roman numeral visibility and add luxury to your time-themed manicure. Chrome polish creates mirror-like numerals that catch light beautifully during celebrations. Rose gold numerals pair perfectly with burgundy or deep purple bases. For subtle elegance, try champagne-colored numerals over nude polish. Each metallic choice creates a different mood while maintaining the sophisticated time theme.
Countdown Number Sequences
Sequential numbering across your nails creates an interactive countdown experience. Start with “5” on your thumb and progress through “4,” “3,” “2,” “1” on each finger, with a celebratory design on your pinky. Bold block numerals ensure easy readability from across the room. This technique works particularly well for party photography and social media posts.
Digital clock displays offer a modern twist on countdown themes. Paint rectangular frames on each nail and fill them with red or green digital-style numbers. The pixelated appearance of digital fonts adds contemporary flair to your New Year manicure. We recommend using white or bright colored bases to make the digital numbers pop.
Countdown placement options allow for creative expression while maintaining the time theme. Try placing countdown numbers vertically down one nail for a unique timeline effect. Alternatively, scatter random countdown numbers across all nails with decorative stars and sparkles filling the negative space. Multiple countdown sequences on different hands can represent various time zones or celebration moments throughout New Year’s Eve.
Conclusion
We’ve explored countless ways to make your nails shine as brightly as your New Year’s resolutions. From sparkly gradients that catch the midnight light to sophisticated rose gold elegance every design we’ve shared helps you express your unique style while celebrating this special moment.
The beauty of New Year’s nail art lies in its versatility. Whether you’re drawn to bold firework patterns or prefer minimalist countdown designs there’s a perfect look waiting for your fingertips. These aren’t just temporary decorations – they’re confidence boosters that’ll carry you into the new year with style.
Remember that the best nail art is the one that makes you feel amazing. Take these ideas experiment with your favorites and don’t be afraid to add your personal touch. Your nails are ready to help you sparkle into the new year with unforgettable flair.
Frequently Asked Questions
What makes nail art important for New Year’s Eve celebrations?
Nail art is a crucial part of New Year’s Eve style because it complements your party outfit and helps you showcase festive spirit. Just like choosing the perfect dress or accessories, your nails deserve attention as they’re often visible during toasts, photos, and celebrations. Well-designed nails can boost confidence and set a positive tone for the new year.
How do I create sparkling glitter gradient nails for midnight celebrations?
Start with a base coat, then apply your chosen nail polish. While it’s still slightly tacky, use a makeup sponge to dab glitter polish from the tip toward the cuticle, creating a gradient effect. You can also use a fan brush for more precise application. Seal with a quality top coat and allow proper drying time for long-lasting shine.
What are the best color combinations for champagne and gold nail designs?
Champagne and gold create an elegant, sophisticated palette perfect for New Year’s. Try champagne polish with gold striping tape, or use gold foil accents on champagne bases. For French manicures, replace white tips with champagne and add gold detailing. Nude bases with minimal gold accents also create a refined, understated look.
How can I create fireworks-inspired nail art patterns?
Use dark base colors like navy or black, then create burst patterns with metallic polishes using fan brushes or detail brushes. Start from a central point and draw radiating lines outward. Add smaller bursts with dotting tools and use streaking techniques for realistic firework effects. Traditional patriotic colors or vibrant neons work best.
What techniques work best for black and gold statement nails?
Try geometric patterns like angular stripes, triangular sections, or hexagonal designs using black and gold polishes. Water marbling creates organic swirls, while dry brush techniques and sponge blending add texture. Focus accent nails on ring fingers or thumbs to highlight intricate designs while maintaining visual balance across your manicure.
How do I apply sequins and create confetti-themed designs?
For confetti effects, layer multicolored dots of varying sizes using dotting tools or brush tips. For sequins, apply a base coat, place sequins while polish is tacky, then seal with top coat. Use tweezers for precise placement and choose various shapes for visual interest. Multiple thin top coats ensure sequins stay secure.
What’s the best approach for minimalist New Year date and number art?
Choose bold sans-serif numerals for impact or script fonts for romance. Use stencils for consistency or try mixed typography for interest. Place numbers on accent nails or create sequences across multiple nails. Stick to monochromatic schemes, metallic accents, or negative space designs to maintain the minimalist aesthetic while celebrating the new year.
How can I create realistic midnight sky and star designs?
Use sponge blending with deep navy, purple, and black polishes to create galaxy backgrounds. Layer colors for depth, then add stars with white or metallic polish using dotting tools. Connect stars with thin lines to form constellations. Finish with holographic polish for a magical, light-catching effect that mimics the night sky.
What makes rose gold and copper tones perfect for New Year nails?
Rose gold and copper offer sophisticated warmth that bridges elegant metallics with cozy winter vibes. These tones pair beautifully with deep burgundy or wine shades for luxury contrast. They’re versatile enough for both minimalist and elaborate designs, and the warm undertones complement most skin tones while maintaining festive elegance.
How do I create countdown clock and time-themed nail art?
Start with neutral bases and use metallic accents to draw clock faces. Try vintage pocket watch designs with Roman numerals or modern digital displays. Create countdown sequences across multiple nails, placing numbers strategically for visual impact. Use thin brushes for clock hands and detail work, ensuring proportional spacing for realistic time displays.