Long nails are the perfect canvas for showcasing your creativity and personal style. Whether you’ve spent months growing them out naturally or opted for extensions, those extra millimeters of nail space open up a industry of artistic possibilities that shorter nails simply can’t accommodate.
We’ve curated an inspiring collection of nail art ideas specifically designed to make your long nails the ultimate statement piece. From intricate geometric patterns and delicate floral designs to bold color combinations and eye-catching embellishments, these ideas will transform your nails into miniature works of art.
Ready to elevate your manicure game? We’ll walk you through stunning designs that range from beginner-friendly options you can master at home to show-stopping looks that’ll have everyone asking where you got them done. Let’s jump into these gorgeous nail art concepts that’ll make your long nails impossible to ignore.
Classic French Tips With Modern Twists
French manicures remain timeless, yet we’re seeing exciting contemporary updates that breathe new life into this classic style. These modern interpretations maintain the elegant foundation of traditional French tips while incorporating fresh elements that make them perfect for today’s nail art enthusiasts.
Colored French Tips
Vibrant hues replace the traditional white tips to create eye-catching alternatives to classic French manicures. We love experimenting with bold colors like electric blue, coral pink, or emerald green for the tip portion while keeping the base in natural tones. Pastel variations work beautifully for spring and summer, featuring soft lavender, mint green, or peachy pink tips that add subtle sophistication.
Ombre French tips blend multiple colors seamlessly from the cuticle to the tip, creating stunning gradient effects. This technique works exceptionally well on long nails since there’s ample space for color transitions. We recommend starting with complementary colors like blue to purple or pink to orange for the most striking results.
Geometric French Designs
Angular lines and sharp edges transform traditional curved French tips into contemporary geometric masterpieces. We create triangular tips, diagonal cuts, or zigzag patterns that add modern flair to this classic style. These designs work particularly well with contrasting colors, such as black geometric tips on nude bases or metallic silver angular designs.
Negative space French manicures incorporate clear sections within the tip area, creating interesting visual breaks in the design. We achieve this by using tape or stencils to block out geometric shapes before applying the tip color. The result is a sophisticated look that plays with transparency and opacity.
Double French tips feature two distinct tip colors or patterns layered for added dimension. We often pair thin metallic lines with broader colored tips, or combine matte and glossy finishes for textural contrast.
Glitter French Manicures
Sparkly French tips add glamour while maintaining the classic silhouette we all recognize and love. We apply glitter polish only to the tip area, creating a sophisticated sparkle that’s perfect for evening events or special occasions. Fine glitter creates subtle shimmer, while chunky glitter makes bold statements.
Glitter gradients fade from intense sparkle at the tips to clear glitter particles near the base, creating smooth transitions that look professionally done. We layer different glitter sizes and colors to achieve depth and complexity in these designs.
Accent nail combinations pair glitter French tips on most nails with full glitter coverage on one or two accent nails. This approach balances elegance with drama, allowing us to incorporate bold sparkle without overwhelming the overall look.
Ombre and Gradient Nail Designs

Building on our exploration of French manicure variations, ombre and gradient designs offer another sophisticated approach to long nail artistry. These flowing color transitions create stunning visual effects that showcase the full length of your nails.
Sunset Ombre Effects
Create breathtaking sunset gradients by blending warm oranges, pinks, and yellows across your nail surface. We recommend starting with a light base coat in pale yellow, then sponging on coral and deep orange toward the tips for that perfect golden hour glow. Professional nail artists often use makeup sponges cut into small pieces to achieve seamless color transitions without harsh lines.
Apply the lightest shade first as your base color, covering the entire nail from cuticle to tip. Working quickly while the polish remains wet, dab the middle shade onto a damp sponge and gently press it onto the middle and tip sections of your nail. Finish by adding the darkest color to just the tip area, blending upward with gentle dabbing motions.
Enhance your sunset design with tiny white dots to represent stars or a thin gold foil stripe along the gradient line. These small details transform a simple ombre into a miniature work of art that captures everyone’s attention.
Glitter Gradient Techniques
Master the art of sparkle placement by concentrating glitter density toward your nail tips while keeping the base area more subtle. We suggest using a clear base coat first, then applying your chosen base color before adding glitter polish in increasing layers from middle to tip.
Build your glitter gradient gradually using a fan brush or small makeup sponge to control the sparkle distribution. Start by applying glitter polish to just the tips, then work backward toward the middle of your nail with lighter, more sparse coverage. This technique prevents overwhelming the entire nail with too much sparkle.
Combine different glitter sizes for added dimension and visual interest in your gradient design. Fine glitter creates a smooth, shimmery base while chunky hex glitter adds dramatic focal points near the tips. Seal everything with a high quality top coat to smooth out texture differences and enhance shine.
Color Fade Combinations
Experiment with complementary color pairings like deep purple fading to soft lavender or emerald green transitioning to mint for sophisticated gradient effects. We’ve found that staying within the same color family creates the most natural looking fades while maintaining visual impact.
Try unexpected color transitions such as navy blue melting into rose gold or burgundy flowing into nude pink for unique gradient combinations. These bold pairings work especially well on longer nails where you have more space to showcase the full color journey.
Perfect your blending technique by working with three colors instead of two for smoother transitions. Use your lightest shade at the base, medium tone in the center, and darkest color at the tips. This three step approach eliminates harsh lines and creates professional looking gradients that rival salon results.
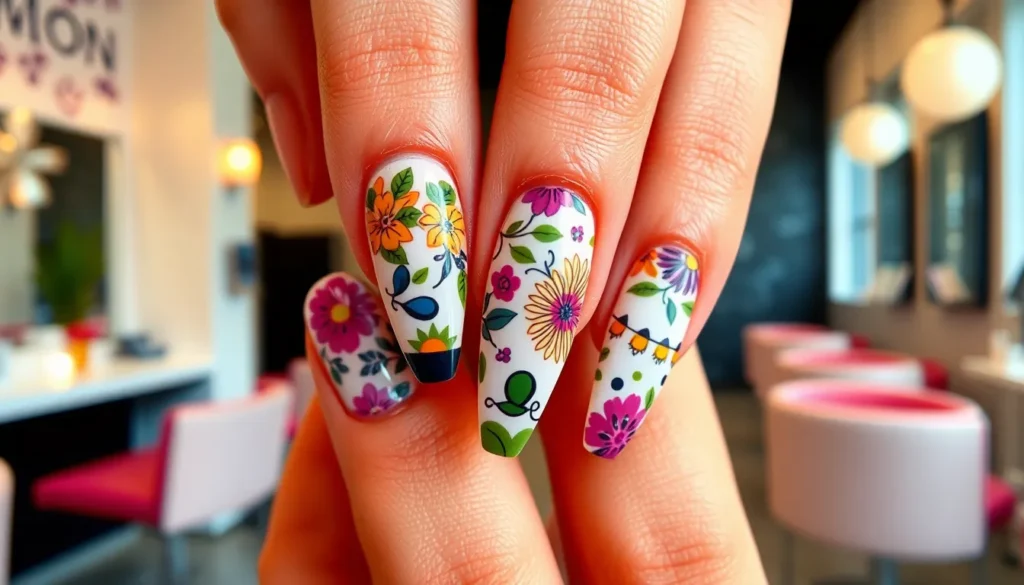
Intricate Floral Nail Art Patterns

Building on the gradient techniques we’ve explored, floral nail art takes your long nails to artistic heights with nature-inspired designs that showcase delicate craftsmanship and creative flair.
Hand-Painted Roses and Petals
Hand-painted roses transform your extended nail canvas into miniature masterpieces that capture romantic elegance. We recommend starting with a neutral base like soft pink or cream to make the floral elements pop. Detailed rose designs work exceptionally well on accent nails, allowing you to create focal points without overwhelming the entire manicure.
Traditional red roses offer timeless sophistication when painted with fine detail brushes and quality acrylic paints. Layer petals using darker shades for depth, then highlight edges with lighter tones to create dimensional effects. Thorny stem details extending down the nail bed add botanical authenticity to your rose designs.
Watercolor-style roses provide a modern twist on classic floral motifs through soft, blended techniques. Blend colors while they’re still wet to achieve that dreamy watercolor effect. Pink and peach combinations work beautifully for spring looks, while deep burgundy and wine shades create dramatic autumn vibes.
Tropical Flower Designs
Tropical flower patterns bring vibrant island energy to your long nail art with bold hibiscus, plumeria, and bird of paradise designs. Bright coral, sunny yellow, and electric pink create authentic tropical color palettes. We suggest using these statement florals on one or two accent nails paired with complementary solid colors.
Hibiscus flowers showcase dramatic five-petal structures that fill your nail space with tropical luxury. Paint the base petals in vibrant orange or pink, then add darker centers with contrasting stamens for authentic detail. Gradient shading from light to dark creates natural petal depth that mimics real hibiscus blooms.
Palm leaf accents complement tropical flowers perfectly by adding lush greenery elements to your design scheme. Feathery palm fronds painted in various green shades provide beautiful contrast against bright flower colors. These botanical elements work especially well as background details or side accents.
Minimalist Botanical Elements
Minimalist botanical designs prove that subtle floral elements can create sophisticated nail art without overwhelming your look. Single-stem flowers, delicate leaf patterns, and simple botanical line work offer elegant alternatives to complex designs. These understated elements work perfectly for professional settings or everyday wear.
Fine line flower stems create graceful designs that emphasize your nail length while maintaining workplace appropriate aesthetics. Use thin brushes to paint single stems that curve naturally with your nail shape. Small flower buds or leaves placed strategically along the stems add interest without complexity.
Pressed flower effects achieve botanical beauty through translucent layering techniques that mimic real dried flowers. Apply sheer base coats, then use fine brushes to create delicate petal outlines in muted colors. Seal with clear topcoat for a glass-like finish that protects your artistic work while improving the pressed flower illusion.
Bold Geometric and Abstract Designs

After exploring delicate florals and soft gradients, we’re shifting focus to sharp, contemporary designs that make powerful statements on long nails.
Negative Space Patterns
Utilizing negative space creates striking visual contrasts that emphasize the natural nail while incorporating bold design elements. We recommend starting with a clear base coat and using striping tape to create precise geometric cutouts. Triangle patterns work exceptionally well on longer nails, allowing us to position sharp angles at varying heights for ever-changing visual interest.
Circular cutout designs offer a softer approach to negative space art while maintaining geometric precision. We achieve these by using reinforcement stickers as guides, painting around them with bold colors like deep navy or burgundy. The exposed natural nail creates breathing room that prevents the design from appearing overwhelming.
Asymmetrical negative space patterns push creative boundaries by combining different shapes and sizes within the same design. We strategically place squares, rectangles, and triangles at different angles across each nail, creating a modern art gallery effect that showcases technical precision.
Color Blocking Techniques
Sharp color transitions define successful color blocking designs that transform long nails into contemporary art pieces. We select contrasting shades like electric blue paired with coral pink, applying each color in distinct sections without blending. The extended nail length provides ample space for multiple color blocks per nail.
Vertical color blocking elongates the nail appearance while creating sophisticated patterns. We divide each nail into two or three vertical sections using striping tape, alternating between complementary colors such as mint green and dusty rose. This technique works particularly well with matte topcoats for a modern finish.
Diagonal color blocking adds ever-changing movement to the overall design by creating angular divisions across the nail surface. We position tape at 45-degree angles and apply bold colors like sunshine yellow and deep purple to create eye-catching contrasts that draw attention to hand gestures.
Angular Line Work
Precise geometric lines serve as the foundation for sophisticated abstract nail art that showcases technical skill. We use fine nail art brushes and steady hands to create intersecting lines, triangular patterns, and diamond shapes in contrasting colors. Metallic gold or silver lines add luxury elements to otherwise minimalist designs.
Chevron patterns bring structured beauty to long nail canvases through repetitive V-shaped lines. We layer multiple chevrons in gradient colors, starting with deep teal at the base and transitioning to light aqua at the tips. This creates depth while maintaining clean geometric appeal.
Intersecting line grids transform nails into modern architectural masterpieces through carefully planned line placement. We create complex patterns using multiple colors, allowing lines to cross and overlap at strategic points. Black lines on white bases create classic contrast, while rainbow grids on clear bases offer playful sophistication.
Textured and 3D Nail Art Creations

Moving beyond flat designs, we’re exploring dimensional nail art that transforms your nails into tactile masterpieces. These elevated techniques add depth and visual interest that catches light beautifully.
Rhinestone Embellishments
Rhinestone placement creates instant glamour on long nail surfaces. We recommend starting with a neutral base color to make crystals pop dramatically. Strategic placement along the cuticle line or nail tip creates elegant accent points without overwhelming the design.
Crystal clustering works exceptionally well near the nail bed area. Choose varying sizes of rhinestones like 2mm, 3mm, and 4mm crystals to create natural looking arrangements. Secure each stone with nail glue and seal with a thick topcoat for longevity.
Linear rhinestone designs follow the natural curve of your nails beautifully. Create flowing lines that start thin at the cuticle and expand toward the tip. This technique elongates the nail visually while adding sophisticated sparkle that catches light from multiple angles.
Sculptured Acrylic Elements
Acrylic flowers bring three dimensional beauty to your nail canvas. We build these elements layer by layer using small acrylic balls and a detail brush. Start with the base petals and work upward, creating natural looking roses or abstract blooms that extend beyond the nail surface.
Raised geometric shapes add modern architectural elements to nail designs. Square pyramids, triangular prisms, and curved domes create striking focal points. Mix different heights and angles to develop complex compositions that showcase technical skill and artistic vision.
Textured surface techniques transform smooth nails into tactile experiences. Use stippling brushes or sponges with thick acrylic paint to create bark like textures, stone surfaces, or fabric impressions. These techniques work particularly well as accent nails paired with simpler designs.
Foil and Chrome Finishes
Chrome powder application creates mirror like surfaces that reflect light dramatically. We apply gel base coat, cure under LED light, then rub chrome powder into the tacky layer using silicone tools. Seal immediately with no wipe topcoat to maintain the reflective finish.
Foil transfer techniques produce metallic patterns with precise control. Press adhesive foil onto tacky gel polish surfaces, then remove backing paper carefully. Create geometric patterns, organic shapes, or full coverage metallic effects that complement your nail length perfectly.
Holographic foil combinations merge multiple metallic tones for complex visual effects. Layer different foil colors or combine with chrome powders to achieve unique finishes. These combinations work especially well with longer nail shapes that provide adequate space for the full holographic spectrum to display.
Seasonal and Holiday-Themed Designs

Seasonal nail art transforms your long nails into festive canvases that celebrate every time of year. We’ll explore designs that capture the essence of winter wonderlands, summer adventures, and beloved holidays.
Winter Snowflake Patterns
Delicate snowflake designs create stunning winter nail art that showcases intricate crystalline patterns across your nail length. We recommend starting with a pale blue or silver base color to mimic winter skies before adding white snowflake details.
Hand painted snowflakes offer the most authentic winter aesthetic when created using thin nail art brushes and white acrylic paint. Start with simple six pointed designs on your thumb and ring finger, then add more complex patterns featuring multiple branches and crystalline details on remaining nails.
Stamping techniques provide consistent snowflake patterns across all ten nails using specialized nail stamping plates. Choose metallic silver or holographic white stamping polish to create dimensional effects that catch light like real snow crystals.
Glitter accent snowflakes combine traditional white snowflake patterns with iridescent glitter particles scattered around each design. Apply clear topcoat mixed with fine silver glitter between snowflake layers to create depth and sparkle reminiscent of fresh powder snow.
Summer Beach Motifs
Ocean wave patterns capture summer’s coastal energy through gradient blues and foaming white wave crests painted across your nail surface. We suggest using sponge dabbing techniques to blend navy, teal, and aqua shades for realistic water effects.
Palm tree silhouettes work beautifully as accent nails when painted in black against sunset gradient backgrounds. Create tropical scenes by combining orange, pink, and yellow ombre bases with detailed palm fronds extending from your cuticle toward the nail tip.
Seashell and starfish designs add dimensional coastal charm when hand painted in coral, peach, and sandy beige tones. Paint conch shells on your thumb and middle finger, then add small starfish details to remaining nails using dotting tools for precise shapes.
Tropical fruit motifs bring summer vibes through miniature pineapples, watermelon slices, and citrus designs painted across your nail length. Use bright yellows, greens, and pinks to create eye catching fruit patterns that celebrate warm weather abundance.
Halloween and Christmas Themes
Spooky Halloween designs transform long nails into haunting masterpieces featuring jack o’lanterns, spider webs, and gothic patterns. We recommend deep purple or black base colors enhanced with orange pumpkin faces and silver web details painted from corner to corner.
Christmas tree patterns create festive holiday nails through triangular evergreen shapes decorated with tiny ornament dots and star toppers. Paint emerald green trees against deep red backgrounds, then add gold and silver ornament details using dotting tools.
Holiday character designs feature beloved figures like Santa faces, reindeer silhouettes, and snowman portraits painted across accent nails. Use your ring finger and thumb as focal points for detailed character work while keeping other nails simple with coordinating colors.
Festive pattern combinations blend traditional holiday elements like candy canes, holly leaves, and gift box designs across your full manicure. Alternate between red and green base colors, then add white accent details that tie each nail together in cohesive seasonal themes.
Marble and Stone Effect Techniques

Natural stone patterns bring sophisticated elegance to long nails. These techniques create stunning textures that mimic real marble and gemstone surfaces.
Classic White Marble
White marble designs transform your long nails into timeless works of art. We recommend starting with a white or light gray base coat to establish the foundation. Gray veining creates the authentic marble appearance using a thin brush or feathering tool.
Alcohol-based inks work exceptionally well for creating realistic veining patterns. Drag the brush lightly across the nail surface while the ink is still wet to achieve natural stone movement. Black and charcoal gray veins add depth and contrast against the white base.
Water marble techniques produce stunning organic patterns that flow naturally. Drop different shades of gray polish into room temperature water and create swirled patterns with a toothpick. Dip your nail through the design to transfer the marble effect seamlessly.
Colorful Marble Variations
Pink marble effects bring warmth and femininity to your nail art collection. Rose gold veining complements dusty pink bases beautifully, creating an elegant finish. Blush tones paired with white create soft, romantic marble patterns.
Green marble designs offer rich, luxurious appearances reminiscent of expensive stones. Emerald and sage combinations produce sophisticated results that complement both casual and formal looks. Gold veining enhances green marble effects with metallic accents.
Blue marble variations capture the beauty of rare stones like sodalite and lapis lazuli. Navy and powder blue combinations create stunning depth when layered properly. Silver veining adds cool metallic touches that enhance the stone effect.
Granite and Geode Inspirations
Granite speckled effects require multiple polish colors applied with sponging techniques. Dark bases like black or charcoal provide the perfect foundation for granite patterns. White, gray, and metallic specks create authentic granite texture when dabbed randomly across the surface.
Geode nail art incorporates crystal formations and metallic edges that mimic natural rock formations. Gold leaf applied along one edge creates the characteristic geode rim effect. Glitter concentrations in the center simulate crystal clusters found in real geodes.
Agate slice designs feature concentric rings and natural banding patterns. Multiple translucent colors layered create the characteristic agate appearance. Metallic striping tape helps define the natural ring formations that make agate stones distinctive.
Minimalist Nail Art for Elegant Looks

Minimalist nail art proves that less can be more when creating sophisticated looks on long nails. These understated designs offer timeless elegance while showcasing technical precision.
Single Accent Nail Designs
Single accent nails create focal points without overwhelming your overall manicure aesthetic. We recommend choosing your ring finger as the accent nail since it naturally draws attention when gesturing. Popular accent nail techniques include adding a single rhinestone at the cuticle line, applying a contrasting matte finish to one nail while keeping others glossy, or incorporating a thin metallic stripe down the center of just one nail.
Geometric accent nails work exceptionally well on long nail canvases. Simple triangular cutouts near the cuticle create negative space interest, while single diagonal lines across the nail bed add modern sophistication. We suggest using nude or clear bases with white geometric shapes for maximum versatility.
Color contrast accent nails elevate neutral manicures instantly. Pair soft pink bases with a single black accent nail, or combine creamy whites with one deep burgundy nail for seasonal appeal. This technique maintains professional appropriateness while adding visual intrigue.
Thin Line Art
Thin line art transforms long nails into minimalist masterpieces using precise brushwork. We achieve these delicate designs using ultra fine brushes or nail art pens with 0.5mm tips. Simple vertical lines running from cuticle to tip create elongating effects, while horizontal lines placed strategically at different nail positions add geometric interest.
Intersecting line patterns create sophisticated grid effects on long nail surfaces. Draw parallel lines at 45 degree angles across each nail, then add perpendicular lines to form diamond patterns. We recommend using contrasting colors like black lines on nude bases or gold lines on soft pink foundations.
Curved line art introduces organic movement to geometric minimalism. Single curved lines that follow the natural nail shape create flowing designs, while multiple curved lines can form abstract wave patterns. These techniques work particularly well when using metallic colors against matte base coats.
Subtle Metallic Details
Subtle metallic details add luxury touches without compromising minimalist aesthetics. We apply thin metallic stripes using nail art tape as guides, creating perfectly straight lines along cuticle borders or nail tips. Rose gold details complement warm skin tones, while silver accents enhance cool undertones.
Metallic dot placement creates constellation effects on long nail canvases. Use dotting tools to place small metallic dots in triangular formations or linear patterns across selected nails. We suggest limiting metallic elements to 2-3 nails maximum to maintain sophisticated restraint.
Chrome powder application in small sections produces mirror like accents. Apply chrome powder only to nail tips for modern French variations, or create small rectangular sections filled with chrome effects. These targeted applications maintain elegance while incorporating trending metallic finishes that complement the extended length of long nails.
Animal Print and Nature-Inspired Patterns

Moving from geometric precision to organic beauty, animal print and nature-inspired patterns offer a wild and captivating approach to long nail artistry. These designs celebrate the natural industry while creating eye-catching statement nails.
Leopard and Zebra Prints
Leopard print nails transform your manicure into a fierce fashion statement that never goes out of style. We recommend starting with a nude or tan base color to create the perfect foundation for this classic animal pattern. Creating authentic leopard spots requires using a small dotting tool or toothpick to apply irregular brown and black oval shapes across the nail surface.
Zebra stripe designs offer bold contrast that showcases the full length of your nails beautifully. Begin with a white or cream base coat and allow it to dry completely before adding the signature black stripes. We suggest using striping tape or a thin nail art brush to create clean, parallel lines that follow the natural curve of your nail bed.
Combining both prints on different nails creates a safari-inspired manicure that’s both playful and sophisticated. Try alternating leopard and zebra patterns across your fingers, or dedicate your ring finger to one print while keeping the others neutral.
Snake Skin Effects
Snake skin nail art brings reptilian elegance to your long nails through intricate scale patterns and metallic finishes. We create this effect by applying a base color in gold, silver, or deep green tones that mimic natural snake coloring. Using a makeup sponge, we dab on overlapping diamond-shaped patterns in slightly darker shades to simulate authentic scales.
Adding metallic accents enhances the realistic appearance of snake skin designs significantly. Apply gold or silver foil pieces over select scales to create that characteristic shimmer found in real reptile skin. We recommend focusing these metallic highlights near the cuticle area for maximum visual impact.
Textured snake skin effects can be achieved using specialized stamping plates designed specifically for reptilian patterns. These tools ensure consistent scale shapes and spacing across all your nails, creating a professional finish that’s difficult to achieve freehand.
Butterfly and Dragonfly Motifs
Butterfly wing designs capture delicate beauty while showcasing intricate color combinations across your nail canvas. We start with a light base color and use thin brushes to paint symmetrical wing patterns in vibrant blues, purples, and oranges. Adding small dots of white or yellow creates the appearance of natural wing markings found on monarch and swallowtail butterflies.
Dragonfly motifs offer a more streamlined approach to insect-inspired nail art with their elongated wing structures. These designs work particularly well on long nails because the extended nail length perfectly accommodates the dragonfly’s characteristic body shape. We recommend using iridescent polishes to capture the natural shimmer of dragonfly wings.
Creating dimensional butterfly and dragonfly designs involves layering translucent colors to achieve realistic wing transparency. Apply base colors first, then use sheer topcoats in complementary shades to build depth and movement within each wing section. Fine glitter particles can simulate the dusty texture found on real butterfly wings.
Metallic and Chrome Nail Art Ideas

Metallic finishes transform long nails into luxurious statement pieces that catch light from every angle. Chrome and metallic effects create dimensional beauty that elevates any nail art design to professional levels.
Rose Gold Accents
Rose gold accents bring warmth and elegance to long nail designs. This trendy metallic finish complements all skin tones and pairs beautifully with neutral base colors like nude, cream, and soft pink. We recommend applying rose gold foil strips along the cuticle line for a delicate accent that doesn’t overpower the overall design.
Creating gradient rose gold tips elevates classic French manicures. Start with a clear or nude base coat, then use a makeup sponge to blend rose gold polish from the tip downward. This technique produces a seamless fade that showcases the full length of your nails while maintaining sophistication.
Geometric rose gold patterns add modern flair to traditional metallic designs. Use thin striping tape to create triangular sections or diagonal lines, then fill with rose gold polish. These angular elements contrast beautifully against matte base colors like deep burgundy or forest green.
Silver Mirror Finishes
Silver mirror finishes create the most reflective and dramatic metallic nail effects. Chrome powder applied over a black gel base produces an intense mirror finish that appears almost liquid. We suggest curing each layer properly under LED lights to achieve maximum reflectivity and durability.
Negative space designs showcase silver chrome effects beautifully. Leave portions of the nail unpainted while applying chrome finish to exact sections like the tips or cuticle area. This technique creates striking contrasts and prevents the metallic finish from overwhelming the entire nail.
Textured silver effects add dimension beyond standard mirror finishes. Apply silver leaf sheets over tacky gel polish for an organic, crackled appearance. These irregular patterns catch light differently than smooth chrome, creating visual interest and unique metallic textures.
Mixed Metal Combinations
Mixed metal combinations create sophisticated nail art that incorporates multiple metallic finishes. Alternate between gold, silver, and copper on different nails for a cohesive yet varied look. This approach works especially well for special occasions when you want maximum impact and luxury appeal.
Layered metallic stripes produce elegant linear designs on long nails. Use thin nail art brushes to paint alternating rose gold and silver stripes vertically down each nail. These parallel lines elongate the nail bed while creating movement and visual interest through metallic contrasts.
Geometric metal blocking divides nails into distinct metallic sections. Create angular shapes using different chrome powders or metallic polishes within each nail. Triangle and diamond patterns work particularly well, allowing each metallic finish to shine while maintaining overall design cohesion across all nails.
Conclusion
Long nails offer unlimited creative possibilities that we’ve explored throughout this comprehensive guide. From subtle minimalist designs to bold geometric patterns and luxurious metallic finishes each technique transforms your nails into personal works of art.
We’ve covered everything from classic French manicure updates to intricate floral motifs seasonal themes and nature-inspired patterns. These diverse approaches ensure there’s a perfect style for every occasion and skill level.
Remember that practice makes perfect when mastering these techniques. Start with simpler designs and gradually work your way up to more complex 3D elements and textured finishes as your confidence grows.
Your long nails are the perfect canvas for self-expression. Whether you prefer understated elegance or eye-catching statement pieces the techniques we’ve shared will help you create stunning nail art that reflects your unique style and personality.
Frequently Asked Questions
What are the best nail art designs for long nails?
Long nails are perfect for geometric patterns, floral motifs, ombre effects, and bold color combinations. Popular designs include modern French manicures, intricate hand-painted roses, negative space patterns, and textured 3D elements. The extended canvas allows for more detailed artwork and creative expression.
How do I create a modern French manicure on long nails?
Start with a neutral base and experiment with colored tips instead of traditional white. Try ombre effects, geometric designs, double French tips, or incorporate glitter elements. Use negative space techniques and vibrant color combinations to breathe new life into this classic style.
What techniques work best for ombre and gradient nail designs?
Use a makeup sponge to blend colors seamlessly, creating sunset effects or glitter gradients. Start with light base coats and build up intensity gradually. Work quickly while polish is wet, and experiment with different color pairings to achieve professional-looking transitions on long nails.
How can I create realistic floral nail art patterns?
Use a neutral base to make floral elements pop. Hand-paint roses with fine brushes, starting with basic shapes and adding details. Try watercolor techniques for modern looks, or create tropical designs with hibiscus and palm leaves. Practice thin line work for delicate stems and petals.
What are the key techniques for geometric and abstract designs?
Focus on negative space to create visual contrast. Use tape for clean lines, experiment with color blocking, and practice angular line work. Try triangle cutouts, chevron patterns, and intersecting grids. Sharp angles and contrasting colors create striking modern art effects on long nails.
How do I add texture and 3D elements to my nail art?
Place rhinestones strategically for maximum impact. Create sculptured acrylic flowers or geometric shapes. Use textured polishes for tactile effects, and experiment with foil and chrome finishes for dramatic reflective surfaces. Build dimension gradually to avoid overwhelming the design.
What are some easy seasonal nail art ideas?
Winter: Create delicate snowflake patterns with white polish and fine brushes. Summer: Paint ocean waves and beach motifs. Halloween: Use spooky colors and character designs. Christmas: Incorporate festive elements like holly, stars, and traditional holiday colors for themed celebrations.
How do I achieve marble and stone effects on nails?
Use alcohol-based inks for realistic veining in marble designs. Try sponging techniques for granite speckled effects. Layer translucent colors for agate slice looks. Start with appropriate base colors and work with fluid motions to mimic natural stone patterns and textures.
What makes minimalist nail art effective on long nails?
Focus on single accent nails to create focal points without overwhelming the look. Use thin line art for elegant simplicity. Incorporate subtle metallic details for luxury touches. The key is restraint – let negative space work as part of the design for sophisticated results.
How can I create animal print patterns on long nails?
For leopard prints, use warm base colors with irregular spot patterns. Zebra stripes require contrasting black and white with curved lines. Snake skin effects work best with metallic finishes and stamping tools. Practice organic, irregular patterns rather than perfect symmetry for authentic looks.
What are the best metallic finishes for long nail art?
Rose gold creates elegant gradients and geometric accents. Silver mirror finishes offer dramatic reflective effects. Mix different metals for sophisticated combinations. Chrome powders provide the most intense shine. Apply over dark bases for maximum impact and use top coat to seal properly.


