Black and white nail art never goes out of style – and we’re here to prove it. This timeless color combination offers endless possibilities for creating stunning manicures that work for any occasion whether you’re heading to a formal event or just want to add some elegance to your everyday look.
We’ve discovered that black and white designs are surprisingly versatile. From minimalist geometric patterns to intricate floral motifs you can achieve everything from subtle sophistication to bold statement nails. The beauty of this classic pairing lies in its ability to complement any outfit while making your nails the perfect accessory.
Ready to transform your nails into tiny canvases? We’ll walk you through creative design ideas that range from beginner-friendly options to more advanced techniques. Whether you’re a nail art novice or a seasoned pro these black and white combinations will give you the inspiration you need to create your next show-stopping manicure.
Classic Black and White French Manicure Variations
We’re reimagining the timeless French manicure with sophisticated black and white variations that elevate this classic style. These fresh takes maintain elegance while adding contemporary flair to your nail art repertoire.
Modern Reverse French Tips
Reverse French tips flip tradition by placing the accent color at the base of your nail instead of the tip. We love using glossy black polish at the cuticle line while keeping the rest of the nail crisp white for a striking contrast.
Black crescents create drama when applied in thin, precise lines about 2-3mm from your cuticle. You’ll achieve the cleanest results by using nail guides or tape to maintain perfect curves across all ten nails.
White tips with black bases offer another stunning reversal option that works beautifully on both short and long nails. This combination looks particularly elegant when you add a thin silver or clear dividing line between the two colors.
Geometric French Line Designs
Angular French tips replace curves with sharp, geometric edges that create a modern architectural feel. We recommend using striping tape to achieve perfectly straight diagonal or zigzag tip lines.
Double line French designs feature two parallel lines instead of one traditional tip line. Create this look by applying thin black stripes 2mm apart at your nail tips, leaving white space between them for visual interest.
Chevron French patterns incorporate V-shaped designs at the tip area using alternating black and white sections. These bold geometric shapes work exceptionally well on almond or coffin shaped nails where you have more surface area.
Textured French Nail Art
Matte and glossy combinations create stunning textural contrast within French manicure designs. We suggest applying matte black tips over glossy white bases, or vice versa, for sophisticated depth.
Glitter accents enhance classic French when you add fine black or white shimmer along the tip line. A thin band of glitter creates subtle sparkle without overwhelming the minimalist aesthetic.
Velvet powder finishes transform ordinary French tips into luxurious textured masterpieces. Dip wet black polish tips into velvet powder for a soft, fabric like appearance that photographs beautifully under different lighting conditions.
Minimalist Black and White Geometric Patterns

Geometric designs bring sophisticated elegance to monochrome nail art without overwhelming complexity. These clean patterns create striking visual impact through strategic placement and precise execution.
Simple Stripes and Lines
Vertical stripes elongate your nail beds while creating an effortlessly chic appearance. We recommend using nail striping tape to achieve perfectly straight lines that run from cuticle to tip. Horizontal bands work beautifully across shorter nails, with alternating black and white sections creating bold contrast.
Single accent lines offer subtle sophistication when placed strategically near the cuticle or tip. These thin stripes require steady hands but deliver maximum impact with minimal effort. Double line designs frame your nails elegantly, using parallel stripes along the edges to create defined borders.
Diagonal stripes add ever-changing movement to static nail surfaces. We suggest starting with wide diagonal bands before progressing to thinner lines for more intricate patterns. Chevron formations combine multiple angled lines to create sophisticated zigzag effects across your nail surface.
Triangle and Diamond Shapes
Triangle accents positioned at the nail base create modern negative space designs with geometric precision. We place these sharp shapes strategically to balance the natural curve of your cuticle line. Inverted triangles work beautifully at the nail tip, creating contemporary French manicure alternatives.
Diamond patterns offer versatility through various size combinations and placement options. These four sided shapes can be outlined in black against white backgrounds or filled solid for bolder statements. Clustered diamonds create textural interest when grouped in threes or fives across your nail surface.
Half triangle designs split your nail diagonally, with each section showcasing contrasting colors for dramatic effect. We recommend keeping one triangle solid while adding subtle patterns to the other for balanced composition. Connected diamond chains link multiple shapes together, creating seamless geometric flows from cuticle to tip.
Polka Dot Designs
Classic dot patterns never go out of style, offering playful sophistication through strategic size variation and spacing. We create these circular designs using dotting tools or bobby pins for consistent shapes. Gradient dot sizes transition from large circles at the base to tiny dots near the tip.
Asymmetrical dot placement breaks traditional patterns while maintaining visual balance across your manicure. These scattered circles create organic movement within structured geometric themes. Border dots frame your nail edges with small circular accents that complement other geometric elements.
Negative space dots reverse traditional expectations by creating white circles on black backgrounds or vice versa. We achieve these hollow circles using reinforcement stickers before applying base colors. Clustered dot formations group multiple circles together, creating flower like patterns that maintain geometric integrity while adding organic appeal.
Bold Black and White Marble Nail Art

Marble patterns bring natural elegance and sophisticated texture to black and white nail designs. These organic swirls and veining effects create stunning contrast while maintaining the timeless appeal of monochrome aesthetics.
Water Marble Techniques
Water marble creates flowing, organic patterns that mimic natural stone formations on your nails. We start by filling a small bowl with room temperature water and carefully dropping alternating colors of black and white polish onto the surface. Each drop spreads naturally, creating concentric circles that we manipulate with a toothpick or fine brush to form marble veining.
Dipping techniques require steady hands as we lower each nail into the water design at different angles. The polish adheres to create unique patterns on every finger, ensuring no two nails look identical. We recommend sealing the surrounding skin with tape or liquid latex to prevent messy cleanup around the nail bed.
Temperature control affects how well the polish spreads on water, with cooler water slowing the spreading process for more controlled designs. Working quickly prevents the polish from forming a skin on the water surface, which can create unwanted texture in the final result.
Dry Brush Marble Effects
Dry brush marbling offers more control than water techniques while still achieving natural stone appearances. We load a fan brush or makeup sponge with both black and white polish simultaneously, then gently sweep across the nail surface in flowing motions. This technique creates subtle color blending with visible brush strokes that resemble natural marble veining.
Layering different opacity levels adds depth to dry brush marble designs. We apply a base coat in one color, then use the dry brush technique with the contrasting shade to create realistic stone patterns. Multiple light passes build up color gradually while maintaining the organic flow of natural marble.
Sponge dabbing creates softer, more diffused marble effects compared to brush techniques. We tear small pieces of makeup sponge to create irregular edges, then dab colors onto the nail in overlapping patterns that blend naturally at the edges.
Stone-Inspired Patterns
Stone-inspired patterns draw from various natural formations like Carrara marble, onyx, and granite for sophisticated nail art designs. We study reference images of actual stone surfaces to recreate authentic veining patterns and color distributions. These designs work particularly well on longer nail shapes where intricate details have space to develop.
Carrara marble patterns feature bold, dramatic veining against white backgrounds with black accent lines. We create these using fine detail brushes to paint flowing, irregular lines that branch and merge naturally across the nail surface. The key lies in varying line thickness and opacity to match real marble characteristics.
Onyx-inspired designs reverse traditional marble coloring with black backgrounds and white veining patterns. These dramatic looks pair well with metallic accent details or glossy top coats that enhance the stone-like appearance. We focus on creating fewer, more prominent veins rather than busy patterns that can overwhelm the dark base.
Black and white granite effects combine stippling and veining techniques for textured appearances. We use small brushes to create tiny speckled patterns mixed with flowing lines, mimicking the complex mineral compositions found in natural granite surfaces.
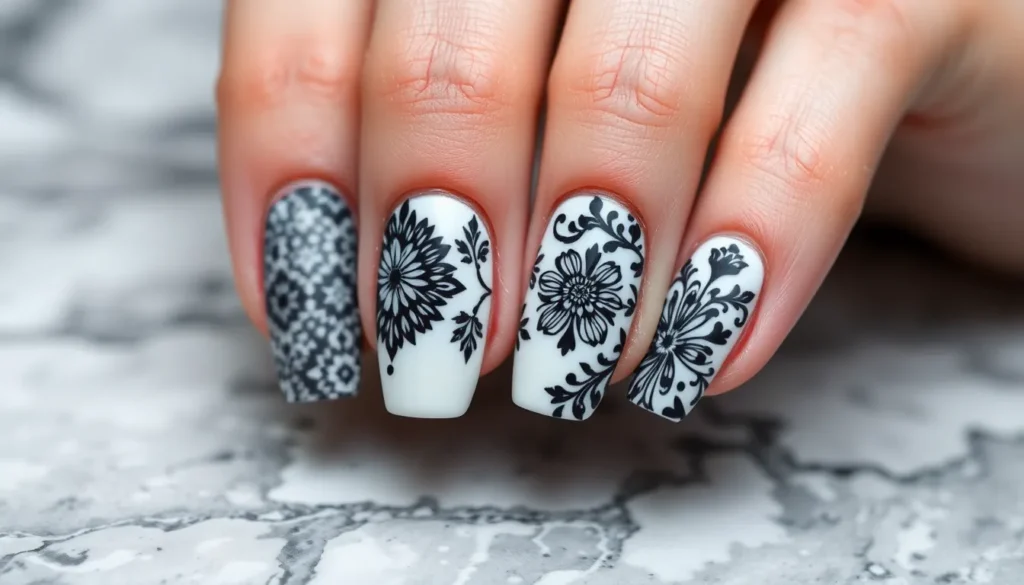
Elegant Black and White Floral Designs

Floral nail art brings organic beauty to black and white designs, offering sophisticated patterns that complement the natural elegance we’ve explored in previous techniques. These botanical motifs create stunning contrast while maintaining the timeless appeal of monochrome nail art.
Hand-Painted Rose Patterns
Classic rose silhouettes transform nails into romantic canvases using black paint against white bases. We create these designs by starting with simple circular shapes and adding layered petals that flow outward naturally. Detailed brush strokes build dimension through varying line weights and petal overlaps.
Outline rose designs offer versatility by focusing on elegant line work rather than solid fills. These patterns work beautifully as accent nails or across entire manicures. Thin brushes help us achieve delicate petal edges that capture the rose’s natural curves and organic movement.
Shadow rose techniques combine both black and white elements to create depth and dimension. We paint roses in solid black on white backgrounds, then add white highlights to select petals for realistic shadowing effects. This approach creates sophisticated contrast while maintaining the botanical theme’s romantic appeal.
Abstract Botanical Motifs
Stylized leaf shapes bring modern interpretation to traditional floral elements through geometric simplification. We design these patterns using clean lines and bold shapes that suggest natural forms without literal representation. Angular leaves and simplified stems create contemporary botanical art that feels fresh and current.
Branch silhouettes extend across multiple nails to create cohesive designs that flow naturally from finger to finger. These patterns work particularly well when we paint black branches against white backgrounds, allowing the organic lines to create movement and visual interest across the entire hand.
Negative space florals use unpainted areas to define flower shapes while surrounding them with solid color blocks. We achieve these effects by masking off floral shapes and painting around them, creating sophisticated designs where the natural nail becomes part of the artistic composition.
Delicate Vine and Leaf Details
Trailing vine patterns create elegant movement across nail surfaces through curved lines that follow natural growth patterns. We paint these designs using fine brushes to achieve delicate stems that weave across individual nails or connect multiple fingers in flowing compositions.
Micro leaf clusters add intricate detail to larger floral designs through tiny painted elements that enhance overall composition depth. These small details require steady hands and precise brush control but create stunning results when we layer them strategically around larger focal points.
Botanical accent lines incorporate subtle plant inspired elements into geometric or minimalist designs we’ve previously explored. Thin vine details can outline French tips or create borders for negative space designs. These elements bridge the gap between structured geometric patterns and organic floral motifs for versatile nail art combinations.
Trendy Black and White Abstract Art

Abstract nail art transforms traditional monochrome designs into bold artistic statements that capture contemporary creativity. These expressive techniques allow endless experimentation while maintaining the sophisticated elegance of black and white palettes.
Splatter Paint Effects
Splatter paint techniques create ever-changing energy through controlled chaos that mimics Jackson Pollock inspired artwork. We achieve these effects by loading a small brush with contrasting polish and gently flicking it across the nail surface to create organic droplets and spontaneous patterns.
Creating authentic splatter patterns requires layering different sized dots and streaks across each nail. Start with larger base splatters using a toothbrush or fan brush then add smaller accent drops with a detail brush. This technique works exceptionally well when combining matte black base coats with glossy white splatters or vice versa.
Professional splatter application involves protecting surrounding skin with liquid latex or tape before beginning the artistic process. Practice the flicking motion on paper first to control the paint distribution and achieve consistent results across all ten nails. The key lies in varying the pressure and distance from the nail to create authentic randomness.
Brush Stroke Patterns
Brush stroke designs replicate the bold confidence of abstract expressionist paintings through deliberate sweeping motions. These patterns range from gentle curved strokes that flow across the nail bed to sharp angular movements that create dramatic geometric intersections.
Calligraphy inspired strokes use thin detail brushes to create flowing lines that dance across the nail surface like elegant handwriting. We layer these strokes in varying thicknesses to build visual depth while maintaining the monochrome sophistication that defines this style category.
Textured brush applications combine different brush types to achieve varied line qualities within single designs. Fan brushes create soft feathered edges while flat brushes produce bold confident marks that anchor the overall composition. The contrast between thick and thin strokes adds professional polish to these artistic expressions.
Layered stroke techniques build complexity through strategic overlapping that creates visual interest without overwhelming the design. Start with lighter base strokes then add darker accent lines that intersect and weave through the initial pattern for sophisticated dimensional effects.
Modern Art-Inspired Designs
Modern art movements provide endless inspiration for creating sophisticated nail designs that reference famous artistic styles and techniques. We draw from cubism geometric fragmentation minimalism clean lines and abstract expressionism bold gestures to create wearable art pieces.
Mondrian inspired grids use precise lines and blocked sections to recreate the Dutch artist’s iconic compositions on nail surfaces. These designs feature clean black lines that divide the nail into asymmetrical sections filled alternately with white space and solid black areas for striking geometric balance.
Bauhaus influenced patterns emphasize functional beauty through simple shapes and clean typography elements. Circle square and triangle motifs combine with sans serif inspired line work to create designs that celebrate form following function principles.
Contemporary gallery worthy concepts push creative boundaries by incorporating negative space mixed textures and unconventional color blocking techniques. These avant garde approaches transform nails into miniature canvases that showcase personal artistic vision while maintaining wearable elegance for daily activities.
Chic Black and White Ombre Techniques

We’re diving into the sophisticated industry of black and white ombre effects that create stunning gradient transitions. These techniques elevate monochrome nail art with seamless color blending that flows naturally from deep black to pristine white.
Gradient Fade Effects
Sponge blending techniques create the smoothest ombre transitions by applying both colors to a makeup sponge and gently dabbing across the nail surface. Start with white polish as your base coat and allow it to dry completely before beginning the gradient process. Apply black polish to one end of a clean makeup sponge and white to the other end, then gently press and roll the sponge across each nail to blend the colors seamlessly.
Vertical gradient applications work particularly well on longer nail shapes like coffin or almond styles. Begin at the cuticle with deep black polish and gradually lighten toward the tip using multiple thin layers. Each layer should overlap slightly with the previous one to maintain smooth color transitions without harsh lines.
Horizontal fade patterns create striking effects on shorter nail beds by transitioning from black on one side to white on the other. This technique works beautifully as an accent design on ring fingers or thumbs paired with solid colored nails.
Color Blending Methods
Wet blending applications require working quickly while polish remains tacky to achieve natural color flow. Apply your base white coat and immediately add small dots of black polish along the cuticle area. Use a small brush or toothpick to gently pull the black downward into the white, creating organic blending patterns.
Brush stippling techniques involve using a fan brush or stippling brush to create textured gradient effects between black and white zones. Load your brush with both colors and gently stipple across the nail surface, building up layers gradually until you achieve the desired opacity and blending.
Polish layering methods create depth by alternating sheer coats of black and white polish over a neutral base. Start with a clear or light gray base, then apply thin layers of white polish followed by increasingly sheer applications of black polish toward the cuticle area.
Subtle Transition Designs
Smoky gradient effects mimic the ethereal quality of smoke by creating ultra soft transitions between black and white tones. These designs work exceptionally well with matte top coats that enhance the smoky appearance and eliminate harsh shine lines.
Pearl shimmer blending incorporates iridescent elements that shift between silver and white, creating luminous transitions when paired with deep black bases. Apply the shimmer polish in the middle transition zone to create a natural bridge between the two main colors.
Negative space gradients leave portions of the natural nail visible to create breathing room within the design. These minimalist approaches work perfectly for everyday wear while maintaining the sophisticated ombre effect through strategic color placement around the nail edges and tips.
Statement Black and White Accent Nails

Statement accent nails transform your monochrome manicure from subtle to striking with strategic focal points. We’ll show you how to create eye-catching designs that balance elegance with bold artistic expression.
Single Feature Nail Designs
Dramatic ring finger statements create instant visual impact by transforming one nail into your manicure’s centerpiece. We love painting nine nails in classic white while dedicating the ring finger to intricate black lacework patterns or detailed geometric designs. Negative space cutouts work beautifully here, allowing your natural nail to peek through bold black shapes like crescents, triangles, or abstract swirls.
Thumb accent techniques offer maximum visibility for your artistic efforts since thumbs naturally draw attention during daily activities. Consider painting your thumbnails with complex mandala patterns in black ink over white bases, or create stunning marble effects using the water technique we discussed earlier. Textured elements like matte black stripes against glossy white backgrounds add dimensional interest that photographs beautifully.
Index finger focal points showcase your creativity every time you point, gesture, or type. We recommend trying hand painted floral silhouettes, where delicate black roses bloom across white nail beds. Alternatively, create striking architectural designs using tape to achieve perfectly straight lines in checkerboard patterns or diagonal stripes that extend from cuticle to tip.
Mix and Match Patterns
Coordinated chaos techniques involve deliberately combining different black and white patterns across your nails while maintaining visual harmony. We suggest pairing polka dots on your thumb with stripes on your index finger, geometric shapes on your middle finger, and solid colors on your ring and pinky fingers. The key lies in using consistent color ratios and similar line weights to create cohesion.
Pattern scaling strategies help you balance busy designs with simpler elements for optimal visual appeal. Try placing large geometric patterns on your middle and ring fingers while using smaller dots or thin lines on your thumb and pinky nails. We’ve found that alternating complex and simple designs creates natural rhythm that pleases the eye without overwhelming your overall look.
Complementary design pairings work when you choose patterns that enhance rather than compete with each other. Combine flowing marble effects with sharp geometric lines, or pair organic floral motifs with structured grid patterns. We recommend limiting yourself to three different pattern types maximum to avoid visual confusion while still achieving that coveted eclectic aesthetic.
Bold Contrast Techniques
High impact color blocking uses stark black and white divisions to create dramatic visual statements that demand attention. We achieve this by painting half of each nail black and the other half white, experimenting with diagonal splits, curved divisions, or zigzag patterns that create ever-changing energy. Vertical splits elongate your fingers while horizontal divisions create width and presence.
Reverse accent applications flip traditional expectations by making your accent nail the simplest rather than the most complex. Paint four nails with intricate black and white patterns like houndstooth, zebra stripes, or complex geometric designs, then finish with one solid colored accent nail in either pure black or crisp white. This unexpected approach creates sophisticated contrast that feels fresh and modern.
Dimensional layering effects combine different textures and finishes to create accent nails with physical depth and visual interest. We layer matte black polish over glossy white bases, add raised elements using nail art pens, or incorporate small black and white rhinestones for three dimensional appeal. Velvet powder in black creates luxurious texture that contrasts beautifully with smooth white surfaces, while holographic topcoats add rainbow shimmer to monochrome foundations.
Professional Black and White Office-Appropriate Styles

Professional black and white nail art strikes the perfect balance between sophistication and personal expression. We’ll explore elegant designs that enhance your professional image while maintaining workplace appropriateness.
Subtle Pattern Combinations
Delicate stripes create the foundation for office friendly nail art, with thin lines placed strategically along one side of each nail. We recommend alternating between matte black lines on glossy white bases and glossy white details on matte black polish. Small accent dots positioned near the cuticle area add visual interest without overwhelming the overall design.
Alternating patterns work beautifully across your fingertips, featuring different combinations on each nail while maintaining the same color palette. Consider pairing vertical stripes on your index finger with horizontal lines on your middle finger and small geometric shapes on your ring finger. This approach creates subtle variation that remains cohesive and professional.
Textural mixing elevates simple patterns through strategic finish combinations that catch light differently throughout the day. Combine glossy black triangles with matte white backgrounds, or use subtle shimmer polish in white paired with flat black details. These combinations add depth without creating distracting shine in professional environments.
Clean Geometric Lines
Architectural inspiration brings modern sophistication to office appropriate nail art through precise geometric shapes and clean edges. We love creating simple rectangles and squares using tape guides, ensuring each shape maintains perfect proportions across all nails. Linear designs featuring parallel lines create elongating effects that make fingers appear more slender and elegant.
Grid patterns offer structured beauty that appeals to detail oriented professionals, with thin intersecting lines creating window pane effects. Use a fine liner brush to create evenly spaced horizontal and vertical lines, forming small squares or rectangles across the nail surface. This technique works especially well on longer nail lengths where the pattern has space to develop fully.
Negative space integration allows the natural nail to become part of the design, creating breathable patterns that feel less heavy than full coverage designs. Leave strategic areas unpainted to form geometric shapes, or use the natural nail color as a third element in your black and white composition. This approach maintains professionalism while showcasing creative design thinking.
Sophisticated Minimalist Looks
Single accent techniques focus attention on one design element per hand, creating maximum impact with minimal visual weight. We suggest featuring one statement nail with a bold geometric pattern while keeping the remaining nails in solid colors or simple designs. This restraint demonstrates sophisticated design sensibility appropriate for conservative work environments.
Micro details showcase precision and attention to quality, with tiny elements that reward close inspection without demanding attention from across the room. Create small triangular points along the cuticle line, or add microscopic dots arranged in perfect geometric formations. These details communicate professionalism and care for quality workmanship.
Balanced asymmetry brings modern design principles to professional nail art, with intentionally uneven elements that create visual interest through careful composition. Place a single black triangle on the lower left corner of one nail and balance it with a white geometric shape on the upper right of another nail. This technique requires planning but results in sophisticated designs that stand apart from typical symmetrical patterns.
Creative Black and White Nail Stamping Ideas

Stamping transforms intricate designs into achievable nail art for everyone. We’ll explore professional techniques that elevate your monochrome manicures with precision patterns.
Stamping Plate Patterns
Geometric stamping plates create sharp, architectural designs that complement minimalist aesthetics. Hexagon patterns, triangle grids, and linear motifs transfer perfectly onto black or white base colors. We recommend starting with simple repeating shapes like diamonds or squares to master your stamping pressure and alignment.
Floral stamping designs bring delicate botanical elements to your monochrome palette. Rose outlines, leaf patterns, and vine motifs stamp beautifully in contrasting colors. Choose plates with varying petal sizes to create depth across your nails, applying white florals over black bases for dramatic impact.
Abstract pattern plates offer artistic freedom with swirls, brush strokes, and organic shapes. Marble veining stamps, paint splatter designs, and flowing curves create sophisticated texture. These patterns work exceptionally well when you alternate between black stamps on white nails and white stamps on black nails across your manicure.
Text and symbol plates add modern edge to your nail art collection. Musical notes, letters, and decorative symbols create conversation starting designs. We suggest using these sparingly as accent elements rather than full coverage patterns to maintain elegance.
Layered Stamping Techniques
Double stamping methods create dimensional designs by overlaying multiple patterns. Start with your base pattern in light gray or off white, then add a second layer in pure black for depth. Practice aligning your stamps using the same plate position to achieve consistent results across all nails.
Gradient stamping effects blend stamping polish colors for smooth transitions. Apply your stamping polish to the plate, then use a makeup sponge to dab away portions before transferring to your nail. This technique creates beautiful fade effects that work particularly well with geometric patterns.
Reverse stamping techniques involve creating your design on the stamper first, then adding color details before transferring. Paint white polish into exact sections of your stamped design while it’s still on the stamper, then transfer the completed multi colored pattern to your nail.
Selective stamping applications let you choose which parts of a design to transfer. Use tape to mask areas of your stamping plate, creating partial patterns or isolating exact elements. This method works perfectly for creating asymmetrical designs or combining different sections from the same plate.
Custom Stamping Combinations
Mixed plate designs combine elements from different stamping plates on single nails. Stamp a geometric base pattern, then add floral accents using a second plate for unique hybrid designs. Ensure your first stamp is completely dry before applying the second layer to prevent smudging.
Stamping with hand painted details enhances basic stamped patterns with artistic touches. Add small dots, lines, or color fills to your stamped designs using nail art brushes. We find that adding tiny white dots to black stamped florals creates beautiful highlighted effects.
Negative space stamping leaves portions of your base color visible through strategic pattern placement. Position your stamps to create windows of negative space, or use stamping plates with built in gaps for modern minimalist looks. This technique works beautifully with nude or clear base colors alongside your black and white elements.
Texture combination stamping pairs different finish types within single designs. Stamp matte patterns over glossy bases, or add glitter polish to exact stamped sections for dimensional contrast. Velvet powder applied over wet stamped patterns creates luxurious textural interest that elevates simple black and white combinations.
Easy DIY Black and White Nail Art for Beginners

We’ve covered advanced techniques, but now let’s focus on simple methods that anyone can master. These beginner-friendly approaches require minimal equipment while delivering impressive results.
Tape and Sticker Methods
Striping tape creates perfect geometric lines without requiring steady hands or artistic experience. We place thin adhesive strips across dry base coats to section areas for contrasting colors. Remove the tape while polish remains wet to achieve clean edges and professional-looking stripes.
Circular stickers produce flawless polka dots by serving as templates for negative space designs. We apply small round stickers to white polish, paint over them with black, then carefully peel away the adhesive circles. This method guarantees uniform dot sizes and consistent spacing throughout the manicure.
Chevron patterns become achievable using triangular nail stickers or cut tape pieces. We create zigzag designs by alternating black and white sections, building sophisticated geometric patterns one triangle at a time. Strategic sticker placement ensures symmetrical results across all nails.
French manicure guides transform classic tips into modern black and white variations. We apply curved stickers to create crisp smile lines, then fill sections with contrasting colors. These guides work particularly well for reverse French designs featuring black tips on white bases.
Simple Brush Techniques
Basic striping brushes enable precise lines for beginners learning freehand techniques. We load thin brushes with contrasting polish to create vertical, horizontal, or diagonal stripes across nail surfaces. Practice on paper first to develop steady hand movements and consistent pressure.
Dotting tools produce perfect circles using simple up and down motions. We dip these tools into polish pools to create varying dot sizes depending on tool diameter. Multiple dots can form flower petals, geometric clusters, or random scattered patterns across black and white bases.
Fan brushes create organic textures through gentle sweeping motions. We lightly load these brushes with white polish to add marble veining over black backgrounds or create cloud-like effects. The multiple bristles produce natural-looking patterns that hide minor imperfections.
Flat brushes work excellently for color blocking and geometric shapes. We use these tools to paint squares, rectangles, and triangular sections with precise edges. Clean brushes between colors to maintain sharp contrast between black and white elements.
No-Tool Required Designs
Finger painting techniques produce abstract art using nothing but fingertips and polish bottles. We dab fingertips into white polish to create organic shapes over black backgrounds or press thumbs against wet polish for unique texture effects. These methods embrace imperfection as artistic expression.
Polish bottle caps serve as stamping tools for circular patterns and textural elements. We dip bottle caps into contrasting polish to create ring shapes or press them into wet polish for interesting texture variations. This technique works particularly well for creating vintage-inspired patterns.
Plastic bag textures add dimension through simple pressing motions. We crinkle plastic bags, dip them in polish, then gently press against nail surfaces to create organic patterns resembling marble or granite textures. Each application produces unique results that can’t be replicated exactly.
Saran wrap creates sophisticated marble effects by manipulating wet polish surfaces. We scrunch plastic wrap and press it against freshly applied polish to lift and redistribute color. This technique produces realistic stone patterns without requiring specialized marble tools or water techniques.
Conclusion
Black and white nail art continues to reign supreme in the beauty industry offering endless possibilities for self-expression. Whether you’re drawn to subtle professional styles or bold artistic statements these timeless color combinations work beautifully for every occasion and skill level.
We’ve shown you that creating stunning monochrome designs doesn’t require expensive salon visits or professional training. With basic tools and techniques you can achieve everything from elegant geometric patterns to intricate marble effects right at home.
The beauty of black and white lies in its versatility – these designs complement any wardrobe and transition seamlessly from boardroom meetings to weekend adventures. Start with simple techniques and gradually build your confidence as you explore more complex artistic expressions.
Your nails are the perfect canvas for creativity and with these classic colors you’ll never run out of inspiration for your next manicure masterpiece.
Frequently Asked Questions
What makes black and white nail art so versatile?
Black and white nail art works for any occasion because of its timeless color combination. These classic colors complement any outfit and can be styled from subtle and professional to bold and dramatic. The monochrome palette allows for endless design possibilities while maintaining sophistication and elegance.
Can beginners create professional-looking black and white nail designs?
Yes! Beginners can achieve stunning results using simple techniques like tape for geometric lines, dotting tools for polka dots, and basic brush strokes. Many designs require minimal equipment and can be created with household items like plastic bags for texture or bottle caps for stamping.
What are the most popular black and white nail art patterns?
Popular patterns include French manicure variations, geometric designs like stripes and triangles, marble effects, floral motifs, and abstract art. Ombre gradients, polka dots, and accent nail designs are also trending choices that offer both simplicity and visual impact.
How do I create smooth ombre effects with black and white polish?
Use a damp makeup sponge to blend colors while the polish is still wet. Apply white as your base, then dab black onto the sponge and gently press onto the nail in a rolling motion. Work quickly and blend while polish is tacky for seamless transitions.
What tools do I need for black and white nail art?
Essential tools include striping brushes for lines, dotting tools for circles, makeup sponges for gradients, and nail tape for clean geometric shapes. Many designs can be created with just basic nail polish brushes and household items like toothpicks or bobby pins.
How can I make black and white nail art work-appropriate?
Choose subtle patterns like thin stripes, small geometric shapes, or single accent nails. Incorporate negative space designs and stick to clean, minimalist patterns. Matte finishes can also make bold designs appear more professional and sophisticated.
What’s the best way to achieve crisp lines in geometric designs?
Use nail tape or striping tape as guides, ensuring they’re firmly pressed down. Apply a thin base coat first, let it dry completely, then apply your design color. Remove tape while polish is slightly wet to prevent chipping and achieve clean, sharp edges.
How long do black and white nail art designs typically last?
With proper base coat, quality polish, and top coat application, these designs can last 7-10 days. Geometric and simple patterns tend to last longer than intricate designs. Using quick-dry top coat and avoiding harsh chemicals helps extend wear time.


