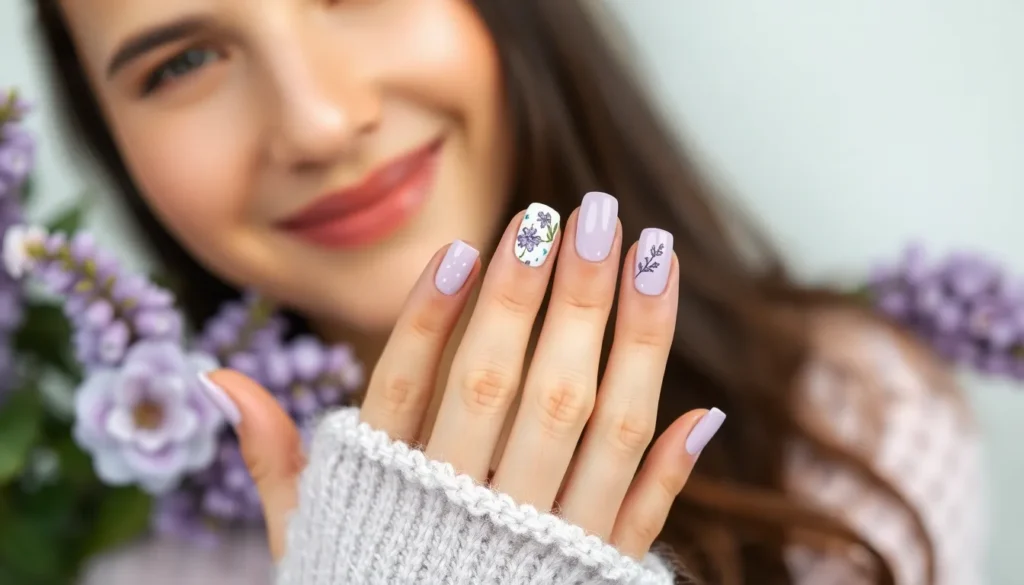
We can’t deny that lavender nails have become the ultimate statement in sophisticated nail art. This dreamy purple hue strikes the perfect balance between feminine elegance and modern chic making it a favorite among beauty enthusiasts everywhere.
From soft pastel lavender to rich deep purple tones we’re seeing this versatile shade dominate nail salons and social media feeds alike. Whether you’re looking for minimalist designs or intricate nail art lavender offers endless possibilities to express your personal style.
We’ve curated the most stunning lavender nail ideas that’ll transform your manicure game completely. These gorgeous designs range from simple solid colors to elaborate patterns featuring glitter accents floral motifs and geometric shapes. Get ready to discover why lavender nails are the perfect choice for any season or occasion.
Classic Lavender French Tips With Modern Twists
Traditional French manicures get a dreamy update with lavender polish that transforms this timeless style into something fresh and contemporary. We’ve discovered innovative ways to reinvent the classic French tip using this versatile purple hue.
Reverse French Manicure in Lavender
Reverse French manicures flip the traditional design by placing lavender polish at the base of your nails instead of the tips. We love how this modern interpretation creates a stunning crescent shape that elongates your fingers and adds visual interest. Start by applying a clear or nude base coat, then paint a curved lavender section near your cuticles using a steady hand or nail guides. The contrast between the natural nail bed and the soft purple creates an elegant gradient effect that’s perfect for both casual and formal occasions.
Paint the lavender section in varying thicknesses to customize your look, from thin delicate crescents to bold statement curves. We recommend using a quality lavender polish with good opacity to achieve clean lines and vibrant color payoff.
Glitter-Tipped Lavender French Nails
Glitter tipped lavender French nails combine sparkle with sophistication by adding shimmer to the traditional white tip area. We apply a lavender base color across the entire nail, then create French tips using glitter polish in silver, gold, or iridescent shades. This technique adds dimension and catches light beautifully, making your manicure perfect for special events or when you want extra glamour.
Choose fine glitter polishes for a subtle sparkle or chunky glitters for dramatic impact. We suggest applying two thin coats of glitter at the tips rather than one thick coat to prevent clumping and ensure smooth application. Seal everything with a high quality top coat to lock in the glitter and create a smooth finish.
Ombré Lavender French Design
Ombré lavender French designs create a seamless color transition from deep lavender at the tips to clear or nude at the base. We achieve this gradient effect using a makeup sponge to blend the colors while they’re still wet, creating a soft fade that’s incredibly modern and chic. Start with your darkest lavender shade at the tips, then gradually blend lighter tones toward the cuticle area.
Work quickly while the polish is still tacky to ensure smooth blending, and clean up the cuticle area with a small brush dipped in acetone. We find that applying a base coat first helps the ombré effect appear more seamless and prevents staining of your natural nails.
Lavender Gradient and Ombré Nail Art Techniques
 1")
Gradient and ombré techniques transform simple lavender polish into stunning dimensional nail art. These blending methods create smooth color transitions that add depth and sophistication to any manicure.
Light to Dark Purple Gradient
Starting with a light lavender base creates the foundation for this dramatic gradient effect. Apply your palest lavender shade across the entire nail as your base coat. We recommend using a makeup sponge to dab medium purple polish from the cuticle area toward the center of each nail.
Blending becomes easier when you work quickly before the polish dries. Layer deeper purple tones near the cuticle line while the previous shade remains slightly wet. The key involves using gentle dabbing motions rather than harsh strokes to achieve seamless transitions.
Building up the gradient requires multiple thin layers rather than one thick application. Apply each purple shade in sections, allowing slight overlap between colors. This technique prevents harsh lines and creates that coveted smooth fade effect we all desire in professional looking gradients.
Lavender to White Cloud Effect
Creating this ethereal cloud effect starts with white polish at the nail tips. Apply pure white to roughly one third of each nail tip, then immediately begin blending downward with a clean makeup sponge. The white should fade gradually into your lavender base color.
Achieving the perfect cloud appearance requires strategic sponge placement. Dab the sponge in circular motions to create natural looking cloud formations. We suggest varying the intensity of white on each nail to mimic how real clouds appear in different densities across the sky.
Finishing touches enhance the dreamy cloud effect significantly. Add tiny dots of white polish using a dotting tool or toothpick to represent wispy cloud details. These small accents make the design appear more three dimensional and realistic.
Multi-Purple Sunset Ombré
Sunset inspired ombré combines three to four purple shades for maximum visual impact. Begin with deep plum or eggplant at the cuticle, transition to medium lavender in the center, then finish with pale lilac at the tips. This creates a natural sunset progression that mimics evening sky colors.
Layering multiple purple tones requires careful color selection for smooth transitions. Choose shades that are no more than two tones apart on the color wheel. We find that staying within the same brand often provides better color compatibility and blending results.
Professional results depend on proper sponge technique and timing. Apply all three colors to a makeup sponge in horizontal stripes, then press onto the nail in one fluid motion. Repeat this process two to three times, cleaning the sponge between applications to maintain color clarity and prevent muddiness.
Floral Lavender Nail Designs for Spring and Summer
 2")
Spring and summer seasons call for fresh floral motifs that capture nature’s beauty on our fingertips. These botanical lavender nail designs bring garden elegance to your manicure with delicate petals and organic textures.
Hand-Painted Lavender Sprigs
Creating realistic lavender sprigs requires precision with thin nail art brushes and layered purple tones. Start with a light lavender base coat and let it dry completely before adding the botanical elements. Use a fine detail brush to paint thin green stems vertically along each nail, varying their heights for natural movement.
Apply small purple dots in clustered formations to mimic lavender flower heads. Begin with the darkest purple shade at the base of each cluster, then add medium purple dots above them. Finish with the lightest lavender shade at the tips of each sprig to create depth and dimension.
Seal your hand painted design with a glossy top coat for longevity. This protective layer prevents chipping while improving the vibrant colors of your botanical artwork. The finished look captures the essence of a lavender field in full bloom.
Pressed Flower Nail Art
Real dried lavender flowers create authentic texture and color variation on your nails. Purchase pre-pressed lavender blooms from create stores or press fresh sprigs between books for two weeks. Clean your nails thoroughly and apply a clear base coat before placement.
Position individual flower pieces strategically across each nail using tweezers for precise placement. Place larger blooms on accent nails and smaller pieces on remaining fingers for balanced distribution. Press gently to ensure proper adherence without crushing the delicate petals.
Apply thin layers of clear topcoat over the flowers to secure them permanently. Build up protection with 2-3 coats, allowing each layer to dry completely. This technique preserves the natural beauty while creating a smooth, professional finish that lasts for weeks.
Watercolor Lavender Blooms
Watercolor effects create soft, dreamy lavender flowers with blended edges and translucent layers. Begin with a white or nude base to enhance the transparency of your design. Mix lavender polish with clear topcoat to achieve the perfect watercolor consistency.
Dab diluted polish onto nails using a small makeup sponge for organic bloom shapes. Work quickly while the polish remains workable, creating irregular petal formations. Layer different purple intensities to build depth, with darker centers fading to lighter outer edges.
Blend colors while wet using a clean brush for seamless transitions between shades. Add tiny dots of concentrated lavender for flower centers, then use a toothpick to create subtle petal lines. The final result resembles delicate watercolor paintings with soft, romantic appeal perfect for spring occasions.
Geometric Lavender Patterns and Abstract Art
 3")
Modern nail art embraces bold geometric shapes and abstract designs that transform lavender polish into stunning contemporary masterpieces.
Minimalist Lavender Lines and Dots
Simple geometric lines create sophisticated lavender nail designs that perfectly balance elegance with modern minimalism. We recommend using a thin striping brush to draw clean horizontal or vertical lines across nude or clear base coats. Strategic placement of these lavender lines at the nail’s center or edge creates visual interest without overwhelming the overall design.
Dot patterns offer endless possibilities for geometric lavender nail art that’s both playful and refined. Using a dotting tool or bobby pin, we create perfectly round circles in various sizes across the nail surface. Cluster small dots at the cuticle area for a gradient effect, or arrange them in diagonal rows for a more structured appearance. The key lies in maintaining consistent spacing between each lavender dot to achieve a professional polished look.
Negative space techniques enhance these minimalist designs by allowing natural nail color to peek through strategic gaps. We apply lavender polish in geometric sections while leaving exact areas unpainted, creating striking contrast and visual depth. This approach works particularly well with thin line designs where negative space frames the lavender elements.
Marble Effect with Lavender Swirls
Water marbling technique produces mesmerizing lavender swirl patterns that resemble natural stone formations. We drop alternating colors of lavender and white polish into room temperature water, then use a toothpick to create swirl patterns before dipping each nail. The result showcases organic flowing lines that capture light beautifully and create unique patterns on every finger.
Dry marble effects offer more control over lavender swirl placement while maintaining the organic aesthetic. Using a small brush or sponge, we blend different shades of lavender polish directly on the nail surface. Quick circular motions create natural looking veins and swirls that mimic authentic marble patterns. Adding touches of silver or white enhances the realistic stone appearance.
Alcohol ink methods create stunning abstract lavender designs with unpredictable artistic results. We apply drops of alcohol ink in lavender shades to wet nail polish, watching as the alcohol creates organic spreading patterns. Each application produces completely unique results, making every manicure a one of a kind work of art.
Negative Space Geometric Designs
Triangle cutouts showcase lavender polish through strategic geometric openings that create modern architectural nail art. We use nail tape to mask triangular sections before applying lavender base color, then remove the tape to reveal crisp negative space shapes. Positioning these triangles at different angles across each nail creates ever-changing visual movement and contemporary appeal.
Circle and oval openings soften geometric lavender designs while maintaining clean modern lines. Using circular nail stencils or reinforcement stickers, we create perfect round negative spaces within lavender backgrounds. These openings can showcase natural nail color, contrasting polish shades, or even small decorative elements like tiny gems or foil accents.
Linear negative space patterns combine lavender polish with strategic unpainted sections to form striking geometric compositions. We apply nail tape in various configurations such as chevrons, stripes, or crosshatch patterns before painting with lavender shades. Removing the tape reveals precise negative space lines that create optical illusions and dimensional effects on the nail surface.
Glittery and Sparkly Lavender Nail Inspirations
 4")
Sparkle meets sophistication when we combine lavender’s dreamy hue with dazzling glitter effects. These glamorous nail designs transform the gentle purple shade into show-stopping manicures perfect for special occasions or whenever you want to add extra shine to your look.
Holographic Lavender Chrome Finish
Holographic lavender chrome creates an otherworldly mirror effect that shifts colors as you move your hands. We recommend starting with a black base coat to enhance the chrome powder’s reflectivity and depth. Apply two thin coats of lavender gel polish and cure each layer under LED light for optimal results.
Chrome powder application requires a no-wipe top coat before the final step. Gently rub the holographic chrome powder onto the tacky surface using an eyeshadow applicator or silicone tool. Work in circular motions to achieve even coverage and maximum shine.
Sealing techniques determine the longevity of your chrome finish. Apply a high-quality gel top coat over the chrome powder and cure for the recommended time. This protective layer prevents chipping and maintains the holographic effect for up to two weeks.
Chunky Glitter Accent Nails
Chunky glitter accent nails create focal points by combining large hexagonal and square glitter pieces with lavender base colors. We suggest applying glitter to your ring finger and thumb for balanced visual appeal. Use a clear base coat on accent nails before pressing glitter pieces into the wet polish.
Placement strategy enhances the overall design’s impact and wearability. Position larger glitter pieces near the cuticle area and smaller pieces toward the nail tip. This gradient effect creates natural flow while preventing excessive bulk that could catch on clothing.
Application tools make chunky glitter placement precise and professional looking. Tweezers work best for positioning individual hexagonal pieces exactly where you want them. A small brush dipped in acetone helps clean up any misplaced glitter before the polish sets.
Subtle Shimmer Lavender Base
Subtle shimmer lavender base coats provide understated elegance with micro-fine glitter particles that catch light beautifully. These polishes contain tiny iridescent flakes that create gentle sparkle without overwhelming the lavender’s soft appearance. We find that two thin coats deliver optimal coverage and shimmer intensity.
Micro-glitter formulations blend seamlessly into lavender polish for everyday wear. Look for brands that incorporate holographic micro-particles or pearl dust for multi-dimensional shine. These subtle effects complement professional settings while still providing glamorous appeal.
Layering techniques allow customization of shimmer intensity levels. Start with one coat of shimmer polish and evaluate the sparkle level before adding more layers. Building gradually prevents clumpy application and maintains the lavender color’s integrity throughout the manicure process.
Textured Lavender Nail Art Ideas
 5")
Texture adds dimensional beauty to lavender manicures beyond traditional smooth finishes. We’ll explore sophisticated textural techniques that transform ordinary lavender polish into tactile nail art masterpieces.
Matte Lavender with Glossy Accents
Matte lavender creates a sophisticated velvet appearance that contrasts beautifully with glossy details. We recommend applying two thin coats of lavender polish followed by a matte top coat for the base texture. Strategic placement of glossy accents using a small detail brush creates stunning visual interest across the nail surface.
Creating geometric glossy patterns on matte backgrounds produces modern nail art that feels current and chic. Apply thin lines using a striping brush dipped in clear top coat for precise glossy details. Dots created with a dotting tool and clear top coat add playful texture contrasts to the matte lavender foundation.
French tip combinations using glossy lavender tips on matte bases offer elegant sophistication for special occasions. We suggest taping off the tip area before applying glossy top coat to achieve clean lines. Reverse applications with matte tips on glossy bases create equally striking results for those seeking unique textural combinations.
Velvet Sand Texture Effect
Velvet sand texture transforms lavender polish into a luxurious textured surface reminiscent of soft fabric. We achieve this effect by mixing fine textured sand powder directly into wet lavender polish before application. Two generous coats ensure complete coverage and optimal texture development across the nail surface.
Specialized textured polishes containing micro beads create instant velvet effects without additional mixing steps. These formulas provide consistent texture distribution and eliminate potential clumping issues common with DIY sand mixtures. Application requires gentle dabbing motions rather than traditional brush strokes to preserve the textured finish.
Layering techniques using textured base coats under regular lavender polish create subtle dimensional effects perfect for everyday wear. We recommend allowing the textured base to dry completely before applying the lavender color coat. Light buffing between coats helps smooth any uneven texture spots while maintaining the desired dimensional appearance.
3D Lavender Rose Embellishments
3D lavender roses add romantic elegance through sculptural nail art techniques that create raised floral designs. We sculpt these roses using thick lavender gel polish applied in layers with a small detail brush. Each petal requires careful shaping and curing under LED lights to maintain dimensional structure throughout the design process.
Acrylic powder mixed with lavender polish creates moldable paste perfect for hand sculpting detailed rose shapes. This technique allows for intricate petal definition and realistic flower proportions on the nail surface. We suggest starting with simple three petal roses before attempting complex multi layered designs requiring advanced sculpting skills.
Pre made 3D rose cabochons offer quick application answers for those preferring ready made embellishments over hand sculpted options. These polymer roses come in various lavender shades and attach securely using nail glue or gel top coat. Strategic placement on accent nails creates balanced designs without overwhelming the overall manicure composition.
Lavender Nail Ideas for Special Occasions
 6")
When life’s most memorable moments call for exceptional beauty looks, lavender nails offer the perfect balance of sophistication and charm. Special occasions demand nail designs that complement formal attire while making a lasting impression.
Wedding-Ready Lavender Elegance
Bridal lavender manicures require delicate sophistication that won’t compete with wedding gowns or bouquets. We recommend starting with a sheer lavender base coat that provides subtle color without overwhelming the overall bridal aesthetic. Tiny pearl accents placed strategically along the nail beds create an elegant focal point that catches light beautifully in wedding photography.
French manicures get a romantic update when we replace traditional white tips with soft lavender polish. This technique works exceptionally well for bridesmaids who want coordinated looks that complement purple wedding themes. Adding a thin silver striping tape just below the lavender tips creates defined lines that photograph gorgeously during ceremony moments.
Lace inspired nail art brings vintage romance to lavender manicures through intricate white detailing over light purple bases. We achieve this look using nail stamps or freehand painting with thin brushes to create delicate floral patterns. Finishing with a high gloss topcoat ensures the design remains chip free throughout long wedding celebrations.
Prom Night Purple Perfection
Prom deserves show stopping nail designs that match the excitement and glamour of this milestone evening. Bold lavender chrome finishes create mirror like surfaces that reflect ballroom lights dramatically. We apply black base coats first to intensify the chrome powder’s reflective properties before buffing to achieve maximum shine.
Rhinestone encrusted accent nails add serious sparkle that complements formal gowns beautifully. Strategic placement of crystals along ring fingers creates focal points without overwhelming all ten nails. We secure each stone with clear gel polish and cure under UV lamps to ensure they stay put during hours of dancing.
Gradient nail art combining deep purple bases with lavender tips creates stunning ombré effects perfect for prom photos. Using makeup sponges to blend the colors smoothly requires patience but delivers professional looking results. Multiple thin coats prevent streaking while building rich color depth that looks expensive under formal lighting.
Holiday Lavender Festivities
Holiday celebrations call for lavender nail designs that capture seasonal magic while maintaining festive sophistication. Winter holidays pair beautifully with lavender and silver combinations that evoke snowy elegance. We create snowflake patterns using white polish over lavender bases, adding tiny silver dots for extra winter sparkle.
Spring holiday manicures benefit from lavender paired with soft pastels that celebrate renewal and growth. Easter celebrations look stunning with lavender bases adorned with small floral decals in complementary pink and white shades. These designs work perfectly for family gatherings and spring brunches.
Summer holiday nail art incorporates lavender into patriotic themes through creative color blocking techniques. We alternate lavender with red and white stripes for Memorial Day celebrations, or create star patterns using lavender as accent colors. These designs prove that purple hues can work beautifully in traditional holiday color schemes when applied thoughtfully.
Easy DIY Lavender Nail Tutorials for Beginners
 7")
We’ve created these beginner-friendly tutorials to help you master lavender nail art without professional training. These step-by-step guides focus on achievable techniques that deliver stunning results.
Simple Solid Lavender Application
Simple Solid Lavender Application requires proper base preparation and careful polish layering for flawless coverage. We recommend starting with clean, filed nails and pushing back cuticles for the smoothest canvas.
Apply a base coat using thin, even strokes from cuticle to tip. This protective layer prevents staining and extends your manicure’s lifespan to 7-10 days. Wait 2-3 minutes for complete drying before proceeding.
Choose your lavender shade based on your skin tone and personal preference. Light lavender shades like “Lilac Mist” work beautifully on fair skin while deeper purples like “Amethyst Dream” complement darker complexions. We suggest testing colors on your pinky nail first.
Paint your first coat with slow, deliberate strokes starting from the center of each nail. Begin at the cuticle line and sweep toward the tip in one smooth motion. Apply thin layers rather than thick ones to prevent bubbling and ensure even coverage.
Add a second coat after the first layer feels completely dry to the touch. This typically takes 3-5 minutes depending on your polish formula and room temperature. The second coat provides full opacity and rich color depth.
Seal with top coat for lasting shine and chip protection. We recommend using a quick-dry formula that sets within 60 seconds. This final step transforms your manicure from amateur to professional-looking.
Basic Lavender Dotticure Technique
Basic Lavender Dotticure Technique creates playful patterns using simple dotting tools or household items. We’ll show you how to achieve perfectly round dots with consistent spacing and size.
Gather your dotting supplies including a dotting tool set, toothpicks, or bobby pins for different dot sizes. A makeup sponge and paper towel will help control polish consistency. Choose contrasting colors like white, silver, or deep purple for your dots.
Prepare your base with two coats of your chosen lavender shade and allow complete drying. This prevents smudging when adding dots and ensures clean, crisp circles. We wait at least 10 minutes before starting dot placement.
Load your dotting tool by dipping it into polish and testing on paper first. The polish should form a smooth bead on the tool tip without dripping. Clean the tool between colors using acetone or nail polish remover.
Create your dot pattern starting with larger dots first, then filling in with smaller ones. We suggest practicing different arrangements on paper: random scattered dots, diagonal lines, or cluster formations. Space dots evenly for balanced visual appeal.
Vary your dot sizes by using different tool ends or adjusting pressure. Light pressure creates small dots while firm pressure produces larger circles. Mix sizes within the same design for ever-changing texture and visual interest.
Quick Lavender Stripe Designs
Quick Lavender Stripe Designs transform basic manicures into modern art pieces using simple striping techniques. We’ll demonstrate three foolproof stripe patterns that take under 15 minutes to complete.
Select your striping tools including thin brushes, striping tape, or nail art pens for clean lines. A steady hand works best with brushes while tape ensures perfectly straight edges for beginners. We recommend starting with tape methods for consistent results.
Plan your stripe layout before applying polish to avoid mistakes and rushed corrections. Common patterns include vertical stripes, diagonal lines, or geometric intersections. Sketch your design on paper first to visualize spacing and proportion.
Apply striping tape to dry lavender base coats, pressing edges firmly to prevent bleeding. Cut tape strips to nail length plus extra for easy removal. We suggest using tweezers for precise placement and smooth application.
Paint over taped sections with contrasting colors like white, gold, or deep purple. Apply thin coats to prevent lifting when removing tape. Work quickly as some tapes can leave residue if left too long.
Remove tape immediately after painting while polish remains wet for crisp, clean lines. Pull tape at a 45-degree angle slowly and steadily. Any small imperfections can be cleaned up with a small brush dipped in acetone.
Experiment with stripe widths by varying tape thickness or brush sizes. Thin lines create elegant, minimalist looks while thick stripes make bold statements. We often combine multiple stripe widths in single designs for added visual complexity.
Lavender Nail Color Combinations and Palettes
 8")
Lavender’s versatility shines brightest when paired with complementary colors and thoughtfully designed palettes. These sophisticated combinations transform simple lavender manicures into stunning works of art.
Lavender and Gold Luxe Pairing
Gold elevates lavender polish to luxurious heights, creating an opulent combination that’s perfect for upscale events. We recommend using metallic gold foil strips along the nail beds while keeping lavender as the base color for maximum visual impact. Champagne gold glitter works beautifully over sheer lavender, creating depth without overwhelming the delicate purple tones.
Rose gold offers a softer alternative that complements lavender’s feminine qualities. This pairing works exceptionally well for bridal parties and romantic occasions. Apply lavender polish as your base coat, then add thin rose gold striping tape in geometric patterns for a modern twist.
Bronze tones create unexpected warmth when combined with cooler lavender shades. Try alternating bronze and lavender on different nails, or use bronze as an accent color on ring fingers only. This combination particularly suits autumn events and adds richness to your overall look.
Soft Pastels with Lavender Base
Mint green creates a dreamy spring palette when paired with lavender polish. We suggest using lavender on the majority of nails while applying mint green to accent nails for a fresh, botanical inspired look. This combination works perfectly for Easter celebrations and garden parties.
Blush pink enhances lavender’s romantic qualities, creating a palette that’s both sweet and sophisticated. Apply lavender to your thumb, ring, and pinky fingers while using blush pink on your index and middle fingers. This creates visual balance while maintaining color harmony.
Buttercream yellow adds unexpected brightness to lavender manicures without clashing with the purple undertones. Use this combination for summer festivals and vacation manicures. We recommend applying buttercream yellow to just one accent nail per hand to prevent color overload.
Baby blue complements lavender’s cool undertones beautifully, creating a serene palette reminiscent of twilight skies. This combination works particularly well for gradient designs where colors blend seamlessly from lavender to blue across the nail bed.
Monochromatic Purple Schemes
Deep plum creates striking contrast when paired with soft lavender shades. We recommend using plum polish on accent nails while keeping lavender on the remaining fingers for a sophisticated monochromatic look. This technique adds depth and visual interest without introducing competing color families.
Lilac provides subtle variation within the purple family, creating dimension through tonal differences rather than contrasting hues. Apply lilac to your thumb and pinky fingers while using lavender on the remaining nails. This creates a gentle gradient effect across your hands.
Mauve adds warmth to cooler lavender tones, creating a balanced monochromatic palette that flatters most skin tones. Use mauve as your base color on all nails, then add lavender tips for a reverse French manicure effect. This combination works beautifully for professional settings.
Periwinkle brings blue undertones into the purple family, creating a sophisticated monochromatic scheme with subtle color variation. We suggest alternating periwinkle and lavender across your nails, or using periwinkle for detailed nail art over a lavender base. This combination particularly suits cool skin tones and creates a calming, harmonious effect.
Professional Lavender Nail Care and Maintenance Tips
 9")
Achieving stunning lavender nail designs requires proper care and maintenance techniques that keep your manicure looking fresh. We’ll share expert tips that help extend your lavender polish’s lifespan and maintain its vibrant appearance.
Best Base Coats for Lavender Polish
Ridge-filling base coats work exceptionally well with lavender polish since they create a smooth surface that enhances color payoff. We recommend applying two thin layers of a strengthening base coat to prevent staining and improve adhesion.
Sticky base formulas grip lavender polish better than regular base coats, preventing chipping and extending wear time. Popular options include gel-based primers that create a tacky surface for superior polish bonding.
Color-correcting base coats in white or nude tones make lavender shades appear more vibrant and true to color. We suggest using these specialty bases when working with sheer lavender formulas that might appear washed out on natural nails.
Strengthening base coats with calcium or protein help prevent breakage during the manicure process. Apply these formulas to weak or damaged nails before adding lavender polish for optimal results.
Extending Lavender Manicure Longevity
Top coat application every 2-3 days keeps lavender polish looking glossy and fresh while preventing chips. We apply thin layers of quick-dry top coat to maintain the manicure’s professional appearance.
Cuticle oil treatments prevent lifting around the nail edges where lavender polish typically begins to fail. Daily application of jojoba or vitamin E oil keeps the surrounding skin moisturized and flexible.
Glove protection during household tasks shields lavender manicures from harsh chemicals and excessive moisture. We recommend keeping rubber gloves handy for cleaning, gardening, and dishwashing activities.
Filing maintenance helps prevent small chips from spreading across the entire nail. Gently buff away minor imperfections and touch up with matching lavender polish to extend the manicure’s life.
Heat exposure limits preserve lavender polish integrity since high temperatures can cause bubbling and premature wear. Avoid prolonged sun exposure and hot water immersion during the first 24 hours after application.
Proper Removal Techniques
Acetone-free removers work best for lavender polish removal since they’re gentler on nails and surrounding skin. We soak cotton pads with remover and press them onto each nail for 30 seconds before gently wiping away the polish.
Foil wrapping method speeds up the removal process for stubborn lavender glitter or gel formulas. Wrap each fingertip with remover-soaked cotton and aluminum foil for 10-15 minutes before gently pushing off the softened polish.
Cuticle pusher tools help remove polish residue from nail edges and cuticle areas without damaging the nail bed. We use these tools with gentle pressure to clear away any remaining lavender color particles.
Nail buffer blocks smooth away any staining or residue left behind after polish removal. Light buffing with a fine-grit buffer restores the natural nail surface before applying new lavender designs.
Moisturizing treatments immediately after removal replenish oils and moisture lost during the process. We apply cuticle cream and nail strengthener to keep nails healthy between lavender manicure applications.
Conclusion
We’ve explored the endless possibilities that lavender nail art brings to your beauty routine. From classic French tips to intricate 3D roses these dreamy purple hues offer something for everyone’s style and skill level.
Whether you’re preparing for a special occasion or simply want to experiment with new techniques lavender nails provide the perfect canvas for creativity. The color combinations and maintenance tips we’ve shared will help you achieve salon-quality results at home.
Remember that nail art is all about self-expression and having fun with your look. With these lavender nail ideas in your toolkit you’re ready to create stunning manicures that’ll turn heads and boost your confidence every day.
Frequently Asked Questions
What makes lavender nails so popular in nail art?
Lavender nails have gained popularity due to their versatility and elegant appeal. The dreamy purple hue ranges from soft pastels to deep purples, offering a perfect blend of feminine elegance and modern chic. This makes lavender suitable for various seasons and occasions, appealing to beauty enthusiasts who want both sophistication and trendiness.
What are some easy lavender nail designs for beginners?
Beginners can start with simple solid lavender application, basic dotticure using a dotting tool, or quick stripe designs with a thin brush. Classic lavender French tips offer a contemporary twist on traditional manicures. These designs require minimal tools and techniques while still creating stunning results.
How do I create a lavender ombré effect?
To create a lavender ombré, use a makeup sponge to blend colors smoothly. Start with a light lavender base, then dab darker purple onto the sponge and gently press from the nail tip upward. Apply multiple thin coats for seamless transitions. Work quickly while polish is wet for best blending results.
What colors pair well with lavender nails?
Lavender pairs beautifully with gold for luxurious looks, blush pink for romantic occasions, and mint green or buttercream yellow for pastel combinations. Monochromatic schemes using deep plum and mauve create sophisticated effects. Silver works well for winter celebrations, while white creates elegant contrast.
How can I make my lavender manicure last longer?
Use a ridge-filling base coat for better adhesion, apply thin layers of polish, and seal with a quality top coat. Reapply top coat every 2-3 days, use cuticle oil regularly, and wear gloves during household tasks. Avoid acetone-based removers and moisturize nails after removal.
What’s the difference between matte and glossy lavender nails?
Matte lavender nails have a flat, non-reflective finish that appears more subtle and modern, while glossy lavender nails have a shiny, reflective surface that looks more traditional and vibrant. You can combine both finishes by using matte base with glossy accents for interesting contrast and dimension.
How do I add glitter to lavender nails?
Apply glitter over wet lavender polish for better adhesion, or use a glitter top coat. For accent nails, place chunky glitter strategically for visual appeal. Holographic chrome requires a black base coat first, then apply the chrome powder with a silicone tool for mirror-like effects.
Can I create floral designs with lavender polish?
Yes! Paint lavender sprigs using a thin brush with precise strokes and layering techniques. Try pressed flower nail art using real dried lavender flowers sealed with top coat, or create watercolor lavender blooms by blending colors with soft, translucent layers for dreamy spring effects.


