The holiday season brings sparkle excitement and endless opportunities to express our festive spirit through every detail of our look. While we’re busy planning outfits and accessories our nails often become the perfect canvas to showcase seasonal creativity and add that extra touch of holiday magic.
Whether you’re attending cozy family gatherings glamorous New Year’s parties or intimate holiday dinners your nails can become stunning conversation starters that complement your entire ensemble. From classic red and gold combinations to trendy winter whites and glittery accent nails the possibilities are truly endless.
We’ve curated the most inspiring holiday nail ideas that’ll transform your fingertips into miniature works of art. These designs range from simple elegant looks you can achieve at home to show-stopping creations that’ll have everyone asking where you got your nails done. Get ready to discover your new favorite holiday manicure that’ll keep you feeling festive all season long.
Classic Christmas Red and Green Holiday Nail Ideas
These timeless color combinations capture the essence of Christmas tradition and bring festive cheer to your fingertips. We’ll explore three beloved designs that never go out of style during the holiday season.
Traditional Holly and Mistletoe Designs
Holly nail art features deep green leaves with bright red berries that create an elegant winter botanical look. Start by painting your nails with a rich forest green base coat and allow it to dry completely. Use a thin nail art brush to paint small oval holly leaves in darker green shades, adding delicate white veins for realistic texture. Finish the design by dotting tiny red berries using a toothpick or dotting tool, creating clusters of three or four berries per nail.
Mistletoe designs offer a romantic twist on traditional holiday nail art with their distinctive three-leaf pattern. Paint your base in soft sage green and use a slightly darker shade to create the characteristic mistletoe leaf shape. Add small white dots to represent the berries, positioning them strategically between the leaves. This design works beautifully as an accent nail paired with solid red or green nails on the remaining fingers.
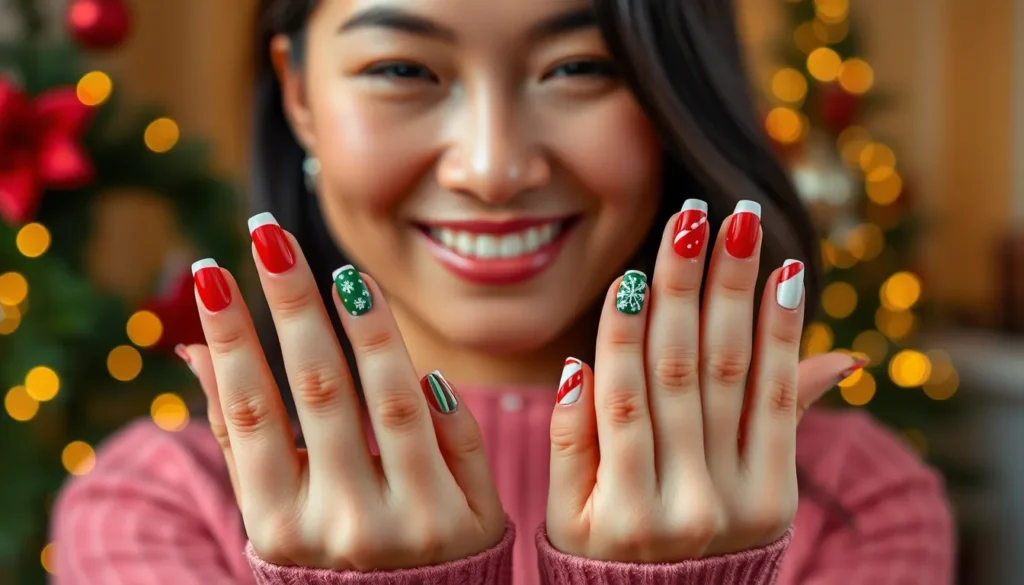
Candy Cane Striped Nail Art
Diagonal candy cane stripes create a playful and instantly recognizable Christmas pattern that’s perfect for spreading holiday joy. Begin with a white base coat and allow it to cure completely before adding the red stripes. Use striping tape or nail stencils to create perfectly straight diagonal lines across each nail, spacing them evenly for the most polished look.
Curved candy cane patterns mimic the actual shape of the beloved holiday treat by incorporating gentle curves instead of straight lines. Apply white polish as your base and use a thin brush to paint red curved stripes that follow the natural curve of your nail shape. This technique requires a steady hand but creates a more authentic candy cane appearance that captures the whimsical spirit of Christmas.
Poinsettia Flower Nail Patterns
Full poinsettia blooms transform your nails into miniature works of Christmas art with their dramatic red petals and golden centers. Create the base petals using deep crimson red polish, painting elongated teardrop shapes that radiate from a central point. Layer lighter red petals on top for dimension, then add tiny yellow dots in the center to represent the flower’s natural stamens.
Minimalist poinsettia accents offer a subtler approach while maintaining the flower’s festive appeal. Paint your nails in classic red and choose one accent nail for the poinsettia design. Use just three or four simple petal shapes in varying shades of red, keeping the design clean and modern. Add a single gold dot in the center to complete the look without overwhelming the overall manicure.
Sparkling Winter Wonderland Holiday Nail Ideas

Transform your manicure into a frosted fantasy with these enchanting winter designs that capture the magic of sparkling snow and icy elegance.
Snowflake Accent Nails
Create intricate snowflake patterns using white nail art pens or thin brushes on deep blue or silver base colors. Start with a simple six pointed star shape then add delicate branches extending from each point. We recommend practicing on a nail wheel first to perfect your technique before applying to your natural nails.
Stamp perfect snowflakes using nail stamping plates designed specifically for winter patterns. Choose metallic silver or pearl white stamping polish to create dimensional effects that catch the light beautifully. Layer different sized snowflakes on accent fingers while keeping other nails solid colored for balance.
Apply snowflake nail stickers for quick and professional looking results when you’re short on time. Place them strategically on ring fingers or thumbs over gradient bases that transition from dark blue to white. Seal everything with a high quality top coat to ensure your winter wonderland manicure lasts through holiday celebrations.
Icy Blue and Silver Glitter Combinations
Blend powder blue and silver chrome to achieve that perfect frozen lake effect on your nails. Apply the powder blue as your base color then use a makeup sponge to dab silver chrome polish from the cuticle area downward creating an ombre gradient. This technique mimics the way ice forms naturally on winter surfaces.
Layer fine silver glitter over pale blue cream polishes to create depth and sparkle reminiscent of fresh snow in sunlight. Focus the glitter concentration near the tips and gradually fade toward the cuticles. We suggest using different sized glitter particles from micro fine to small chunks for the most realistic winter effect.
Experiment with thermal polish that shifts from deep blue to silver depending on temperature changes. These color changing formulas perfectly capture the essence of winter weather while providing an interactive element to your holiday manicure. Top with clear glitter for extra dimension and holiday sparkle.
Crystal Inspired Nail Designs
Recreate crystal formations using clear gel polish built up in geometric shapes on accent nails. Apply the gel in triangular and angular patterns then cure under UV light to create raised crystalline structures. Add silver foil pieces strategically to mimic the way light refracts through real crystals.
Paint abstract crystal clusters using various shades of white gray and silver with angular brush strokes that intersect and overlap. Start with the largest crystal shape as your focal point then add smaller fragments around it. This artistic approach gives your nails a modern winter sophistication.
Embed actual crystal rhinestones into wet base coat before curing to create genuine sparkle and dimension. Choose clear AB crystals that reflect rainbow colors or stick with classic clear stones for timeless elegance. Position them near cuticles or tips rather than nail centers to avoid catching on clothing and ensure comfortable wear.
Elegant Gold and Metallic Holiday Nail Ideas

Metallic nail designs add sophisticated glamour to any holiday celebration. These luxurious finishes catch the light beautifully and complement both casual gatherings and formal events.
Rose Gold Christmas Tree Silhouettes
Rose gold creates the perfect backdrop for minimalist Christmas tree designs that exude modern elegance. We love how this warm metallic shade flatters all skin tones while maintaining a festive spirit.
Start by applying two coats of rose gold polish as your base color. Once completely dry, use a fine nail art brush dipped in dark green or black polish to paint simple triangular tree shapes on accent nails. Create the trunk with a thin brown line at the base of each triangle.
Add tiny rhinestones or gold studs at the top of each tree to serve as stars. Place small dots of white polish randomly on the trees to mimic snow or ornaments. This design works beautifully on ring fingers while keeping other nails in solid rose gold.
For variation, try creating silhouettes on just the thumb and ring finger of each hand. The contrast between the shimmery base and matte tree designs creates visual interest that’s both sophisticated and playful.
Champagne Glitter Gradient Nails
Champagne glitter gradients bring sparkle and sophistication to holiday manicures through their subtle yet eye catching finish. This technique creates depth and dimension that photographs beautifully under holiday lights.
Begin with a nude or clear base coat to ensure smooth application. Apply champagne glitter polish starting at the tips of your nails, concentrating the heaviest application at the edges. Use a makeup sponge to dab and blend the glitter downward toward the middle of each nail.
Build the gradient slowly with multiple thin layers rather than one thick application. This prevents clumping and creates a seamless transition from heavy sparkle to subtle shimmer. Allow each layer to dry completely before adding the next.
Finish with a high quality top coat to seal the glitter and prevent chipping. The champagne color pairs beautifully with gold jewelry and complements both warm and cool undertones in clothing.
Metallic French Tips with Holiday Accents
Metallic French tips offer a modern twist on the classic manicure while providing the perfect canvas for subtle holiday decorations. These designs look polished enough for professional settings yet festive enough for holiday parties.
Replace traditional white tips with gold, silver, or copper metallic polish for an instant upgrade. Apply the metallic color using French tip guides or tape for clean, precise lines. Make the tips slightly thicker than traditional French manicures to showcase the metallic finish.
Add small holiday accents to one or two nails per hand to avoid overwhelming the design. Consider tiny snowflakes painted in white on silver tips, small holly leaves on gold tips, or miniature gift bow designs using contrasting metallics.
Create variation by alternating different metallic shades across your nails. Try gold tips on your thumbs and pinkies with silver on your remaining fingers. This creates visual interest while maintaining the sophisticated French manicure aesthetic.
For special occasions, add a single rhinestone at the base of each metallic tip. This subtle detail catches light beautifully and elevates the entire manicure without appearing too busy or overwhelming.
Fun and Festive Character Holiday Nail Ideas

Character themed nail art transforms your fingertips into miniature holiday storytelling canvases. We’ll show you how to bring beloved Christmas characters to life with these whimsical designs that capture the playful spirit of the season.
Santa Claus Face Nail Art
Create jolly Santa faces using a red base coat and white acrylic paint for his iconic beard. Start with your ring finger as the accent nail, applying two coats of bright red polish to establish Santa’s hat. Use a small detail brush to paint a white curved line at the base of the nail for the hat’s trim, then add a tiny white dot for the pompom.
Paint Santa’s face using a flesh toned polish or mix white with a drop of pink. Allow the base to dry completely before adding his features with a fine liner brush. Black polish creates the eyes as small dots, while red polish forms his rosy cheeks and nose.
Finish the design by carefully painting white curved strokes for his fluffy beard using a fan brush technique. Seal everything with a glossy top coat to make Santa’s face shine bright. This design works beautifully on thumbs or ring fingers as statement nails.
Reindeer and Rudolph Designs
Design adorable reindeer silhouettes using brown polish as your base color across all nails. Create the reindeer head shape by painting an oval in the upper portion of each nail, leaving space for antlers. Use a steady hand or nail art brush to draw delicate antler branches extending upward.
Add Rudolph’s signature red nose using a small dotting tool and bright red polish. Black polish creates the eyes as tiny dots positioned just above the nose area. Brown or darker polish defines the antler details with thin connecting lines.
Embellish regular reindeer with golden brown highlights on the antlers for a more realistic look. Try creating a winter scene by adding white snowflakes around the reindeer using a fine brush. This design pairs perfectly with neutral winter outfits.
Gingerbread Man Nail Decorations
Create sweet gingerbread men using warm brown polish as your base across accent nails. Start by painting the entire nail in a caramel or cinnamon brown shade, allowing it to dry completely before adding details. Use a small brush to outline the gingerbread man shape in the center of each nail.
Detail the gingerbread figures with white polish to create icing decorations. Paint small dots for buttons running down the center, then add curved lines for the classic smile. Tiny dots of white polish form the eyes, while you can use colored polish for candy decorations.
Enhance the design by adding texture with a matte top coat to mimic real cookie surfaces. Try alternating between traditional gingerbread men and gingerbread women with bow details. These charming characters look especially festive when paired with red or green accent nails featuring simple holiday patterns.
New Year’s Eve Glamorous Holiday Nail Ideas

Ring in the new year with stunning nail designs that capture the excitement and elegance of midnight celebrations. These sophisticated looks will ensure your nails shine as brightly as the fireworks lighting up the sky.
Black and Gold Party Nails
Black and gold combinations create the ultimate sophisticated party aesthetic. We love how this classic color pairing instantly elevates any New Year’s Eve outfit. Start with a deep black base coat on all nails, allowing it to dry completely before adding gold accents.
Apply gold foil strips diagonally across two accent nails for geometric glamour. The metallic contrast against the black creates visual depth that catches light beautifully. Consider using nail tape to achieve perfectly straight lines, then carefully peel it away while the gold polish is still slightly wet.
Create elegant gold French tips on remaining fingers for coordinated luxury. This modern twist on the classic manicure adds just enough sparkle without overwhelming the overall design. Finish with gold glitter on your ring finger to create a stunning focal point that represents the celebration ahead.
Midnight Blue with Star Accents
Midnight blue polish captures the essence of New Year’s Eve’s starlit sky. This rich, deep shade provides the perfect backdrop for celestial nail art that feels both mystical and festive. Apply two coats of navy or midnight blue as your base color.
Add tiny gold stars using a dotting tool or star-shaped nail stickers. We recommend creating constellation patterns across different nails rather than covering every surface. Place larger stars on your thumb and ring finger, with smaller ones scattered on the remaining nails for balance.
Layer silver glitter topcoat over the entire design for extra sparkle. This technique mimics the way starlight twinkles in the night sky. Focus the heaviest glitter application on your accent nails to create depth and dimension that catches party lights perfectly.
Confetti and Fireworks Nail Art
Confetti-inspired designs bring the party atmosphere right to your fingertips. We achieve this look by layering different sized glitter pieces in gold, silver, and holographic finishes over a clear or nude base. Apply the glitter while the base coat is still slightly tacky for better adherence.
Create firework bursts using thin nail art brushes and metallic polish. Start from a central point and paint radiating lines outward in gold and silver. Add tiny dots at the end of each line to represent sparkling embers falling through the air.
Incorporate actual confetti pieces sealed under a clear topcoat for texture. Small paper confetti in star and circle shapes adds authentic party vibes to your manicure. Press them gently into wet clear polish, then seal with two coats of topcoat for a smooth, long-lasting finish that celebrates the countdown to midnight.
Minimalist Modern Holiday Nail Ideas

We love how minimalist holiday nail designs offer elegant sophistication without overwhelming details. These clean, modern approaches to festive manicures prove that less truly can be more.
Subtle Christmas Tree Line Art
Delicate single lines create stunning Christmas tree silhouettes that capture festive spirit with minimal effort. We start by painting a thin vertical line using a fine nail art brush and forest green polish down the center of each nail. Three small horizontal lines branch out from the main trunk at different heights to form the tree shape.
Adding tiny gold dots at the tip transforms our simple tree into a sparkling masterpiece. We place one small dot where the lines intersect to mimic ornaments. Clear topcoat seals the design and adds professional shine.
Creating multiple small trees across different nails works beautifully for accent designs. We paint two or three mini trees on ring fingers while keeping other nails neutral. Varying tree heights adds visual interest without cluttering the overall look.
Simple Dot Pattern Holiday Designs
Strategic dot placement creates festive patterns that feel modern and intentional rather than busy. We use dotting tools or bobby pins to create perfect circles in holiday colors like deep red, forest green, and metallic gold. Five dots arranged in a flower pattern mimics poinsettia blooms with minimal detail.
Alternating red and green dots in diagonal lines across nails creates candy cane inspired patterns. We space dots evenly using the nail’s natural curve as our guide. Three dots clustered together at the nail tip resembles holly berries when painted in classic red.
Gradient dot designs transition from large to small dots moving toward the cuticle. We start with our largest dotting tool at the tip and progress to smaller sizes. Gold dots scattered randomly over nude base coats create subtle sparkle perfect for office holiday parties.
Negative Space Holiday Motifs
Unpainted areas become the design element itself in these sophisticated negative space techniques. We use geometric tape to mask off triangular Christmas tree shapes before applying polish to surrounding areas. Removing tape reveals crisp tree silhouettes in natural nail color.
Circular reinforcement stickers create perfect negative space ornaments when placed before painting. We arrange three circles of different sizes on each nail before applying metallic polish. Peeling off stickers after polish dries reveals elegant ornament shapes.
Half moon techniques work beautifully for creating snow drift effects at nail bases. We apply curved tape along the cuticle line and paint upper portions in icy blue or silver. The natural nail peeks through to simulate fresh snow accumulation.
Combining multiple negative space elements on accent nails creates statement pieces. We mask off both tree and star shapes using various stencils before applying deep winter colors. These multi motif designs become conversation starters while maintaining minimalist appeal.
DIY Budget-Friendly Holiday Nail Ideas

Creating stunning holiday nail art doesn’t require expensive salon visits or professional tools. We’ll show you how to achieve gorgeous festive looks using items from around your house and budget-friendly polish combinations.
Using Household Items for Nail Art
Tape transforms your nails into geometric masterpieces with crisp lines and professional-looking stripes. Regular scotch tape creates perfect chevron patterns when applied diagonally across painted nails. Washi tape offers decorative borders and can be left on as accent details for textured holiday designs.
Toothpicks become precision nail art tools for creating detailed snowflakes and delicate dot patterns. Dip the pointed end in white polish to draw intricate winter scenes or use the blunt end for perfectly round ornament designs. Paper clips straightened into different shapes work as custom stamping tools for repetitive patterns.
Sponges create stunning gradient effects that mimic winter sunsets and aurora borealis designs. Makeup sponges work best for blending multiple colors seamlessly from cuticle to tip. Kitchen sponges with different textures add unique patterns when dabbed over base colors.
Plastic wrap produces marbled holiday effects by pressing crumpled wrap into wet polish for organic stone-like patterns. Bubble wrap creates instant polka dot textures when pressed onto base coats. Aluminum foil crumpled and dabbed creates metallic textured backgrounds perfect for winter themes.
Affordable Nail Polish Combinations
Red and white polishes create classic candy cane stripes using thin brushes or striping tape for under $5 total. Drug store brands like Essie and Sally Hansen offer quality reds that pair beautifully with crisp white accents. Mix these shades with clear polish to create custom pink tints for gradient effects.
Green and gold combinations deliver elegant Christmas sophistication without premium price tags. Forest green bases paired with gold glitter topcoats create luxurious looks for under $8. Dollar store gold polishes work perfectly as accent colors when applied over quality base coats.
Silver and blue shades capture winter wonderland magic using budget-friendly metallic options from discount retailers. Light blue bases with silver glitter create icy effects that rival expensive gel manicures. Navy blue paired with silver foil creates sophisticated New Year’s Eve looks.
Black and gold combinations offer timeless elegance perfect for holiday parties and celebrations. Matte black bases make gold accents pop dramatically when applied as French tips or geometric designs. These versatile colors work for both Christmas and New Year’s celebrations.
Quick and Easy Holiday Nail Hacks
Nail stickers eliminate complicated painting techniques while delivering professional-looking snowflakes and Christmas trees in minutes. Apply base color, add stickers while slightly tacky, then seal with clear topcoat for long-lasting designs. Dollar stores carry extensive holiday nail sticker collections during the season.
Glitter placement becomes effortless using clear lip balm as an adhesive for loose glitter application. Dab small amounts on nail tips or exact areas before sprinkling glitter for controlled placement. This technique works better than nail glue for temporary sparkle effects.
Rubber bands create perfect chevron patterns when wrapped around painted nails before applying second colors. Position bands at different angles for varied geometric designs that look professionally done. Remove bands immediately after applying polish for clean lines.
Hair bobby pins serve dual purposes as both nail art tools and cleanup helpers. Use the ridged end to create textured backgrounds or scrape away mistakes before polish dries. The smooth end works perfectly for applying small rhinestones and creating precise dots.
Conclusion
We’ve explored an incredible range of holiday nail ideas that’ll transform your fingertips into festive masterpieces this season. From timeless Christmas classics to glamorous New Year’s Eve designs every style preference and skill level is covered.
The beauty of holiday nail art lies in its versatility – whether you’re drawn to minimalist elegance or bold character themes there’s a perfect design waiting for you. Our budget-friendly DIY tips prove that stunning results don’t require expensive salon visits.
Remember that your nails are the perfect canvas to showcase your holiday spirit and personal style. These designs will keep your manicure looking fresh and festive throughout the entire holiday season while making you feel confident at every celebration.
Frequently Asked Questions
What are the most popular Christmas nail design colors?
The most popular Christmas nail design colors are classic red and green combinations, which embody traditional holiday spirit. Gold and metallic finishes add sophisticated glamour, while icy blue and silver create enchanting winter wonderland effects. Black and gold combinations work perfectly for New Year’s Eve celebrations.
How can I create holiday nail art at home without professional tools?
You can create stunning holiday nail art using household items like tape for geometric designs, toothpicks for detailed patterns, and sponges for gradient effects. Nail stickers offer quick results, while lip balm helps with precise glitter placement. These budget-friendly alternatives make festive nail designs accessible to everyone.
What are some easy holiday nail designs for beginners?
Simple dot patterns, subtle Christmas tree line art, and candy cane stripes are perfect for beginners. Nail stickers provide effortless character designs, while basic French tips with metallic accents offer elegant simplicity. These designs require minimal skill but deliver maximum festive impact.
How long do DIY holiday nail designs typically last?
DIY holiday nail designs typically last 5-7 days with proper application and top coat protection. Using quality base coat, allowing each layer to dry completely, and applying a good top coat can extend wear time. Avoid harsh chemicals and wear gloves during cleaning to maintain longevity.
Can I mix different holiday nail art styles on one hand?
Absolutely! Mixing different styles creates unique, personalized looks. You can combine classic red and green on some nails with metallic accents on others, or alternate between character designs and minimalist patterns. This approach allows creative expression while maintaining cohesive holiday themes.
What’s the best way to remove glitter nail polish after the holidays?
Soak cotton pads in acetone-based nail polish remover and press them onto each nail for 10-15 seconds before gently wiping away. Alternatively, use foil wraps with acetone-soaked cotton for stubborn glitter. Follow up with cuticle oil to restore moisture to your nails and surrounding skin.