Easter’s just around the corner and we’re already dreaming about pastel colors, adorable bunnies, and festive nail designs that’ll make our hands the star of every spring gathering. There’s something magical about transforming our nails into tiny canvases that celebrate the season’s joy and renewal.
We’ve curated the most stunning Easter nail art ideas that’ll have you reaching for your polish collection faster than you can say “bunny hop.” From delicate floral patterns to playful chick designs, these creative looks range from beginner-friendly to show-stopping masterpieces that’ll impress even the most discerning nail art enthusiasts.
Whether you’re planning a family brunch or simply want to embrace the spring spirit, these Easter-themed manicures will add the perfect touch of seasonal charm to your look. Get ready to discover designs that capture everything we love about this hopeful holiday.
Pastel Easter Egg Nail Art Ideas
Pastel Easter egg designs bring delicate spring colors to your fingertips while celebrating the season’s most beloved symbols. We’ll explore three stunning color combinations that capture the essence of traditional Easter eggs with modern nail art techniques.
Soft Pink and Lavender Ombre Effects
Start with a soft pink base coat on your ring and middle fingers for this dreamy ombre technique. Apply lavender polish to your thumb and pinky while creating a gradient effect on your index finger. Use a makeup sponge to blend the two colors seamlessly from cuticle to tip. Create small white dots using a dotting tool to mimic Easter egg speckles across all nails. Finish with a high gloss top coat to enhance the pastel shimmer and protect your design for up to two weeks.
Mint Green and Baby Blue Color Combinations
Choose mint green as your primary color for your thumb, middle, and pinky nails in this fresh spring palette. Paint your ring and index fingers in baby blue to create visual interest and balance. Add delicate white swirl patterns using a thin nail art brush to replicate traditional Easter egg designs. Apply small silver rhinestones at the intersections of your swirl patterns for extra elegance. Seal everything with a matte top coat to give your pastel Easter eggs a sophisticated finish that complements any spring outfit.
Yellow and Peach Gradient Designs
Begin this sunny design by painting alternating nails in soft yellow and warm peach tones. Create gradient effects on your accent nails by blending both colors from light to dark using vertical strokes. Add tiny white flower details with a fine brush to represent spring blooms on Easter eggs. Use a toothpick to create small dots in contrasting colors for authentic egg patterns. Complete the look with a glossy top coat that makes your yellow and peach gradients pop beautifully against your skin tone.
Bunny-Themed Easter Nail Art Ideas

Adorable bunny motifs bring whimsical charm to your Easter manicure while capturing the playful spirit of the holiday. These delightful designs transform your nails into miniature works of art that celebrate one of Easter’s most beloved symbols.
Cute Bunny Face Designs on Accent Nails
Creating charming bunny faces on your accent nails adds personality to your Easter nail art collection. We recommend starting with a soft pink or white base color, then using a thin nail art brush to paint tiny black dots for eyes and a small pink triangle for the nose. Adding whiskers with delicate black lines completes the sweet facial features that make each bunny unique.
Essential supplies for bunny face designs:
| Supply | Purpose | Recommended Color |
|---|---|---|
| Base polish | Foundation | Soft pink or white |
| Dotting tool | Eyes and nose | Black and pink |
| Thin brush | Whiskers | Black |
| Top coat | Protection | Clear |
Positioning these bunny faces on your ring finger creates the perfect focal point while keeping the remaining nails simple with complementary pastel shades. We suggest practicing the facial features on a nail wheel first to perfect your technique before applying them to your natural nails.
Bunny Silhouette and Ear Patterns
Bunny silhouettes offer an elegant approach to Easter nail art that works beautifully across multiple nails. We create these designs by painting simple bunny outlines using black or dark gray polish against light colored backgrounds like cream or pale yellow. The key lies in achieving smooth, rounded shapes that instantly read as bunny profiles.
Steps for perfect bunny silhouettes:
- Apply your chosen light base color and let dry completely
- Sketch the bunny shape lightly with a toothpick if needed
- Fill in the silhouette using steady brush strokes
- Add dimension with slightly darker shading around the edges
Bunny ear patterns work exceptionally well as repeating motifs across your manicure. We position pairs of elongated oval shapes to represent ears, spacing them evenly across each nail for a cohesive look. Alternating the ear directions creates visual interest while maintaining the bunny theme throughout your design.
Cotton Tail Textured Nail Art
Cotton tail textures bring dimensional appeal to your bunny themed Easter nails through creative use of materials and techniques. We achieve authentic fluffy textures by dabbing white acrylic paint with a small makeup sponge, creating irregular cloud like patterns that mimic real rabbit tails. This technique works best over neutral base colors that allow the white texture to stand out prominently.
Texture creation methods:
| Method | Tool | Effect |
|---|---|---|
| Sponge dabbing | Makeup sponge | Fluffy clouds |
| Stippling | Fan brush | Fine texture |
| Dotting layers | Various sized tools | Dimensional bumps |
Building up the cotton tail texture in multiple thin layers prevents clumping while creating realistic depth. We apply the first layer sparingly, let it dry, then add additional layers until achieving the desired fluffy appearance. Sealing these textured designs with a quality top coat ensures longevity while maintaining the dimensional effect that makes cotton tail nail art so captivating.
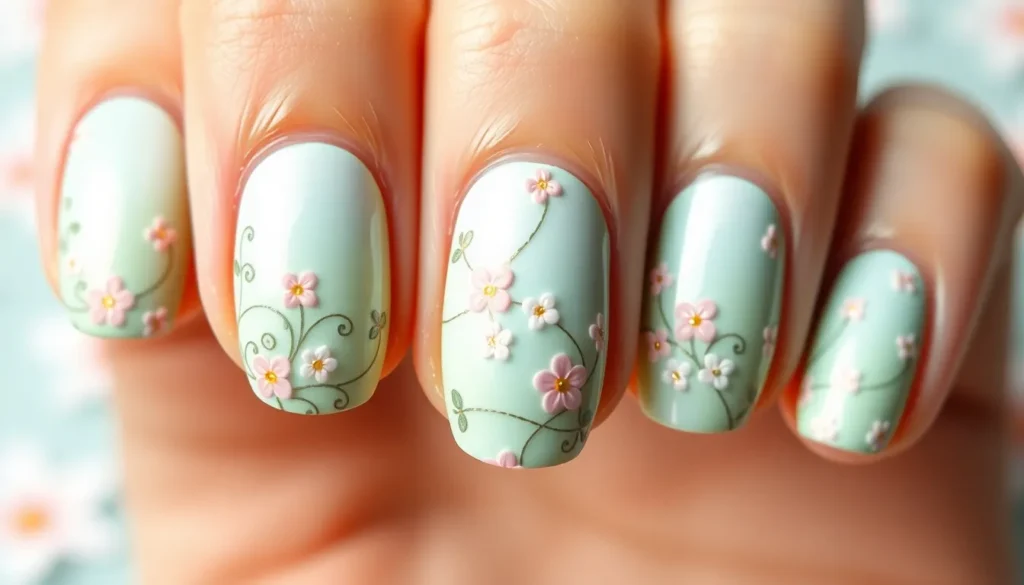
Floral Spring Easter Nail Art Ideas

Spring flowers capture the essence of Easter’s renewal theme perfectly. We’ll explore enchanting floral designs that bring nature’s beauty to your fingertips.
Cherry Blossom and Sakura Patterns
Cherry blossom nail art creates an elegant springtime look with delicate pink petals scattered across your nails. Start with a nude or light pink base coat to mimic natural nail tones. Using a thin nail art brush or dotting tool, create small five-petal flowers in varying shades of pink and white across 2-3 accent nails.
Branch details add authenticity to your cherry blossom design by connecting the flowers naturally. Paint thin brown lines using a striping brush to create delicate branches that flow from cuticle to tip. Add tiny dots of darker pink in the center of each flower for realistic depth.
Gradient backgrounds enhance the cherry blossom theme by mimicking sunset or dawn skies. Blend soft pink, peach, and white polishes using a makeup sponge for an ombre effect. Apply the flowers over the dried gradient for a stunning layered appearance that captures spring’s gentle beauty.
Daisy Chain and Wildflower Designs
Daisy patterns bring cheerful simplicity to your Easter nail art with classic white petals and sunny yellow centers. Paint small white ovals radiating from a central yellow dot on your ring finger and thumb. Use a fine detail brush to ensure each petal maintains clean edges and consistent spacing.
Mixed wildflower arrangements create a meadow inspired look across all ten nails. Combine daisies with tiny purple violets, small blue forget-me-nots, and miniature pink cosmos flowers. Vary the flower sizes and colors on each nail to achieve an organic, naturally scattered appearance.
Green stem accents connect your wildflower design elements while adding realistic botanical details. Paint thin curved lines in sage or forest green between flowers to represent stems and leaves. Add small leaf shapes along the stems using the same green shade for a cohesive garden themed manicure.
Tulip and Daffodil Accent Nails
Tulip silhouettes offer bold spring color options with their distinctive cup shaped petals and elegant stems. Choose vibrant shades like coral, magenta, or deep purple for the tulip heads on your accent nails. Paint the classic tulip shape using steady strokes from a flat nail art brush for smooth, even coverage.
Daffodil details feature the flower’s signature trumpet center surrounded by white petals for authentic Easter symbolism. Create the central trumpet using bright yellow polish and a small round brush. Surround it with six white oval petals arranged in a circular pattern for the traditional daffodil appearance.
Color combinations maximize visual impact by pairing complementary spring hues across your manicure. Try soft lavender tulips with creamy white daffodils on alternating accent nails. Balance the bold florals with neutral base colors like pale gray or champagne on remaining nails for sophisticated Easter elegance.
Cross and Religious Easter Nail Art Ideas

Religious themes add meaningful depth to your Easter manicure while celebrating the spiritual significance of this sacred holiday.
Simple Cross Designs with Gold Accents
Cross patterns create elegant focal points that honor Easter’s religious foundation with sophisticated style. We recommend starting with a neutral base like soft beige or pure white to make the cross design stand out beautifully.
Essential supplies for cross nail art:
- Fine detail brush or striping brush
- Metallic gold nail polish
- Top coat for durability
- Steady hand or nail tape for clean lines
Gold accents transform simple crosses into stunning statement pieces that catch light beautifully. Paint thin vertical lines first, then add horizontal strokes to complete each cross shape. We suggest placing crosses on your ring fingers as accent nails while keeping other nails in coordinating solid colors.
Delicate cross clusters work wonderfully when you want subtle religious symbolism across multiple nails. Create varying sizes of crosses using different brush techniques, with larger crosses on thumbs and smaller ones on pinky nails. This approach creates visual balance while maintaining the sacred theme throughout your manicure.
Stained Glass Window Inspired Patterns
Stained glass motifs bring cathedral beauty directly to your fingertips with rich colors and intricate patterns. We love using jewel tones like deep purple, emerald green, and royal blue to recreate that authentic stained glass appearance.
Color combinations for stained glass effects:
- Ruby red with golden yellow borders
- Sapphire blue with silver accents
- Amethyst purple with copper details
- Emerald green with bronze highlights
Geometric shapes form the foundation of convincing stained glass designs that mirror church windows. Start by mapping out your pattern with thin black lines, then fill each section with translucent colors. We recommend using slightly sheer polishes to achieve that authentic glass like quality that makes these designs truly special.
Lead line techniques using black nail art pens create authentic divisions between colored sections. Paint your base colors first, allowing them to dry completely before adding the characteristic black outlines. This method ensures crisp, clean lines that replicate real stained glass craftsmanship on your nails.
Scripture Quote Nail Art
Scripture verses transform your nails into meaningful reminders of Easter’s spiritual message and personal faith. We suggest choosing short, powerful phrases that fit comfortably across one or two nails without overcrowding the design.
Popular Easter scripture choices:
- “He is Risen” in elegant script
- “John 3:16” with decorative flourishes
- “Alleluia” in flowing lettering
- “New Life” with botanical accents
Calligraphy techniques elevate simple text into beautiful artistic expressions worthy of the holiday’s significance. Practice your chosen phrase on paper first to perfect the letter spacing and flow. We recommend using contrasting colors like white text on dark backgrounds or gold lettering on soft pastels for maximum readability.
Decorative borders enhance scripture text while maintaining focus on the meaningful words you’ve chosen. Add small flourishes, tiny crosses, or delicate vine patterns around your text to create cohesive designs. These embellishments frame your chosen verses beautifully while keeping the religious message as the centerpiece of your Easter nail art.
Chick and Baby Animal Easter Nail Art Ideas

Baby animals bring pure joy to Easter celebrations, and these adorable nail art designs capture that playful spirit perfectly. We’ll show you how to transform your nails into a charming menagerie of spring creatures.
Yellow Chick Face Designs
Create adorable chick faces that’ll make everyone smile this Easter season. Start with a bright yellow base coat on your accent nails, then use a small dotting tool to add two tiny black dots for eyes. Apply a small orange triangle using a fine brush for the beak, positioning it just below the eyes. Add rosy pink circles on each side using a cotton swab for those sweet chick cheeks.
Perfect your chick details by waiting for each layer to dry completely before adding the next element. Use white nail polish with a toothpick to create tiny highlight dots in the black eyes, bringing your chicks to life. Finish with a glossy top coat to protect your design and add dimension to those precious faces.
Scale your chick design across multiple nails by varying the expressions and poses. Paint some chicks looking left, others right, and a few straight ahead for a lively barnyard effect. Consider adding small yellow feather textures around the faces using a fan brush and lighter yellow polish.
Baby Duck and Duckling Patterns
Design charming duckling silhouettes using soft yellow and white color combinations that capture their fluffy appearance. Begin with a pale yellow base, then use a small brush to paint the duck’s body shape in a slightly deeper yellow shade. Create the classic duck bill with bright orange polish, making it slightly larger than a chick’s beak for authenticity.
Add water elements to complement your duckling designs by painting tiny blue ripples beneath each duck. Use a striping brush with light blue polish to create gentle wave patterns, suggesting the ducklings are swimming or wading. Include small white dots scattered around to represent water droplets and bubbles.
Enhance your duck patterns with realistic details like webbed feet in orange polish and small wing markings using a fine liner brush. Paint tiny curved lines on the duck’s body to suggest feather patterns, using a shade slightly darker than your base yellow. Top with a matte finish for a soft, downy texture that mimics real duckling fluff.
Lamb and Spring Animal Motifs
Create fluffy lamb designs using white polish and special texturing techniques that create authentic wool appearances. Apply a white base coat, then dab a makeup sponge lightly in white polish to create the characteristic bumpy wool texture across the nail. Use black polish with a fine brush to add the lamb’s face, featuring two small black dots for eyes and a tiny pink triangle for the nose.
Include other spring animals like baby rabbits with cotton tail textures and tiny fawn spots for variety. Paint soft brown bases for fawn designs, adding white spots using a dotting tool in irregular patterns. Create rabbit ears using elongated oval shapes in pink and white, positioning them at the top of accent nails for a playful peek over effect.
Complete your animal collection with miniature butterfly accents and buzzing bee details that complement your barnyard theme. Use bright colors like orange, blue, and purple for butterfly wings, painting them with symmetrical patterns on either side of a thin black body. Add yellow and black stripes for busy bees, including tiny clear wings using sheer polish applied with a fan brush.
Easter Basket and Egg Hunt Nail Art Ideas

Transform your manicure into an interactive Easter experience with designs that capture the excitement of egg hunts and the charm of wicker baskets filled with springtime treasures.
Woven Basket Texture Designs
Woven basket textures bring authentic Easter charm to your nails through carefully crafted crosshatch patterns. Start with a warm brown or tan base coat to mimic natural wicker material. Using a thin nail art brush or toothpick, create horizontal lines across each nail in a slightly darker brown shade. Add vertical lines that weave over and under the horizontal strokes, alternating the pattern to achieve a realistic basket weave appearance.
Enhance the basket texture with dimensional elements like tiny pearl dots representing eggs nestled inside. Apply these accents sparingly along the basket pattern using a dotting tool. Consider adding small green strokes near the cuticle area to simulate grass peeking from the basket rim. The key to perfecting this design lies in maintaining consistent spacing between your weave lines and using steady pressure for clean intersections.
Metallic accents can elevate your basket design with subtle gold highlights along select weave intersections. This technique creates depth and catches light beautifully throughout the day. Complete the look with a matte top coat to maintain the authentic woven texture appearance rather than a glossy finish that might detract from the basket illusion.
Hidden Egg and Surprise Element Nails
Hidden egg designs create delightful surprises when you move your hands, mimicking the thrill of discovering eggs during traditional hunts. Begin with a spring green base that represents grass or foliage where eggs typically hide. Using small sponges, dab patches of different green tones to create natural depth and texture variations.
Paint miniature eggs in various pastel colors, positioning them strategically behind leaf patterns or grass tufts. Create the leaf overlay using a darker green shade, allowing portions of the eggs to peek through naturally. This layering technique requires patience but produces stunning results that change appearance based on viewing angle. Add tiny white highlights to each visible egg portion to enhance their three dimensional appearance.
Incorporate magnetic nail polish as a surprise element that shifts colors when exposed to magnets. This creates an interactive experience similar to the excitement of egg hunting. Apply the magnetic polish as your base, then add traditional Easter elements on top. The color shifting effect adds movement and intrigue to your manicure, making each nail a small treasure waiting to be discovered.
Grass and Garden Scene Nail Art
Grass and garden scenes transform your nails into miniature Easter landscapes bursting with seasonal life. Create a gradient base starting with light blue at the cuticle transitioning to soft green at the tip, representing sky meeting earth. Use a makeup sponge to blend these colors seamlessly for a natural horizon effect.
Build grass texture using a fan brush loaded with various green shades, starting with darker tones at the base and gradually adding lighter highlights. Stroke upward from the nail tip to create realistic grass blade movement. Layer different green tones to achieve depth and natural color variation found in real garden settings. Add occasional yellow green highlights to simulate sunlight catching grass tips.
Scatter tiny flowers throughout your garden scene using dotting tools in bright spring colors like pink, purple, and yellow. Create simple five petal flowers by placing five small dots in a circle formation, then adding a contrasting center dot. Include small butterflies or ladybugs as accent elements on select nails. These tiny creatures add movement and whimsy to your garden tableau, completing the Easter outdoor celebration theme perfectly.
Glitter and Sparkle Easter Nail Art Ideas

We’re elevating our Easter nail celebrations with dazzling effects that catch the light beautifully. These glamorous designs combine the season’s soft pastels with eye-catching sparkle elements.
Pastel Glitter Ombre Effects
Gradient techniques create stunning transitions from light to dark using Easter’s signature colors. We recommend starting with a lavender base and gradually blending into deeper purple glitter at the tips. Fine glitter particles work best for smooth color transitions that won’t create bumpy textures.
Layering methods involve applying sheer glitter polish over pastel base coats for dimensional depth. Pink and mint green combinations produce particularly striking results when we add silver micro glitter between color layers. Each coat needs complete drying time to prevent smudging during the blending process.
Tool selection makes all the difference in achieving professional ombre results. Makeup sponges create seamless gradients when we dab them lightly across the nail surface. Small detail brushes help blend harsh lines where different glitter concentrations meet.
Holographic Easter Egg Designs
Rainbow reflections transform simple egg shapes into mesmerizing focal points on accent nails. We use holographic top coats over pastel egg designs to create shifting color effects that change with lighting angles. Chrome powder mixed with clear gel polish produces even more dramatic holographic results.
Dimensional effects emerge when we combine different holographic finishes on individual nails. Linear holo polishes create fine rainbow lines, while scattered holo creates broader sparkle patterns. Alternating between these finishes across our manicure keeps the design ever-changing and captivating.
Application techniques require exact timing to achieve optimal holographic coverage. We apply holo polish in thin, even strokes while the base color remains slightly tacky. Magnetic holo polishes need exposure to magnetic tools during the curing process to activate their full rainbow potential.
Shimmer and Pearl Accent Nails
Pearl placement creates elegant focal points that complement our Easter color schemes perfectly. We position small pearl cabochons near the cuticle area or along the nail’s natural curve for balanced visual weight. UV gel adhesive ensures pearls stay secure through multiple hand washes and daily activities.
Shimmer layering involves building translucent sparkle effects over solid base colors. Gold shimmer over soft yellow creates sunny Easter morning vibes, while silver shimmer enhances cool mint and lavender combinations. Light application prevents overwhelming the underlying pastel tones we’ve carefully chosen.
Accent patterns incorporate both shimmer and pearls in coordinated designs across multiple nails. We might feature heavy pearl clusters on ring fingers while adding subtle shimmer to remaining nails. This balanced approach prevents our manicure from appearing too busy while maintaining sophisticated Easter elegance.
Easy DIY Easter Nail Art Ideas for Beginners

We believe everyone deserves beautiful Easter nails regardless of their skill level. Creating stunning Easter nail art doesn’t require years of practice or expensive tools when you know the right techniques.
Simple Dot and Stripe Patterns
Polka dot Easter eggs transform ordinary manicures into festive masterpieces using just a dotting tool or bobby pin. Start with a pastel base color like soft pink, lavender, or mint green and let it dry completely. Dip your dotting tool into contrasting colors such as white, yellow, or baby blue to create evenly spaced dots across each nail.
Striped patterns work beautifully for creating Easter basket weaves or candy cane effects on accent nails. Use striping tape or nail art brushes to paint thin lines in alternating colors. We recommend practicing the basket weave pattern by painting vertical stripes first, then adding horizontal lines that appear to go under and over the vertical ones.
Rainbow stripes capture the joy of Easter celebrations by using all pastel colors in sequence. Paint each stripe while the previous one is still slightly tacky for seamless blending. Keep your brush movements steady and use the same pressure for consistent line thickness.
Sticker and Decal Application Tips
Nail stickers offer instant Easter designs without requiring artistic skills or steady hands. Clean your nails thoroughly with rubbing alcohol before applying any stickers to ensure proper adhesion. Choose from bunny faces, Easter eggs, flowers, or religious symbols that complement your base color.
Application technique matters significantly for professional looking results. Peel stickers carefully using tweezers to avoid stretching or tearing the design. Press firmly from the center outward to eliminate air bubbles, then seal with a quality top coat.
Layering decals creates dimensional effects that make your nails appear more expensive and detailed. Apply larger background elements first, then add smaller accent pieces on top. We suggest using water decals for intricate designs like stained glass patterns or detailed floral motifs.
Removal tips help preserve your natural nails when changing designs. Soak cotton pads with acetone and press against each nail for 30 seconds before gently sliding the stickers off. Never force or scrape stickers as this can damage your nail surface.
Quick French Manicure Easter Twists
Pastel French tips modernize the classic French manicure with soft Easter colors instead of stark white. Choose complementary pastel shades like pink tips with lavender base or mint tips with yellow base. Use French manicure guides or tape for clean, even lines across all nails.
Easter egg tip designs replace solid colored tips with miniature Easter egg patterns. Paint your tips in pastel colors first, then add tiny dots, stripes, or zigzag patterns using a detail brush. This technique works especially well on longer nails where there’s more space for intricate details.
Reverse French Easter styles flip the traditional design by painting the half moon area near your cuticles instead of the tips. Use Easter themed colors like soft yellow crescents with white bases or pink crescents with mint bases. Add tiny Easter motifs like crosses, bunnies, or flowers in the crescent area for extra festive appeal.
Gradient French effects blend Easter colors from the tip toward the base for a modern ombre look. Start with the lightest color at your cuticle and gradually build up to the darkest shade at the tip. Use a makeup sponge to dab colors and create smooth transitions between shades.
Conclusion
Easter nail art offers endless possibilities for expressing your creativity while celebrating the season’s joyful spirit. Whether you’re drawn to delicate florals sparkly glitter effects or meaningful religious symbols there’s a perfect design waiting for your fingertips.
We’ve shown you that stunning Easter manicures don’t require professional skills or expensive equipment. From simple dot patterns to elaborate basket weaves each technique we’ve shared can help you create beautiful nails that capture the essence of spring renewal.
Your Easter celebration deserves nails that reflect the holiday’s warmth and wonder. So grab your favorite polishes embrace your artistic side and let your manicure become part of your festive Easter story.
Frequently Asked Questions
What are the most popular Easter nail art themes?
The most popular Easter nail art themes include pastel Easter eggs, cute bunny designs, spring florals like cherry blossoms and daisies, religious crosses, adorable chicks and baby animals, Easter baskets, and sparkly glitter effects. These themes capture the essence of renewal, celebration, and the playful spirit of Easter while offering options for all skill levels.
Can beginners create Easter nail art at home?
Yes, beginners can easily create stunning Easter nail art at home. Start with simple techniques like dot patterns, stripes, or nail stickers for instant designs. Basic tools like dotting tools, thin brushes, and pastel polishes are all you need. French manicure variations with Easter colors also provide an accessible starting point for newcomers.
What colors work best for Easter nail designs?
The best colors for Easter nail designs include soft pastels like pink, lavender, mint green, baby blue, sunny yellow, and peach. These colors embody the fresh, spring feeling of Easter. White serves as an excellent base color, while gold accents add elegance to cross designs and other religious motifs.
How long do Easter nail art designs typically last?
Easter nail art designs typically last 7-14 days with proper application and care. Using a quality base coat, thin polish layers, and a good top coat extends wear time. Avoid harsh chemicals, wear gloves when cleaning, and apply cuticle oil daily to maintain the design’s appearance and nail health.
What tools do I need for Easter nail art?
Essential tools for Easter nail art include dotting tools, thin detail brushes, nail art pens, and toothpicks for fine details. You’ll also need base coat, various pastel polishes, top coat, and nail stickers or decals for beginners. Small sponges help create gradient effects, while glitter polishes add festive sparkle.
How can I make my Easter nail art more dimensional?
Create dimensional Easter nail art by using texturing techniques like stippling for cotton tail effects, layering different polish finishes, adding small pearl dots, or using magnetic polishes. Building up designs with multiple thin layers, incorporating 3D elements like tiny flowers, and using contrasting matte and glossy finishes adds visual depth.
Are there religious Easter nail art options?
Yes, religious Easter nail art includes simple cross designs with gold accents, delicate cross clusters, stained glass window patterns using jewel tones, and scripture quote nail art. These meaningful designs add spiritual significance to your Easter celebration while maintaining elegance and sophistication in your manicure.
What’s the easiest Easter nail design for kids?
The easiest Easter nail design for kids involves simple polka dots in pastel colors to represent Easter eggs, basic bunny faces using white polish with black dots for eyes, or applying Easter-themed nail stickers. These designs require minimal skill, dry quickly, and create adorable results that kids will love showing off.


