We all know that feeling when we’re scrolling through social media and see those stunning nail designs that look impossible to recreate. The good news? You don’t need to be a professional nail artist to achieve adorable results that’ll have everyone asking where you got your nails done.
Simple nail art is having a major moment right now and for good reason. These easy-to-master designs prove that sometimes less really is more. Whether you’re dealing with short nails or you’re a complete beginner we’ve got techniques that’ll work for everyone.
From minimalist dots and stripes to playful patterns that take just minutes to create we’re about to share game-changing ideas that’ll transform your manicure routine. These designs are perfect for busy schedules tight budgets and anyone who wants gorgeous nails without the salon price tag.
Minimalist Dot Designs for Effortless Elegance
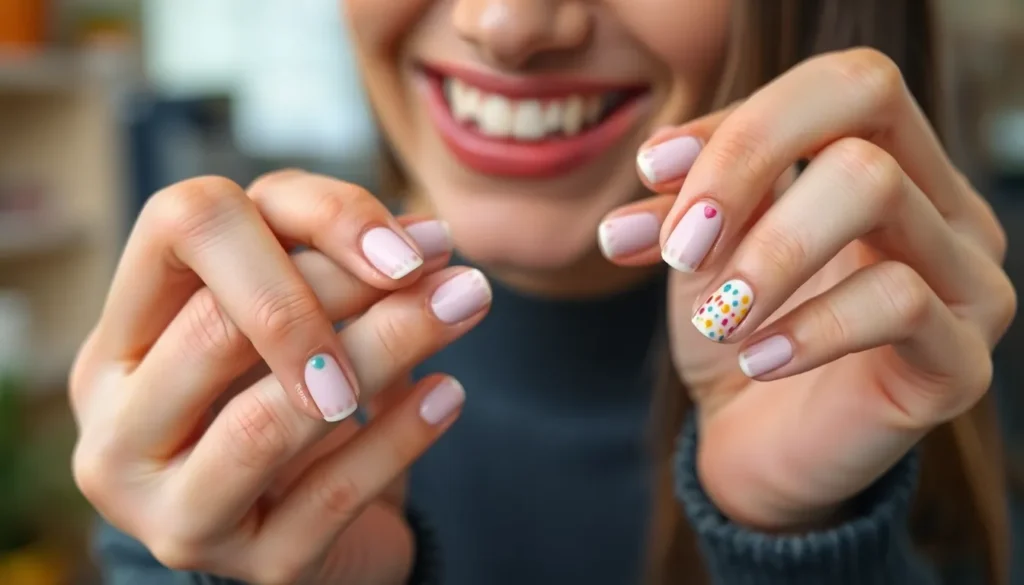
Dots create the perfect foundation for minimalist nail art that looks sophisticated yet remains incredibly simple to achieve. We’ve discovered that these tiny circles pack maximum visual impact with minimal effort required.
Polka Dot Patterns Using a Bobby Pin
Bobby pins transform into precision dotting tools that deliver consistent results every single time. We dip the rounded end into our chosen polish color and gently press it onto the nail surface to create perfect circles.
Start with a neutral base like nude or soft pink to let your dots shine as the focal point. We recommend spacing dots evenly across each nail for classic polka dot charm or clustering them near the cuticle for modern asymmetry.
Clean your bobby pin between colors using nail polish remover to prevent muddy mixing. We’ve found that alternating between two complementary shades like white and gold creates stunning contrast without overwhelming the overall look.
Practice on a piece of paper first to get comfortable with pressure control since too much creates messy blobs while too little produces barely visible marks. We suggest working quickly before the polish on your bobby pin starts to thicken.
Gradient Dots for a Subtle Ombre Effect
Gradient dots blend multiple shades seamlessly to create depth and visual interest across your manicure. We start with our lightest shade and create dots near the cuticle area using our trusty bobby pin technique.
Move progressively toward darker tones as you work down the nail to achieve that coveted ombre transition. We typically use three to four shades from the same color family for the smoothest gradient flow.
Space your dots closer together where colors meet to help blend the transition zones naturally. We’ve discovered that overlapping dots slightly at color boundaries creates the most professional looking fade effect.
Allow each color to dry completely before adding the next shade to prevent unwanted mixing on the nail surface. We recommend this technique with blues transitioning to teals or pinks fading into corals for stunning everyday elegance.
Seal your gradient dot design with a quality top coat to smooth any texture differences and add glossy protection. We finish by cleaning around the cuticles with a small brush dipped in acetone for crisp professional edges.
Classic French Tips with a Modern Twist
 1")
French manicures remain timeless, but we can refresh this classic look with contemporary updates that feel fresh and current.
Colored French Tips Instead of Traditional White
Swap white tips for vibrant colors to instantly modernize your French manicure. We love using soft pastels like baby pink, lavender, or mint green for a subtle twist that works perfectly for spring and summer. Bold colors such as coral, navy blue, or even black create a statement look that’s perfect for evening events.
Apply your chosen color using the same technique as traditional French tips. Start by painting a thin line across the nail tip, then fill in the area above it. We recommend using a nail art brush or striping brush for better control and cleaner lines.
Mix different colors on each nail for a rainbow French effect. Choose colors within the same family for a cohesive look, or go bold with contrasting shades like purple and yellow for a playful vibe. This technique works especially well on shorter nails where each color gets proper visibility.
Metallic French tips add glamour to any outfit. Gold, silver, and rose gold polishes create an elegant finish that’s perfect for special occasions. We suggest applying a base coat first, then using a metallic polish with good opacity to achieve that luxurious shine.
Thin Line French Manicure for Delicate Appeal
Create ultra thin French tips using a detail brush or nail art pen for a delicate, sophisticated appearance. This modern approach uses just a thin line of color along the nail edge instead of the traditional thick white band. We find this technique particularly flattering on longer nail shapes like oval or almond.
Use a steady hand when drawing the thin line by resting your wrist on a flat surface for better control. Start from one side of the nail and draw across in one smooth motion. If the line isn’t perfect, clean it up with a small brush dipped in nail polish remover before the polish dries.
Double thin lines create an interesting geometric effect. Paint one thin line at the very tip, then add a second line about 2mm below it. We love using the same color for both lines or mixing complementary shades like nude and white for subtle contrast.
Vary the thickness slightly on different nails for an organic, hand drawn look. Make some lines slightly thicker than others, but keep them all relatively thin compared to traditional French tips. This technique adds visual interest while maintaining the elegant French manicure aesthetic.
Simple Geometric Shapes for Contemporary Style
 2")
Geometric nail designs offer a perfect bridge between minimalist elegance and modern artistic expression. These sharp, clean lines create sophisticated looks that complement any outfit while remaining surprisingly achievable at home.
Triangle Accents Using Tape as Guides
Triangle accents transform ordinary manicures into striking geometric statements using nothing more than regular household tape. We recommend starting with a completely dry base color before applying thin strips of tape in triangular shapes across one or two accent nails.
Positioning triangles near the cuticle creates an elegant negative space effect that elongates shorter nails beautifully. Cut your tape into small triangular pieces, then press them firmly onto the nail surface to prevent color bleeding underneath.
Applying contrasting polish over the taped areas requires a light touch with quick, even strokes to avoid lifting the tape edges. Metallic shades like gold, silver, or rose gold create stunning contrast against neutral bases, while bold colors like navy or burgundy offer dramatic impact.
Removing the tape immediately while the polish remains wet ensures crisp, clean lines without pulling dried polish away from the nail. Use tweezers to lift tape corners gently, pulling at a 45 degree angle for the sharpest geometric edges.
Creating multiple triangular shapes on different nails adds visual interest without overwhelming the overall design. Try positioning triangles at varying angles or sizes across your manicure for a modern, asymmetrical look that feels intentionally curated.
Chevron Patterns with Two Contrasting Colors
Chevron patterns deliver bold geometric impact using just two complementary polish shades and strategic tape placement. We suggest selecting colors with strong contrast, such as black and white, navy and cream, or coral and mint green for maximum visual effect.
Creating the chevron template starts with applying your lighter base color across all nails and allowing it to dry completely before moving to the taping stage. Cut regular scotch tape into thin strips, then position them in V shaped angles across the center of each nail.
Applying the darker contrast color over the taped sections requires steady brush control to maintain even coverage without disturbing the tape boundaries. Work quickly but carefully, using thin coats to prevent color from seeping under the tape edges.
Positioning chevrons at different orientations across your nails creates ever-changing visual movement that catches light beautifully. Try pointing some chevrons upward toward the fingertip while others angle downward toward the cuticle for an intentionally mixed pattern.
Sealing chevron designs with a quality top coat enhances the contrast between your two chosen colors while providing lasting protection against chips. Apply the top coat in thin, even strokes to avoid smudging the geometric lines you’ve worked carefully to create.
Floral Motifs That Anyone Can Master
 3")
Floral nail art transforms simple manicures into delicate masterpieces that capture spring’s beauty year round. We’ve discovered that mastering these botanical designs requires just basic tools and a steady hand.
Single Flower Accent on Ring Finger
Focus your floral artistry on one statement nail for maximum impact. The ring finger serves as the perfect canvas for a single bloom that won’t overwhelm your overall look. Start with a soft pink or nude base coat across all nails to create a cohesive foundation.
Create your flower using three simple brush strokes per petal. Dip a small nail art brush into white or pastel polish and gently press down while pulling outward to form each petal shape. Position five petals around a central point, slightly overlapping them for a natural appearance. Add a tiny yellow dot in the center using a toothpick to complete your bloom.
Layer different sized flowers for added dimension and interest. Begin with a larger flower as your focal point, then add one or two smaller buds nearby using the same technique with less pressure. This creates depth while maintaining the design’s simplicity. Finish by adding tiny green leaves using short curved strokes on either side of your flowers.
Tiny Daisy Designs Using a Dotting Tool
Transform basic dots into charming daisy patterns with this foolproof technique. A dotting tool or bobby pin creates perfectly sized petals that even beginners can master effortlessly. Choose white polish for classic daisies or experiment with soft pastels for a modern twist.
Start each daisy with five white dots arranged in a circular pattern. Space the dots evenly around an imaginary center point, leaving enough room for a small yellow dot in the middle. Press your dotting tool straight down for round petals, or drag it slightly outward for more elongated petal shapes. The key lies in consistent pressure and spacing between each dot.
Scatter multiple mini daisies across two or three nails for a garden effect. Vary the sizes by using different ends of your dotting tool or switching to a toothpick for smaller blooms. Place some daisies near the cuticle area and others toward the nail tips to create natural randomness. Add tiny green dots as flower centers occasionally to introduce subtle color variation without overwhelming the delicate white theme.
Striped Patterns for Clean and Chic Looks
 4")
Stripes bring effortless sophistication to any manicure while maintaining that sought-after minimalist aesthetic. We’ll show you how these linear designs can instantly elevate your nail game with just two simple techniques.
Vertical Stripes for Elongated Nail Appearance
Vertical stripes create the illusion of longer, more slender nails that enhance your natural nail shape. We recommend starting with a nude or light pink base coat as your foundation, then selecting two complementary colors like navy and white or black and gold for striking contrast.
Apply your base color and let it dry completely before moving to the striping step. We suggest using striping tape or thin nail art brushes to create clean, precise lines that run from cuticle to tip. Position the stripes at different widths for visual interest, alternating between thick and thin lines across each nail.
Remove the tape while the polish is still slightly wet to prevent peeling and achieve those crisp edges we’re after. Clean up any imperfections with a small brush dipped in acetone, then seal your design with a glossy top coat for professional looking results.
Horizontal Color Blocking with Two Shades
Horizontal stripes offer a bold, modern approach that transforms your nails into miniature works of art. We love pairing contrasting colors like coral and mint, or staying monochromatic with different shades of the same color family for subtle sophistication.
Start by applying your lighter shade as the base color and allow it to cure completely before proceeding. We recommend using tape to section off horizontal bands, placing them at the halfway point of your nail or creating asymmetrical blocks for contemporary flair.
Paint over the taped sections with your second color, ensuring even coverage without flooding the cuticles. Remove the tape immediately after application to reveal those sharp, clean lines that make horizontal color blocking so striking.
Finish with a high quality top coat to smooth any slight ridge between colors and add that glossy sheen that makes your striped nail art look professionally done.
Heart Designs Perfect for Romantic Occasions
 5")
Heart motifs bring romantic charm to our nail art while remaining beautifully simple to create. These lovely designs work perfectly for date nights, anniversaries, or whenever we want to add a touch of love to our manicure.
Simple Heart Outlines Using a Toothpick
Creating heart outlines becomes effortless when we use a toothpick as our drawing tool. Start with a completely dry base coat in a soft neutral shade like nude or pale pink to make the hearts pop. Dip the pointed end of a clean toothpick into your chosen polish color and practice the heart motion on paper first.
Place two small dots side by side near the top of your nail to form the heart’s curves. Use gentle pressure to drag the toothpick downward from each dot, bringing the lines together to create the heart’s pointed bottom. Work quickly while the polish remains wet to ensure smooth lines that connect seamlessly.
Spacing Tips for Multiple Hearts:
| Number of Hearts | Placement Strategy | Best Nail Length |
|---|---|---|
| 1 heart | Center of accent nail | Any length |
| 2 hearts | Side by side | Medium to long |
| 3 hearts | Triangle formation | Long nails only |
| Scattered hearts | Random placement | Medium to long |
Clean your toothpick between each heart to maintain crisp lines and prevent color mixing. Allow each heart to dry completely before adding a top coat to seal the romantic design.
Filled Hearts as Statement Accent Nails
Filled hearts make bold accent nails that draw attention without overwhelming the entire manicure. Choose one or two nails per hand to feature these statement hearts while keeping the remaining nails in complementary solid colors. Apply your base color to all nails and let them dry completely before creating the heart design.
Use a small flat brush or the tip of a makeup sponge to fill in your heart shape with contrasting polish. Start by outlining the heart with your brush, then carefully fill in the center with smooth, even strokes. Work from the outside edges toward the center to avoid creating air bubbles or uneven coverage.
Color Combinations for Maximum Impact:
- Red hearts on white base for classic romance
- Pink hearts on nude base for subtle sweetness
- Black hearts on light gray base for modern edge
- Gold hearts on burgundy base for luxury appeal
- White hearts on deep red base for dramatic contrast
Layer a second coat of the heart color if needed to achieve full opacity and vibrant coverage. Finish with a glossy top coat that extends slightly beyond the heart edges to create a smooth, professional appearance that lasts for days.
Color Gradient Techniques for Smooth Transitions
 6")
Gradient nails create stunning ombre effects that seamlessly blend multiple colors across your nail bed. These techniques transform ordinary manicures into sophisticated designs perfect for any occasion.
Sponge Method for Seamless Blending
Makeup sponges work as your best tool for achieving professional gradient effects without expensive equipment. We recommend using dense makeup wedges or beauty blenders that create smooth color transitions without streaks.
Paint your chosen colors directly onto the sponge in horizontal stripes before applying to your nails. Start with your lightest shade at the top section where you want it positioned on your nail. Add your second color slightly overlapping the first shade to create natural blending zones.
Dab the loaded sponge onto your nail using gentle pressing motions rather than dragging movements. Press the sponge straight down and lift it up repeatedly to transfer the gradient pattern. Repeat this dabbing process 3 to 4 times while the polish remains wet for optimal color saturation.
Clean your sponge between different color combinations to prevent muddy transitions. Use rubbing alcohol or nail dehydrator to quickly remove previous polish residue. This step ensures each new gradient maintains crisp color definition and vibrant results.
Apply a base coat before starting your gradient to protect your natural nails from staining. Dark colors like deep purples or blues can temporarily tint your nail beds. The base coat creates a protective barrier while helping the gradient colors adhere better.
Two-Tone Gradient from Light to Dark
Choose colors within the same color family for the most natural looking gradients. Pairing light pink with hot pink creates effortless transitions compared to mixing completely different hues like yellow and purple. Similar undertones blend more seamlessly and appear professionally done.
Start with your lightest shade as the base color covering the entire nail surface. Apply two thin coats of your light color and allow complete drying between applications. This foundation ensures your gradient has proper coverage and prevents patchy results.
Apply your darker shade to only the tip portion of your nail using horizontal brush strokes. Cover approximately one third of your nail length with the darker color while it’s still slightly tacky. Work quickly before the polish sets completely for better blending opportunities.
Use a small detail brush to blend the colors where they meet in the middle section. Drag the brush in small circular motions or gentle back and forth strokes to soften harsh lines. This technique creates smooth color transitions that appear naturally graduated.
Build up your gradient intensity by repeating the process with additional thin layers. Add more of your darker shade to the tips and blend again while wet. Multiple thin applications create richer color depth than single thick coats and prevent bubbling issues.
Finish with a glossy top coat to even out any texture differences between the blended areas. The top coat smooths minor imperfections while improving the gradient’s visual impact. Apply one generous layer covering the entire nail surface for professional results.
Negative Space Nail Art for Unique Appeal
 7")
Negative space nail art embraces the beauty of what’s left unpainted, creating stunning designs that celebrate your natural nail. These techniques offer a fresh alternative to fully covered nails while maintaining the sophisticated simplicity we’ve been exploring.
Half-Moon Designs Leaving Natural Nail Exposed
Half-moon manicures showcase the natural crescent shape at your nail base, creating an elegant contrast between polish and bare nail. We recommend starting with a clear base coat to protect your natural nails before applying the design.
Position reinforcement stickers or small pieces of tape along your cuticle line to create the perfect half-moon shape. Apply your chosen polish color from the sticker edge to the nail tip, leaving the moon area completely exposed. Metallic shades like rose gold or silver work beautifully against natural nails, while classic colors like deep burgundy or navy create sophisticated contrast.
Remove the tape immediately after painting each nail to ensure clean edges. We suggest using a small cleanup brush dipped in acetone to perfect any uneven lines around the exposed area.
Reverse half-moons offer another stunning variation where you paint only the crescent area near your cuticle. This technique works especially well with bold colors like emerald green or coral pink, creating a modern twist on the traditional French manicure.
Geometric Cutouts Using Nail Tape
Geometric negative space designs transform your nails into tiny canvases for modern art using simple tape techniques. We’ve found that striping tape and hole reinforcement stickers create the cleanest lines for these contemporary patterns.
Triangle cutouts make striking accent nails when positioned at different angles across your nail bed. Apply your base color first, then place triangular tape pieces randomly before adding a contrasting top color. Remove the tape to reveal geometric windows of your natural nail or base shade.
Diagonal stripe patterns create ever-changing negative space effects that elongate your nails visually. Use thin striping tape to section off diagonal areas, then alternate between painted and unpainted sections for a bold geometric statement.
Circle cutouts using hole reinforcement stickers produce perfect round windows in your polish. We recommend placing multiple circles of varying sizes on each nail before applying color for a playful polka dot negative space effect.
Cross patterns combine vertical and horizontal tape strips to create window pane effects on your nails. Apply the tape in a grid formation, paint over the entire nail, then carefully remove the tape to reveal intersecting lines of exposed nail.
Finish all geometric negative space designs with a thin layer of top coat to seal the edges and create a smooth surface across both painted and unpainted areas.
Seasonal Themes Made Simple and Cute
 8")
Seasonal nail art designs let you celebrate each time of year with charming patterns that match the natural beauty around us. These themes require minimal tools while delivering maximum impact for your manicure routine.
Spring Pastels with Tiny Leaf Details
Spring pastel nail art captures the fresh energy of blooming gardens with soft colors and delicate botanical touches. We recommend starting with a base coat in mint green, baby pink, or lavender to set the perfect seasonal foundation.
Creating tiny leaf details requires just a thin brush or toothpick for precision work. Apply small curved strokes in sage green or forest green to form simple leaf shapes along the side of each nail. Position these leaves near the cuticle area for a natural growth pattern that mimics real foliage.
Combining multiple pastel shades creates a garden effect across your fingertips. Paint each nail a different pastel color like soft yellow, powder blue, or peachy pink while maintaining the same leaf detail pattern. This technique works especially well for short nails where intricate designs might feel overwhelming.
Scatter tiny white dots among your leaf details to represent spring blossoms or morning dew. Use a dotting tool or bobby pin to place these accents strategically around your leaf patterns. Finish with a glossy top coat to enhance the soft colors and protect your seasonal design.
Winter Snowflakes Using White Polish Dots
Winter snowflake nail art transforms simple white dots into magical frozen crystals that capture the season’s sparkle. We suggest using a deep blue, navy, or classic red base to make your snowflake patterns pop against the darker background.
Building snowflakes starts with creating a center dot using white nail polish and a dotting tool. Add six smaller dots around the center point in a circular pattern to form the basic snowflake structure. Connect these outer dots with tiny lines using a thin brush or toothpick for authentic snowflake geometry.
Varying snowflake sizes across your nails creates visual interest and mimics natural snowfall patterns. Make some snowflakes larger on your accent nails while keeping others smaller on remaining fingers. This size variation prevents the design from looking too uniform or repetitive.
Adding silver glitter over your white snowflakes enhances their winter magic with subtle shimmer. Apply a light dusting of fine silver glitter while the white polish remains slightly tacky for better adhesion. Seal everything with a high quality top coat to lock in the sparkle and create a smooth finish that lasts through winter activities.
Quick and Easy Holiday Nail Art Ideas
 9")
Holiday nail art brings festive cheer to your manicure routine with designs that capture the spirit of each celebration. We’ll show you how to create stunning seasonal looks using basic polishes and everyday tools.
Christmas Tree Designs with Green Polish
Christmas tree nails transform your fingertips into tiny winter wonderlands with just a few simple strokes. Start with a clear or nude base coat and let it dry completely before beginning your festive design.
Create triangular tree shapes using a small brush dipped in forest green or emerald polish. Begin at the nail tip and paint three stacked triangles, making each layer slightly wider than the one above. The top triangle should be smallest, followed by a medium triangle in the middle, and the largest triangle at the base.
Add a brown trunk by painting a thin vertical line at the bottom using a toothpick or fine brush. Keep the trunk short and centered beneath your tree for the most realistic look.
Apply tiny gold dots as ornaments by dipping a bobby pin in metallic polish and gently pressing it onto the green triangles. Space the dots randomly across each tree layer to mimic hanging decorations.
Top your trees with yellow star accents using the tip of a toothpick to create small five-pointed stars. Paint a tiny dot first, then drag the polish outward in five directions to form star points.
Finish with white snow by dabbing a small brush lightly loaded with white polish along the bottom edge of each triangle. This creates the illusion of snow resting on tree branches.
Halloween Pumpkin Accents in Orange
Halloween pumpkin designs bring spooky charm to your nails with vibrant orange hues and creative detailing. Begin with a neutral base coat in nude or clear polish and allow it to cure fully.
Paint round pumpkin shapes using bright orange polish and a medium brush, creating circular forms that fill about two thirds of each nail. Make the pumpkins slightly oval rather than perfectly round for a more natural appearance.
Add vertical ridges by drawing thin lines down each pumpkin using a toothpick dipped in darker orange or brown polish. Create three to four evenly spaced lines running from top to bottom to give your pumpkins realistic texture.
Create green stems at the top of each pumpkin using a fine brush and forest green polish. Paint short vertical lines or small curved shapes that extend upward from the pumpkin’s center.
Design spooky faces on accent nails using black polish and a thin brush or toothpick. Draw triangle eyes and jagged mouths to create classic jack-o’-lantern expressions, varying the faces across different nails.
Enhance with glitter by applying orange or black glitter polish over dried pumpkins for extra sparkle. Concentrate the glitter around the edges or use it to highlight certain areas of your design.
Complete the look with a glossy top coat to seal your Halloween creation and add professional shine to your festive pumpkin nails.
Conclusion
These simple nail art techniques prove that you don’t need expensive tools or professional training to create beautiful manicures at home. With just basic polishes and everyday items like bobby pins and tape we can achieve stunning results that rival salon work.
The versatility of these designs means there’s something perfect for every occasion – from minimalist dots for the office to festive holiday patterns for celebrations. Each technique builds confidence and creativity while keeping your nail routine both affordable and enjoyable.
We encourage you to experiment with different color combinations and adapt these ideas to match your personal style. Remember that practice makes perfect and even small imperfections add character to handmade nail art. Start with the simplest designs and gradually work your way up to more complex patterns as your skills develop.
Frequently Asked Questions
What tools do I need to start creating simple nail art at home?
You only need basic items like nail polish, a bobby pin for dots, tape for clean lines, a toothpick for hearts, and a makeup sponge for gradients. Most designs use everyday household items, making nail art accessible without expensive professional tools or salon visits.
How can I create polka dot designs without special dotting tools?
Use a bobby pin as your precision tool! Dip the rounded end into nail polish and gently press onto your nails to create perfect circles. Clean the bobby pin between colors to maintain clarity, and space dots evenly or cluster them for different modern looks.
What’s the easiest way to modernize a classic French manicure?
Swap traditional white tips for vibrant colors like soft pastels or bold shades. You can also try metallic tips for glamour, ultra-thin lines for delicacy, or even create a rainbow effect by using different colors on each nail for a contemporary twist.
How do I achieve clean geometric shapes on my nails?
Use tape as your guide for crisp lines and perfect shapes. Apply tape in triangular or diagonal patterns, paint over it, then remove immediately while polish is still wet. This technique works for chevrons, triangles, and various geometric cutouts with professional-looking results.
Can beginners successfully create floral nail art designs?
Absolutely! Start with simple single flowers using just three brush strokes per petal on your ring finger. For daisies, use a dotting tool to create small white petals around a yellow center. These designs require minimal skill but create beautiful, delicate results.
What’s the best technique for creating gradient or ombre nails?
Use the sponge method with a makeup sponge. Apply different colored polishes to the sponge in strips, then dab onto your nails, blending where colors meet. Clean the sponge between applications and finish with a top coat for smooth, professional-looking gradients.
How can I incorporate seasonal themes into my nail art?
For spring, use pastel bases with tiny leaf details and white blossom dots. Winter designs work well with snowflake patterns using white dots on dark bases. Holiday themes like Christmas trees or Halloween pumpkins can be created using basic shapes and seasonal colors.
What is negative space nail art and how do I create it?
Negative space nail art uses unpainted areas as part of the design. Try half-moon manicures by taping around the cuticle area, or create geometric cutouts using tape patterns. These designs embrace natural nail color while creating sophisticated, modern looks with minimal effort.


