We’ve all been there – staring at our plain nails wondering how to transform them into something absolutely wild. Whether you’re prepping for a special event or just want to express your bold personality, crazy nail art has become the ultimate form of self-expression that’s taking social media by storm.
From 3D sculptures that defy gravity to glow-in-the-dark masterpieces that’ll make your friends do double-takes, today’s nail artists are pushing boundaries we never thought possible. We’re talking about designs that incorporate everything from tiny LED lights to actual miniature landscapes painted on your fingertips.
Ready to ditch those boring solid colors and jump into the industry of extreme nail creativity? We’ve compiled the most jaw-dropping crazy nail ideas that’ll transform your manicure game forever. These aren’t your typical French tips – we’re about to show you nail art so incredible that you’ll become the trendsetter everyone wants to copy.
Glow-in-the-Dark Nail Art That Lights Up Your Night
Transform your nighttime look with luminous nail designs that literally shine in darkness. We’re exploring electrifying techniques that make your manicure the ultimate conversation starter.
UV Reactive Polish Applications
Create stunning color transformations with UV reactive polishes that change under blacklight exposure. These specialized formulas appear one color in natural light and shift to vibrant neons like electric blue, hot pink, or lime green under UV rays.
Apply a white base coat first to make the color shift more dramatic and visible. We recommend brands like Color Club and Orly that offer reliable UV reactive formulas lasting up to two weeks without chipping.
Layer different UV shades on each nail for a rainbow effect that surprises everyone at nightclubs, concerts, or parties. Combine purple base with yellow UV reactive topcoat for a color shift that goes from deep violet to bright sunshine yellow.
LED Embedded Nail Designs
Install tiny LED lights directly into acrylic nail extensions for genuine illumination that doesn’t require external light sources. Professional nail technicians use micro LEDs smaller than 2mm that can be embedded safely without damaging natural nails.
Choose battery powered options that last 4 to 6 hours per charge for special events and photo shoots. These designs work best on longer nail extensions where there’s space to hide the small battery pack and wiring.
Select colors strategically since red and blue LEDs are brightest while maintaining the longest battery life. We’ve seen stunning results with alternating LED colors across fingertips creating a light show effect.
Phosphorescent Powder Techniques
Mix glow powder directly into clear nail polish for custom luminous shades that charge under any light source and glow for hours. High quality phosphorescent powders like strontium aluminate provide the brightest and longest lasting glow effects.
Create gradient effects by applying heavier concentrations of glow powder at nail tips and blending down toward cuticles. This technique produces an ombre glow that’s brightest at fingertips and fades naturally.
Combine multiple glow colors on different nails using green, blue, and aqua phosphorescent powders for a complete glow spectrum. Seal everything with two coats of clear topcoat to prevent powder from rubbing off during daily activities.
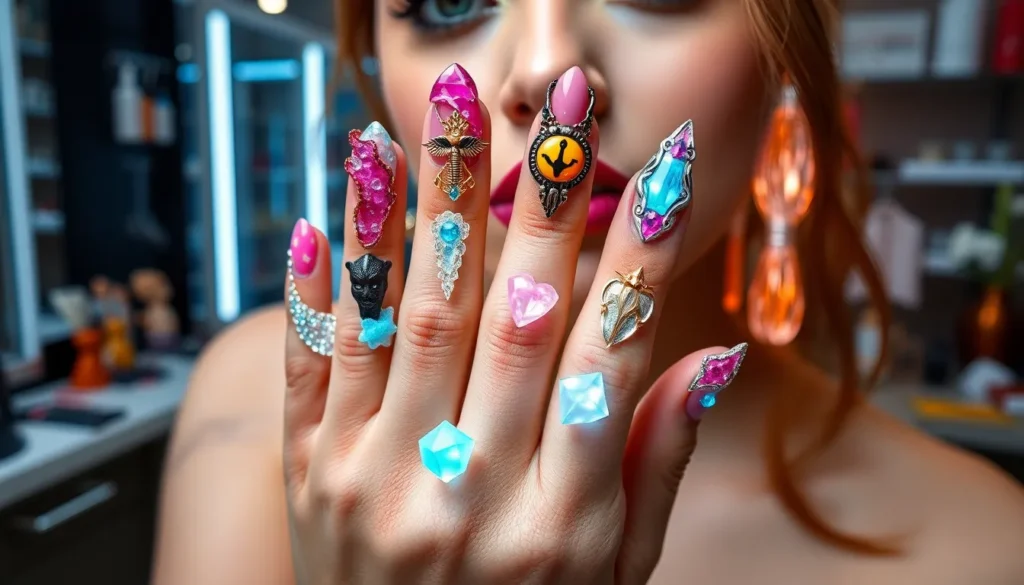
3D Sculptural Nail Extensions That Defy Gravity

Moving beyond luminous effects, we’re exploring dimensional nail art that literally adds height and texture to your fingertips. These sculptural techniques transform nails into miniature works of art that challenge traditional flat designs.
Miniature Object Attachments
Tiny charm application creates the most dramatic sculptural effects on extended nail beds. We attach miniature roses, butterflies, and geometric shapes using strong nail adhesive, positioning them strategically for maximum visual impact. Professional nail artists recommend using lightweight polymer clay charms to prevent nail breakage.
Hardware incorporation brings industrial elements into nail design through small screws, chains, and metal studs. We secure these objects with UV gel, building layers around the base for stability. Popular attachment methods include embedding objects halfway into acrylic during the curing process.
Food replica mounting transforms nails into edible-looking masterpieces using polymer clay donuts, pizzas, and sushi pieces. We create these miniatures at 1:12 scale to maintain proportion on nail surfaces. Each attachment requires careful weight distribution to ensure comfortable wear.
Clay and Acrylic Sculpting Methods
Hand sculpting techniques allow us to create custom 3D elements directly on the nail using polymer clay or sculpting acrylic. We build roses petal by petal, animals feature by feature, creating unique designs that match client specifications. Working time ranges from 45 minutes to 2 hours per nail depending on complexity.
Molding processes speed up production by creating reusable silicone molds from master sculptures. We press clay or acrylic into these molds, producing identical elements for multiple nails. Commercial molds are available for popular shapes like flowers, bows, and abstract patterns.
Layered construction builds complex sculptures through multiple application stages, allowing each layer to cure before adding the next. We start with base shapes, add details, then finish with fine textures using dental tools and sculpting brushes. This method creates sculptures up to 10mm in height.
Architectural Nail Structures
Gothic cathedral designs feature pointed arches, flying buttresses, and intricate spires extending from the nail bed. We use black acrylic as the primary material, adding silver leaf details for authentic stone appearance. These structures can reach 15mm in height while maintaining structural integrity.
Modern skyscraper recreations showcase famous buildings like the Empire State Building and Burj Khalifa in miniature form. We layer clear and tinted acrylics to simulate glass and steel, incorporating LED elements for window lighting effects. Each building requires 3-4 hours of construction time.
Bridge and landmark sculptures transform nails into iconic structures like the Golden Gate Bridge or Eiffel Tower. We use wire armatures for support, building around them with colored acrylic to create recognizable silhouettes. These designs work best on longer nail extensions to accommodate the architectural proportions.
Color-Changing Nail Polish That Responds to Temperature

Thermochromic technology transforms your fingertips into a ever-changing canvas that shifts colors based on temperature changes. This revolutionary nail art technique creates mesmerizing effects that respond to your body heat and environmental conditions.
Thermochromic Polish Options
Professional thermochromic formulas deliver the most reliable color shifts for stunning temperature reactive designs. Brands like Color Club Mood Changing and Orly Breathable offer high quality thermal polishes that transition smoothly between colors. Del Sol creates vivid shifts from light to dark shades when exposed to heat sources.
Application techniques maximize the visual impact of these temperature sensitive formulas. We recommend applying a white base coat to enhance color vibrancy and ensure dramatic transitions. Thin coats work better than thick applications since they respond more quickly to temperature fluctuations. Sealing with a clear topcoat preserves the thermochromic properties while adding durability to your manicure.
Heat Sensitive Design Patterns
Gradient thermal effects create stunning ombre transitions that shift across your nail surface. Position your hands near warm beverages or heating vents to activate exact areas of the polish. Strategic placement allows you to control which sections change color first. French tip designs using thermochromic polish produce elegant effects where only the tips transform with temperature changes.
Geometric patterns combine regular polish with thermochromic formulas for striking contrasts. Striping tape helps create clean lines between temperature sensitive and standard colors. Dotting tools allow you to place thermochromic accents that activate individually when touched. Negative space designs showcase the color changing properties by framing them with neutral backgrounds.
Mood Ring Nail Effects
Classic mood ring colors recreate the nostalgic jewelry trend directly on your nails. Purple to pink transitions mirror traditional mood ring palettes and respond to emotional temperature changes. Blue to green shifts create ocean inspired effects that fluctuate with your body heat. Black to red transformations offer dramatic gothic aesthetics that activate with warmth.
Layering techniques multiply the color changing possibilities for complex mood effects. Base colors influence the final appearance when thermochromic topcoats shift from opaque to transparent. Glitter polishes underneath create sparkling reveals as the temperature sensitive layer becomes clear. Multiple thermochromic shades layered together produce rainbow transitions that cycle through various emotional color associations.
Holographic and Chrome Mirror Finishes That Catch Every Light

Reflective nail finishes create stunning visual effects that transform ordinary manicures into show-stopping accessories. These mirror-like surfaces bounce light in multiple directions, producing rainbow prisms and metallic gleams that shift with every hand movement.
Holographic Powder Applications
Holographic powder creates spectacular rainbow effects that dance across your nails as light hits them from different angles. We recommend applying a black or dark base coat first to maximize the powder’s prismatic intensity and color depth.
Buffing technique determines the final shine level when working with holographic pigments. Use a dense eyeshadow brush to pat the powder onto tacky gel polish, then buff gently in circular motions to achieve that mirror-like finish.
Layering different holographic shades produces custom rainbow combinations that shift between pink, blue, green, and gold tones. Mix fine and chunky holographic particles for textural contrast, creating dimension that catches light from multiple angles.
Sealing holographic powder properly requires a no-wipe gel topcoat to prevent dulling the reflective properties. Apply thin coats and cure between layers to maintain the powder’s brilliant light-catching abilities throughout wear.
Chrome Mirror Techniques
Chrome powder application requires precise timing for achieving that perfect mirror finish on your nails. Work quickly while the gel base remains tacky, as the powder adheres best to slightly sticky surfaces before full curing.
Buffing chrome powder creates seamless mirror surfaces that reflect like actual metal when done correctly. Use a silicone tool or dense brush to buff the powder into the nail surface, removing any streaks or uneven patches.
Temperature affects chrome powder performance during application, so work in moderate conditions for optimal results. Cold powder doesn’t adhere as well, while warm environments can cause the base coat to cure too quickly.
Chrome maintenance extends the mirror effect for weeks with proper care and quality topcoat application. Avoid harsh chemicals and wear gloves during cleaning to preserve the reflective surface from dulling or scratching.
Iridescent Foil Methods
Foil transfer technique creates instant metallic effects without the mess of loose powders or complex application processes. Cut foil sheets into nail-sized pieces and press firmly onto tacky gel polish for complete coverage.
Broken foil patterns produce artistic designs when applied strategically across the nail surface. Leave gaps between foil pieces to create geometric patterns, or layer different colored foils for dimensional effects.
Adhesive timing determines foil success rates during the transfer process onto your nails. Wait until the gel base reaches the perfect tackiness level, typically 30-60 seconds after curing under LED lights.
Foil durability improves significantly when sealed with high-quality topcoat that prevents lifting and extends wear time. Apply two thin coats rather than one thick layer to avoid trapped air bubbles that compromise the finish.
Nail Piercings and Hardware That Add Edge to Your Look

Pierced nails represent the boldest frontier in avant garde nail art, transforming your fingertips into statement pieces that blend beauty with rebellious style.
Safe Piercing Placement
Strategic positioning ensures both aesthetics and nail health when creating pierced nail designs. We recommend placing piercings in the upper third of extended acrylic nails where the structure remains strongest and won’t compromise the natural nail bed.
Professional nail technicians use specialized drill bits to create precise holes ranging from 1mm to 3mm in diameter. The sweet spot sits approximately 5mm from the free edge, providing adequate support while maximizing visual impact.
Acrylic extensions offer the safest foundation for nail piercings since they’re thicker and more durable than natural nails. We suggest waiting 24 hours after application before piercing to ensure complete curing and structural integrity.
Avoiding the stress point near the cuticle prevents painful tears and potential infection. This vulnerable area experiences the most flexing during daily activities, making it unsuitable for hardware attachments.
Jewelry and Chain Attachments
Surgical steel rings provide the most popular piercing option with diameters ranging from 6mm to 12mm for comfortable wear. These hypoallergenic materials resist tarnishing and maintain their shine through handwashing and daily activities.
Delicate chain connections create dramatic cascading effects between multiple nails, with sterling silver and gold filled options offering durability without skin irritation. We’ve seen stunning designs featuring chains that connect thumb to pinky, creating web like patterns across the hand.
Gemstone dangles add sparkle and movement to pierced nails, with cubic zirconia and genuine crystals providing options for every budget. Popular choices include tear drop shapes, geometric cuts, and vintage inspired designs that complement the nail’s length and shape.
Magnetic closures eliminate the need for traditional clasps, making jewelry changes quick and painless. These innovative systems use neodymium magnets strong enough to secure attachments during normal activities while allowing easy removal for special occasions.
Hardware Store Inspiration
Industrial materials open endless creative possibilities for edgy nail designs, from tiny screws and washers to miniature chains and wire mesh. We source materials from hardware stores, ensuring they’re properly sterilized before application.
Miniature bolts create an authentic industrial aesthetic when embedded into thick acrylic extensions. These functional looking elements measure just 3mm to 5mm in length, providing realistic detail without excessive weight.
Wire mesh sections can be shaped and molded into architectural elements, creating textured surfaces that catch light beautifully. Stainless steel mesh offers the best combination of flexibility and durability for intricate nail art applications.
Copper tubing provides unique opportunities for creating coiled designs and geometric patterns. When cut into small segments and properly sealed, these elements add dimensional interest while maintaining the edgy industrial theme.
Living Nail Gardens With Real Moss and Tiny Plants

We’re entering the extraordinary area of botanical nail art where nature becomes your canvas. This living approach transforms nail extensions into miniature gardens that bring the outdoors to your fingertips.
Succulent Nail Attachments
Succulent attachments transform nail extensions into living botanical showcases using tiny plants like baby jade and string of pearls. We recommend selecting succulents under 5mm in diameter to maintain proportion and nail functionality. These micro plants require specialized acrylic wells built into extended nail tips to house their root systems safely.
Attachment methods involve drilling precise 3mm holes into thick acrylic extensions and securing plants with biocompatible adhesive. We use surgical grade epoxy to bond succulent stems while preserving their ability to photosynthesize. Professional nail artists often incorporate tiny drainage systems using micro tubing to prevent root rot.
Plant selection focuses on hardy varieties that tolerate nail wear and limited soil space. We favor sedums, tiny air plants, and miniature haworthia species for their resilience and compact growth patterns. These selections maintain their structure for 2-3 weeks before requiring replacement or trimming.
Moss Application Techniques
Moss layering creates lush green carpets across nail surfaces using preserved sheet moss and living moss varieties. We apply thin layers of specialized plant adhesive to create textural depth that mimics forest floors. This technique works best on longer nail extensions where moss has adequate surface area to establish.
Adhesive application requires plant safe bonding agents that won’t harm living moss while maintaining nail durability. We use water resistant botanical glues applied in thin, even coats to prevent moss suffocation. Professional applications include spray misting systems to keep moss hydrated during the bonding process.
Texture variations combine different moss species like cushion moss, sheet moss, and haircap moss for dimensional effects. We layer these varieties to create miniature landscapes with varying heights and textures. Each moss type requires exact humidity levels and light exposure to maintain its vibrant green appearance.
Miniature Network Maintenance
Daily care routines involve gentle misting with distilled water and rotating nail positions to ensure even light exposure. We recommend using fine spray bottles to avoid oversaturating delicate plant materials. These living nail gardens require 2-3 light mistings per day to maintain optimal plant health.
Light management ensures botanical nail elements receive adequate photosynthesis opportunities through strategic hand positioning. We suggest spending 15-20 minutes near bright windows or under grow lights daily. Full spectrum LED nail lamps can supplement natural light for maintaining plant vitality.
Lifecycle expectations for living nail gardens typically span 1-2 weeks before requiring plant replacement or garden redesign. We monitor plant health daily and remove any browning or dying vegetation immediately. This maintenance schedule allows for continuous garden evolution while preserving nail health and safety.
Textured Nail Art Using Unconventional Materials

Moving beyond traditional polishes and powders, we’re discovering exciting ways to incorporate unexpected materials directly into our nail designs. These unconventional textures create stunning tactile experiences that transform fingertips into miniature art installations.
Sand and Glitter Combinations
Beach sand creates the most authentic textured nail surfaces when mixed with clear polish or gel topcoats. We recommend collecting fine sand from various beaches to build a collection of natural colors ranging from pristine white to volcanic black. Mixing techniques work best when you sprinkle sand onto wet polish, allowing gravity to create organic patterns rather than forced placement.
Desert minerals offer another dimension to textured nail art, with crushed mica and quartz fragments providing subtle shimmer effects. Layering different sand types creates depth, starting with coarser grains as a base and finishing with finer particles for smooth transitions. Professional nail artists often combine beach sand with traditional glitter particles, creating hybrid textures that catch light from multiple angles.
Preservation methods ensure these sand embedded designs last longer than expected. We seal sandy textures with multiple thin topcoat layers rather than one thick application, preventing the sand from shifting or falling out. Color coordination works beautifully when matching sand tones to complementary glitter shades, creating cohesive desert or oceanic themes.
Fabric and Lace Embedments
Delicate lace pieces transform nail surfaces into intricate textile masterpieces when properly embedded into gel or acrylic extensions. We source vintage lace doilies and cut them into nail sized segments, ensuring the patterns align with the natural nail curve. Application techniques require patience, as each lace piece must be carefully positioned and pressed into wet gel medium before curing.
Mesh fabrics create bold geometric textures that add industrial edge to feminine nail designs. Tulle layering produces ethereal effects, especially when multiple colors are stacked to create gradient depth. We’ve discovered that stretchy fabrics like jersey knit conform better to nail curves than rigid materials, reducing the risk of lifting or tearing.
Velvet embedments offer luxurious texture that feels as stunning as it looks. Crushed velvet pieces create rich, matte surfaces that contrast beautifully with glossy topcoats applied around the fabric areas. Securing these textile elements requires specialized fabric adhesives that remain flexible after curing, preventing cracking as nails naturally flex.
Food Item Nail Art
Dried spices bring aromatic textures and vibrant colors to unconventional nail designs, with turmeric powder creating golden yellow bases and paprika adding warm red tones. We grind whole spices fresh for the most intense colors and textures, mixing them into clear polish for even distribution. Cinnamon bark pieces create rustic brown textures that pair perfectly with fall themed manicures.
Crushed breakfast cereals offer playful textures and unexpected pops of color, with fruity cereals providing rainbow effects when embedded in clear acrylic. Cookie crumb applications work especially well for dessert themed nail art, using actual graham cracker or chocolate cookie pieces to create realistic textures. We seal these food elements with multiple topcoat layers to prevent moisture damage and maintain hygiene.
Coffee grounds create sophisticated brown textures that mimic expensive textured polishes at a fraction of the cost. Tea leaves offer similar earth tones with added fragrance benefits, though we recommend using decaffeinated varieties to prevent staining. Preservation techniques include thorough dehydration before application and antimicrobial topcoats to ensure food safety while maintaining the artistic integrity of these edible nail designs.
Interactive Nail Designs With Moving Parts

Mechanical elements transform static nail art into ever-changing displays that respond to touch and movement. We’re exploring kinetic nail designs that incorporate functional components for truly interactive experiences.
Spinning Elements
Miniature bearing systems create mesmerizing rotating effects on extended acrylic nails. We embed tiny ball bearings between dual nail layers, allowing decorative tops to spin freely with finger movement. Professional nail artists recommend using precision micro bearings measuring 2-3mm in diameter for optimal functionality.
Propeller attachments add whimsical motion to nail extensions through carefully balanced polymer blades. We secure these lightweight components using surgical adhesive while ensuring proper weight distribution prevents nail damage. Wind activated designs respond beautifully to natural air currents and hand gestures.
Rotating charm wheels function like miniature slot machines on your fingertips. We position multiple decorative elements on circular discs that users can spin manually to reveal different designs. These systems require precise engineering to maintain smooth rotation while supporting decorative weight.
Sliding Components
Track based mechanisms allow decorative elements to glide across nail surfaces in predetermined paths. We install thin metal guides within acrylic extensions that support sliding charms and miniature figures. Professional installation requires creating precise channels that maintain structural nail integrity.
Drawer style compartments open to reveal hidden designs or tiny storage spaces within nail extensions. We construct these functional elements using layered acrylic techniques that create smooth sliding action. Secret compartments can hold glitter, tiny gems, or even miniature artwork for surprising reveals.
Linear motion systems enable decorative elements to move back and forth along nail lengths. We achieve this effect through carefully positioned groove channels that guide small ornamental pieces. Spring loaded mechanisms provide automatic return functions that reset sliding elements to their original positions.
Magnetic Interactive Features
Embedded magnetic strips transform nails into interactive displays that respond to magnetic fields. We incorporate thin neodymium magnets within acrylic structures to attract decorative metal elements. These systems allow wearers to rearrange nail designs by moving magnetic accessories across nail surfaces.
Floating ornament effects create the illusion of suspended decorative elements above nail beds. We position opposing magnetic poles to generate repulsion forces that hold lightweight charms in stable hovering positions. This technique requires careful magnetic strength calibration to prevent ornament drift.
Magnetic polish systems react to external magnetic fields to create shifting pattern effects. We apply specialized iron particle polishes that respond to handheld magnets for creating wave patterns and ever-changing textures. Professional magnetic tools generate consistent field patterns that produce repeatable artistic effects across all nails.
Optical Illusion Nails That Trick the Eye

Visual trickery takes center stage with optical illusion nail designs that challenge perception and captivate viewers. These mind-bending manicures use strategic patterns and color placement to create effects that seem impossible on such a small canvas.
Geometric Pattern Illusions
Checkerboard warping effects create the appearance of curved surfaces on flat nails by strategically distorting traditional grid patterns. We achieve this illusion by gradually adjusting square sizes from the center outward, making straight lines appear bent or wavy. Professional nail artists recommend using high-contrast colors like black and white or navy and silver for maximum visual impact.
Spiral tunnel designs draw viewers into seemingly endless depths using carefully planned geometric progressions. Starting with a large circle at the cuticle, we create concentric shapes that decrease in size toward the nail tip, alternating between two contrasting colors. This technique requires precise brush control and steady hands to maintain consistent spacing between each ring.
Impossible triangle patterns replicate the famous Penrose triangle illusion, creating shapes that appear three-dimensional but can’t exist in reality. We construct these designs using three interlocking bands of different shades, ensuring each segment appears to pass both over and under the others simultaneously. Metallic polishes in gold, silver, and copper work exceptionally well for this design.
Op art stripe illusions use parallel lines of varying thickness to create movement and vibration effects that seem to pulse when viewed. Strategic placement of thick and thin stripes in complementary colors generates these mesmerizing patterns. We recommend using tape guides to ensure perfectly straight lines and consistent spacing throughout the design.
Depth Perception Designs
Floating object illusions make decorative elements appear suspended above the nail surface using strategic shadowing techniques. We create this effect by painting identical shapes in multiple shades, positioning darker versions slightly offset from lighter ones to simulate shadows. Rhinestones and small charms enhance this illusion when placed over the painted shadows.
Tunnel vision effects transform nail surfaces into seemingly endless corridors using perspective drawing principles. Starting with a large rectangular opening at the base, we paint progressively smaller rectangles toward the tip, adding side walls that converge to create the tunnel effect. Gradient shading from light to dark enhances the depth perception dramatically.
Layered transparency illusions create the appearance of multiple glass sheets stacked above the nail surface through careful color layering. We build these designs using translucent polishes in complementary shades, allowing each layer to show through the others. Strategic highlighting with white polish creates realistic light reflections on each imaginary surface.
Bubble dome effects make portions of the nail appear raised and three-dimensional using highlighting and shadowing techniques. Circular or oval shapes receive bright highlights at their imaginary peaks and darker shading around their edges. This creates convincing depth without any actual texture changes to the nail surface.
Color Gradient Tricks
Temperature shift illusions use warm to cool color transitions to create the appearance of heat sources or cold zones on nail surfaces. We blend oranges and reds into blues and purples using sponge techniques, making certain areas appear to glow with warmth while others seem frozen. These gradients work particularly well with thermochromic base coats for added realism.
Metallic fade effects create the illusion of polished metal surfaces transitioning from bright to tarnished using carefully planned color progressions. Starting with bright silver or gold at one end, we gradually blend into darker bronze or copper tones toward the other end. Buffing between coats ensures smooth transitions that mimic real metal patina.
Rainbow refraction patterns simulate light breaking through prisms by strategically placing spectrum colors in curved bands across nail surfaces. We use the natural order of rainbow colors (red, orange, yellow, green, blue, indigo, violet) but curve their placement to create the illusion of bent light rays. Holographic top coats amplify these prismatic effects significantly.
Ombre depth illusions use multi-tonal gradients to create the appearance of infinite space or dimensional portals on nail surfaces. Starting with the lightest shade at the center, we blend progressively darker tones toward the edges, creating either convex or concave depth illusions. Strategic placement of glitter particles enhances the cosmic or dimensional appearance of these designs.
Conclusion
We’ve taken you through an incredible journey of nail art possibilities that push every creative boundary imaginable. From living moss gardens to interactive moving parts these aren’t just manicures – they’re wearable art installations that spark conversations and turn heads wherever you go.
The beauty of crazy nail ideas lies in their ability to transform something as simple as your fingertips into a canvas for unlimited expression. Whether you’re drawn to the mesmerizing effects of thermochromic technology or the bold statement of nail piercings there’s a technique waiting to match your unique style.
We encourage you to start small and gradually work your way up to more complex designs. Remember that the most stunning nail art often comes from combining multiple techniques – imagine holographic powders meeting optical illusions or glow-in-the-dark elements paired with 3D sculptures.
Your nails are your personal billboard to the industry. Make them unforgettable.
Frequently Asked Questions
What is extravagant nail art and why is it trending?
Extravagant nail art is an innovative form of self-expression that goes beyond traditional polish colors. It includes 3D sculptures, glow-in-the-dark elements, miniature landscapes, and interactive designs. This trend is popular on social media because it allows people to showcase their creativity and make bold fashion statements through their manicures.
How do glow-in-the-dark nails work?
Glow-in-the-dark nails use UV reactive polishes that change color under blacklight, phosphorescent powders that glow for hours, or tiny LED lights embedded in acrylic nails. Apply a white base coat to enhance color shifts, and brands like Color Club and Orly offer reliable UV formulas for best results.
What are 3D sculptural nail extensions?
3D sculptural nail extensions add height and texture to manicures using miniature objects, polymer clay charms, industrial hardware, and hand-sculpted elements. These designs can feature architectural structures inspired by gothic cathedrals or modern skyscrapers, creating dramatic artistic effects that push traditional nail design boundaries.
How do thermochromic nails change colors?
Thermochromic nails use special polishes that change colors in response to temperature fluctuations. They work best with a white base coat and thin application layers. Professional formulas from brands like Color Club and Orly provide reliable color shifts that respond to body heat and environmental temperature changes.
What are holographic and chrome mirror finishes?
Holographic finishes use special powders applied over dark base coats to create prismatic rainbow effects. Chrome mirror finishes require precise buffing techniques with chrome powder to achieve a flawless reflective surface. Both techniques require proper sealing with topcoat for durability and can be layered for custom color combinations.
Are nail piercings safe?
Nail piercings can be safe when done properly on extended acrylic nails, specifically in the upper third area. Use surgical steel jewelry and professional piercing techniques to create precise holes. This allows for decorative rings, chains, and industrial elements while maintaining nail health and structural integrity.
Can you really grow plants on nails?
Yes, living nail gardens incorporate real moss and tiny succulents like baby jade attached to nail extensions. Use plant-safe adhesives and specialized acrylic wells to secure plants. Daily care includes misting and proper light management to maintain plant health while creating unique botanical nail art designs.
What unconventional materials can be used in nail art?
Nail art can incorporate beach sand, glitter, lace, fabric, dried spices, crushed cereals, and coffee grounds to create unique textures and designs. These materials are embedded into polish or acrylic and sealed properly for durability. Always ensure materials are clean and safe for nail application.
How do interactive nail designs with moving parts work?
Interactive nails feature mechanical elements like spinning bearings, sliding tracks, drawer compartments, and magnetic components. These kinetic designs allow parts to move, spin, or reveal hidden elements, creating dynamic nail art experiences that engage viewers and add functionality to traditional manicures.
What are optical illusion nails?
Optical illusion nails use geometric patterns, spiral tunnels, impossible triangles, and color gradients to create visual effects that challenge perception. These designs can make nails appear three-dimensional, create depth illusions, or seem to change shape when viewed from different angles, captivating viewers with mind-bending effects.