We’ve all been there – staring at our plain nails and craving something cute and feminine that’ll make our fingertips absolutely irresistible. Bow nail art has become one of the hottest trends in the nail community, and it’s easy to see why. These adorable designs add instant charm and sophistication to any manicure while letting our playful side shine through.
Whether we’re heading to a special event or just want to treat ourselves to something sweet, bow nail designs offer endless possibilities. From delicate 3D bows that practically pop off our nails to simple painted ribbons that whisper elegance, there’s a bow style for every skill level and occasion.
The best part? We don’t need to be professional nail artists to create stunning bow designs. With the right techniques and a little creativity, we can transform our nails into tiny canvases of cuteness that’ll have everyone asking where we got our manicure done.
Classic French Tip Bow Nail Art Ideas
French manicures get a charming upgrade when we add delicate bow accents to create timeless elegance. These sophisticated designs blend traditional nail art with playful bow elements for stunning results.
Traditional White Bow Accents
White bow accents transform classic French tips into elegant statement nails. We recommend placing small white bows at the base of each nail near the cuticle area for a subtle yet sophisticated look. The contrast between the natural nail bed and crisp white tips creates the perfect backdrop for delicate bow details.
Positioning these bows requires careful attention to nail shape and size. On shorter nails, we suggest creating tiny bows using a fine nail art brush or dotting tool. Longer nails provide more canvas space, allowing us to create slightly larger bow designs that won’t overwhelm the overall aesthetic.
Finishing touches make these designs truly shine. We always apply a high-quality top coat to seal the artwork and add glossy dimension to both the French tips and bow accents. This step ensures the design lasts longer while maintaining that salon-fresh appearance.
Colored French Tips With Bow Details
Colored French tips offer endless possibilities for creative bow incorporation. We love experimenting with soft pastels like blush pink, lavender, or mint green as base colors, then adding complementary bow shades for visual interest. These color combinations work beautifully for spring weddings or garden parties.
Bold French tip colors create dramatic bow nail art statements. Deep burgundy, navy blue, or emerald green French tips paired with metallic gold or silver bow accents deliver sophisticated glamour. We recommend these combinations for evening events or holiday celebrations.
Matching bow colors to French tip shades creates cohesive elegance. This monochromatic approach works particularly well with neutral tones like beige, taupe, or soft gray. We suggest varying the bow placement across different nails to add visual movement while maintaining color harmony throughout the manicure.
Glitter Bow Nail Art Ideas for Special Occasions

Glitter bow nail art transforms ordinary manicures into dazzling showstoppers perfect for weddings, parties, and holiday celebrations. We’ll explore three stunning approaches that add glamorous sparkle to your bow designs while maintaining the sophisticated elegance discussed in our previous sections.
Rose Gold Glitter Bow Designs
Rose gold glitter creates romantic bow accents that complement both warm and cool skin tones beautifully. We recommend applying a base coat in nude or blush pink, then carefully outlining bow shapes using fine rose gold glitter polish. Position these sparkling bows at the base of your ring finger nails for an understated bridal look that pairs perfectly with engagement rings.
Fine rose gold particles work best for detailed bow outlines, while chunkier glitter adds dramatic texture to bow centers. Create depth by layering different rose gold shades, starting with lighter tones and building up to deeper copper hues. This technique produces dimensional bows that catch light from multiple angles.
Professional nail artists often suggest using striping brushes dipped in rose gold glitter polish for precise bow loops and tails. Seal your design with two thin coats of high quality top coat to prevent glitter from chipping during special events.
Holographic Bow Accents
Holographic glitter creates rainbow prismatic effects that shift colors as your hands move under different lighting. We love how these iridescent bow designs become conversation starters at evening parties and formal events. Apply holographic glitter over black or deep purple base colors to maximize the color shifting properties.
Create striking accent nails by painting holographic bow shapes on just your thumb and ring finger. This selective placement draws attention without overwhelming your overall look. Use holographic nail foils for ultra smooth bow surfaces that reflect light more intensely than traditional glitter polish.
Experiment with different holographic formulas since some lean more silver while others display stronger rainbow effects. We’ve found that brands specializing in indie nail polish often offer the most dramatic color shifts for maximum visual impact at special occasions.
Ombre Glitter Bow Patterns
Ombre glitter bows blend multiple shades seamlessly for sophisticated gradient effects perfect for formal events. Start with the lightest glitter shade at bow tips and gradually transition to darker tones toward the center knot area. This creates natural shadows that make bow designs appear more three dimensional.
Popular ombre combinations include champagne to gold glitter for daytime events or silver to black glitter for evening occasions. Apply each shade while the previous layer remains slightly tacky to achieve smooth color transitions without harsh lines.
We recommend using makeup sponges to dab glitter polish for the softest ombre blending. Work quickly since glitter polish dries faster than regular nail color. Complete your ombre bow design by adding a small rhinestone or pearl to the center knot for extra elegance that photographs beautifully at special events.
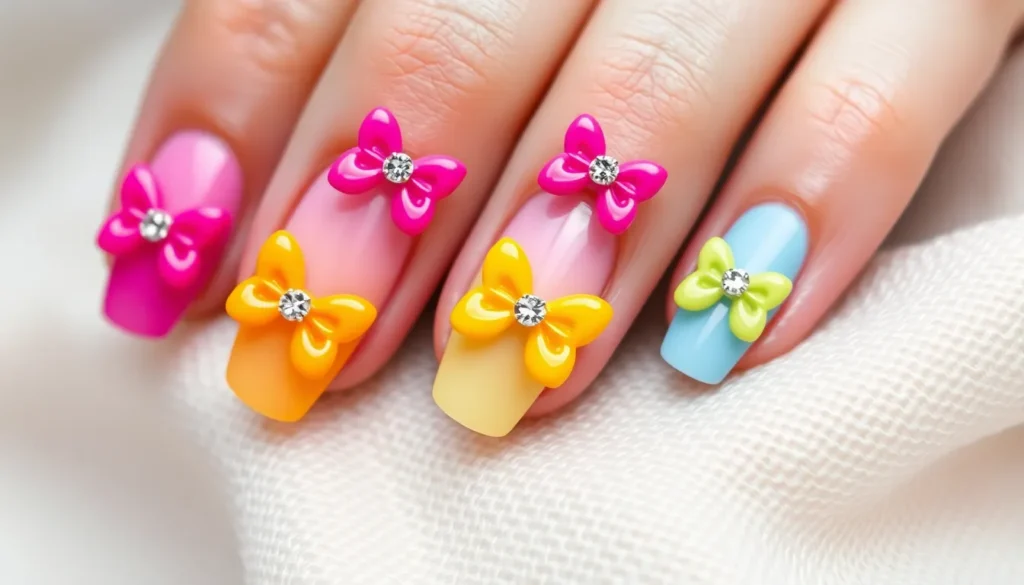
3D Bow Nail Art Ideas Using Rhinestones and Gems

Dimensional bow designs reach new heights of glamour when we incorporate sparkling embellishments like rhinestones and gems. These luxurious elements transform simple bow nail art into stunning three dimensional masterpieces that catch light beautifully.
Crystal Bow Centerpieces
Clear crystal rhinestones create the most versatile bow centerpieces that complement any nail color or occasion. We recommend starting with a medium sized crystal as your bow’s center knot and building outward with smaller stones to form the bow loops. Swarovski crystals offer superior brilliance and staying power compared to standard rhinestones.
Colored crystal arrangements allow us to match bow centerpieces to exact outfits or themes. Sapphire blue crystals work beautifully for something blue wedding themes while emerald green stones create striking holiday designs. Ruby red crystals make perfect Valentine’s Day bow accents that sparkle against classic red polish.
Crystal gradient effects involve using crystals in varying sizes to create depth and movement in our bow designs. Start with the largest crystal at the center and gradually decrease the size as you work toward the bow ends. This technique creates natural light reflection patterns that make each bow appear to dance on the nail.
Pearl-Adorned Bow Designs
Classic white pearls bring timeless elegance to bow nail art that’s perfect for bridal manicures and formal events. We suggest using flat backed pearls in 2mm to 4mm sizes to create delicate bow outlines without adding excessive bulk. Position pearls along the bow’s curves to emphasize the ribbon like appearance.
Colored pearl variations offer sophisticated alternatives to traditional white pearl designs. Champagne pearls complement nude and beige nail colors beautifully while black pearls create dramatic contrast against light backgrounds. Rose gold pearls work exceptionally well with pink and coral nail polish shades.
Pearl cluster formations involve grouping multiple small pearls together to form fuller bow shapes with more visual impact. We recommend using nail glue dots to secure pearl clusters and allowing each section to dry completely before moving to the next. This technique works best on longer nails where we have adequate space for larger designs.
Mixed Media Bow Creations
Rhinestone and pearl combinations create the most luxurious bow designs by mixing different textures and light reflection properties. We typically use pearls for the bow loops and rhinestones for the center knot to achieve balanced visual weight. This combination works particularly well for wedding and anniversary celebrations.
Metallic accent integration involves adding small metal studs or chains to enhance the dimensional quality of our bow designs. Gold studs complement warm toned polishes while silver accents work best with cool colors. We suggest limiting metallic elements to prevent overwhelming the overall design.
Textured base layering provides the foundation for complex mixed media bow creations by using techniques like caviar beads or sugar powder before applying larger embellishments. This approach creates sophisticated depth that makes each bow appear more realistic and professionally crafted. We recommend sealing textured bases with a thin top coat layer before adding rhinestones or pearls for better adhesion.
Minimalist Bow Nail Art Ideas for Everyday Wear

Minimalist bow nail art perfectly balances elegance with simplicity for your daily manicures. We’ll show you three effortless approaches that create stunning bow designs without overwhelming your nails.
Simple Line Art Bow Designs
Creating delicate line art bows requires only a thin nail art brush and steady hands. We recommend using a 00 liner brush to draw two curved lines that meet at the center, forming the classic bow shape. Black polish works beautifully on nude or pink base colors for a chic contrast.
Drawing technique makes all the difference in achieving clean bow outlines. We suggest starting with the bow’s center knot, then adding the loops on each side for better symmetry. Practice on a nail wheel helps perfect your brush control before applying the design to your nails.
Color combinations enhance the versatility of line art bows throughout different seasons. We love pairing white bow outlines on soft lavender bases for spring or navy blue lines on cream backgrounds for professional settings. Metallic gold lines create an elevated look that transitions seamlessly from day to evening wear.
Negative Space Bow Patterns
Negative space bow designs use your natural nail color as part of the artistic pattern. We create these by painting around the bow shape, leaving the bow itself unpainted for a modern reverse effect. Clear base coats protect your natural nails while maintaining the see-through aesthetic.
Strategic placement of negative space elements adds visual interest without complexity. We position bow cutouts at the nail tips for a contemporary French manicure variation or center them on accent nails for subtle detail. This technique works exceptionally well on shorter nail lengths where intricate designs might appear crowded.
Color blocking enhances negative space bow patterns with geometric appeal. We recommend using two complementary shades that frame the unpainted bow shape, such as soft pink and white or sage green and cream. This approach creates depth while maintaining the minimalist philosophy of everyday nail art.
Single Accent Bow Nails
Single accent bow nails focus attention on one designated finger per hand for understated elegance. We typically choose the ring finger or thumb as the accent nail, keeping the remaining nails in a coordinating solid color. This technique allows for slightly more detailed bow work without overwhelming the overall manicure.
Proportional sizing ensures your accent bow complements rather than dominates your nail design. We create bows that cover approximately one-third of the nail surface, positioning them at the base, center, or tip depending on your nail shape. Oval nails showcase center-placed bows beautifully, while square nails suit tip placement better.
Textural contrast elevates single accent bow designs beyond simple painted elements. We incorporate matte topcoats on the accent nail while keeping others glossy, or add subtle shimmer to just the bow portion. These small details create sophisticated dimension that catches light naturally throughout your daily activities.
Seasonal Bow Nail Art Ideas Throughout the Year

We can transform our bow nail art to reflect each season’s unique beauty and colors. These seasonal variations help us keep our manicures fresh and relevant year round.
Spring Floral Bow Combinations
Spring bow designs flourish with delicate pastels and fresh floral elements that capture the season’s renewal energy. We recommend creating soft pink bows alongside tiny painted daisies or cherry blossoms for a romantic garden inspired look. Baby blue ribbon accents paired with white tulip silhouettes bring that classic spring freshness to any manicure.
Lavender bow details work beautifully when combined with green leaf patterns or small rose buds. These combinations create depth while maintaining the gentle aesthetic spring demands. We suggest using a white or nude base to let the pastel bow elements truly shine against the natural nail color.
Yellow bow accents paired with painted sunflowers or daffodils capture spring’s sunny optimism perfectly. Mint green ribbon designs complement pink cherry blossom details for those seeking a more whimsical approach to seasonal nail art.
Summer Bright Color Bow Designs
Summer bow nail art embraces vibrant hues and tropical themes that reflect the season’s energetic spirit. We love creating hot pink bow designs with coral accent details for that perfect beach vacation manicure. Electric blue ribbon patterns paired with white polka dots bring a playful nautical vibe to summer nails.
Sunset colored bow gradients using orange, pink, and yellow create stunning focal points for warm weather occasions. These ombre bow techniques work especially well on longer nails where we have more space for color blending. Turquoise bow accents combined with gold glitter details capture that tropical paradise feeling.
Neon green bow patterns paired with bright purple details create bold contrast perfect for summer festivals. We suggest balancing these intense colors with neutral base tones to prevent overwhelming the overall design. Watermelon inspired bow art using pink and green combinations brings a fun fruity element to summer manicures.
Fall Autumn-Themed Bow Patterns
Fall bow nail art celebrates rich earth tones and cozy seasonal elements that reflect autumn’s warmth. We create burnt orange bow designs alongside painted maple leaves or small acorns for that perfect harvest season look. Deep burgundy ribbon accents paired with gold leaf details bring sophisticated autumn elegance to any manicure.
Chocolate brown bow patterns work beautifully when combined with copper or bronze metallic accents. These warm combinations create depth while capturing fall’s rich color palette perfectly. We suggest using cream or beige base colors to let the autumn bow elements stand out dramatically.
Plum colored bow details paired with painted pumpkins or pine cones bring seasonal charm to fall manicures. Forest green ribbon designs combined with orange accent details create that classic autumn leaf combination we all love during this cozy season.
Winter Holiday Bow Nail Art
Winter bow designs sparkle with festive elements and cool tones that capture the holiday season’s magic. We create silver bow patterns alongside painted snowflakes or tiny star details for elegant winter wonderland manicures. Deep red ribbon accents paired with gold glitter bring classic Christmas sophistication to holiday nail art.
Icy blue bow details work perfectly when combined with white pearl accents or crystal rhinestone elements. These combinations create that frosty winter feeling while maintaining glamorous appeal for holiday parties. We recommend using dark navy or black base colors to make winter bow elements pop dramatically.
Emerald green bow patterns paired with red accent details capture traditional Christmas colors beautifully. White bow designs combined with silver metallic elements create stunning winter wedding manicures that photograph perfectly. Purple bow accents with gold details bring New Year’s Eve glamour to our seasonal nail art collections.
Cute Kawaii-Style Bow Nail Art Ideas

Kawaii inspired bow designs bring an irresistible charm to our manicures with their adorable aesthetic and playful elements. These sweet designs capture the essence of Japanese cute culture while maintaining the sophisticated appeal of bow nail art.
Pastel Rainbow Bow Designs
Soft gradient bow patterns create a dreamy kawaii effect by blending multiple pastel shades seamlessly across each bow design. We recommend using baby pink, lavender, mint green, and powder blue to achieve the perfect rainbow ombre effect. Apply each color in small sections while the polish is still wet to ensure smooth blending.
Multi colored bow arrangements work beautifully when we alternate different pastel shades across our nails for a cohesive rainbow theme. Position a coral bow on the thumb, lilac on the index finger, and seafoam green on the middle finger for maximum kawaii appeal. Complete the look with a glossy top coat to enhance the candy like finish.
Cloud inspired bow bases add an extra layer of kawaii charm when we paint fluffy white clouds beneath our rainbow bows. Use a makeup sponge to dab white polish in circular motions before adding the colorful bow details on top. This technique creates a whimsical sky effect that perfectly complements the pastel rainbow theme.
Character Inspired Bow Patterns
Hello Kitty bow tributes capture the iconic kawaii aesthetic by incorporating the beloved character’s signature red bow into our nail designs. We suggest painting a classic red bow with white polka dots on the ring finger as an accent nail. Add tiny whiskers and pink cheeks on adjacent nails to complete the Hello Kitty theme.
Sailor Moon inspired bows bring magical girl energy to our manicures with crescent moon details and star accents surrounding delicate bow designs. Paint golden yellow bows with silver crescent moons positioned at the center of each bow. Scatter tiny silver stars around the design for an authentic anime inspired look.
Pokemon themed bow elements offer endless creativity when we incorporate popular characters like Pikachu’s lightning bolt patterns or Jigglypuff’s pink swirls. Create yellow bows with black zigzag details for a Pikachu tribute or soft pink bows with musical note accents for Jigglypuff inspired nails.
Sweet Candy Colored Bow Accents
Bubblegum pink bow clusters create the ultimate kawaii statement when we arrange multiple small bows across each nail in varying shades of pink. Use hot pink, cotton candy pink, and rose pink to create depth and visual interest. Position three to four mini bows per nail for optimal impact without overwhelming the design.
Mint chocolate chip bow combinations blend refreshing mint green with rich brown accents to mimic the beloved ice cream flavor. Paint mint green bows with tiny brown dots scattered throughout to represent chocolate chips. Add a glossy finish to enhance the sweet candy like appearance.
Cotton candy bow swirls incorporate the fluffy texture of spun sugar through layered application techniques and soft color transitions. We achieve this effect by applying a base coat in pale pink then adding white swirl details before positioning light blue bows on top. Use a fine detail brush to create the characteristic wispy texture that makes cotton candy so appealing.
Elegant Wedding Bow Nail Art Ideas

Wedding bow nail art transforms your special day manicure into a sophisticated masterpiece that complements your bridal look perfectly. These refined designs capture the romance and elegance of your wedding celebration.
Bridal White and Lace Bow Designs
Pure white bow accents create the quintessential bridal manicure that matches your wedding dress beautifully. We recommend positioning delicate white ribbon designs along the nail bed’s edge, creating an elongated appearance that flatters shorter nails. Traditional lace patterns work wonderfully as backgrounds for these pristine bow details, adding vintage charm to your overall design.
Creating lace texture beneath your bow accents adds dimensional depth that photographs beautifully in wedding portraits. Apply a sheer nude base coat first, then use a fine detail brush to paint intricate lacework patterns across each nail. White bow embellishments should sit prominently above these delicate backgrounds, ensuring they remain the focal point of your design.
Matte finish options provide an incredibly sophisticated alternative to traditional glossy wedding nails. We suggest sealing your white bow designs with a high quality matte topcoat that prevents chipping during your ceremony and reception. This modern approach creates stunning contrast against your engagement ring and wedding band.
Something Blue Bow Accents
Incorporating your “something blue” tradition into bow nail art creates meaningful symbolism for your wedding day. Soft powder blue ribbon details work perfectly as accent pieces on ring fingers, drawing attention to your wedding bands. We love pairing these subtle blue bows with classic French tip manicures for timeless bridal elegance.
Navy blue bow designs offer a more dramatic approach that photographs beautifully against white wedding dresses. Position these deeper blue accents strategically across multiple nails, creating visual balance that doesn’t overwhelm your overall bridal aesthetic. Metallic silver outlines around these navy bows add luxurious sparkle that catches light during your ceremony.
Ombre blue bow patterns transition from pale sky blue to deeper sapphire tones, creating movement and interest across your manicure. Start with the lightest shade at the bow’s center, gradually deepening the color toward the ribbon’s edges. This technique creates realistic depth that makes your bow designs appear three dimensional and professionally crafted.
Pearl and Satin Bow Patterns
Tiny pearl embellishments transform simple bow designs into luxurious bridal masterpieces worthy of your special day. We recommend using flat backed pearls along the bow’s center lines, creating elegant definition that catches candlelight beautifully. These classic elements complement pearl jewelry and add sophisticated texture to your wedding manicure.
Satin finish nail polish creates the perfect base for pearl adorned bow designs, providing subtle shimmer without overwhelming sparkle. Apply this specialized polish in thin, even coats to achieve that coveted satin sheen that resembles your wedding dress fabric. The result creates cohesive elegance between your gown and your manicure.
Graduated pearl sizes add visual interest to your bow patterns, starting with larger pearls at the bow’s center and decreasing in size toward the ribbon tails. This professional technique creates realistic proportion that makes your nail art appear expertly crafted. We suggest sealing these pearl details with extra topcoat layers to ensure they remain secure throughout your wedding festivities.
DIY Bow Nail Art Ideas for Beginners

Creating beautiful bow nail art doesn’t require professional training or expensive tools. We’ll walk you through three beginner-friendly methods that guarantee stunning results with minimal effort.
Basic Bow Drawing Techniques
Start with simple two-step bow outlines using a thin nail art brush and your favorite polish color. Draw two connected triangular shapes that meet in the center, creating the classic bow silhouette on your nail bed.
Practice the center knot technique by painting a small oval or rectangle where the triangular shapes meet. This detail instantly transforms basic triangles into recognizable bow designs that look professionally crafted.
Master the ribbon tail addition by extending curved lines from each bow loop downward. These flowing tails add movement and elegance to your basic bow drawings while requiring only steady hand movements.
Perfect your bow proportions by keeping the bow width no more than two-thirds of your nail width. This sizing ensures your bows look balanced and proportionate on different nail shapes and lengths.
Layer contrasting colors for dimensional effects by painting the base bow in one shade and the center knot in another. This technique creates visual depth without requiring advanced artistic skills or specialized tools.
Easy Stamping Bow Methods
Choose bow-exact stamping plates that feature various bow sizes and styles for consistent results. These plates eliminate guesswork and ensure each bow maintains perfect symmetry across all your nails.
Apply stamping polish generously across the bow design on your plate before scraping excess polish away. This technique ensures crisp, clean transfers that capture every detail of the bow pattern.
Practice the rolling motion when transferring the stamped design from the silicone stamper to your nail. Roll the stamper from one side to the other rather than pressing straight down for complete coverage.
Work quickly after picking up the design since stamping polish begins to dry within 30 seconds of application. This timing is crucial for achieving sharp, well-defined bow outlines on your finished manicure.
Seal stamped bows immediately with a high-quality top coat to prevent smudging and extend wear time. Apply the top coat carefully to avoid disturbing the freshly stamped bow details.
Simple Sticker Application Tips
Select high-quality nail stickers that feature realistic bow designs and strong adhesive properties. Quality stickers bend easily around nail curves and resist peeling during normal daily activities.
Prep your base coat thoroughly by allowing it to dry completely before applying bow stickers. This preparation prevents the stickers from lifting at the edges and ensures longer-lasting results.
Position stickers carefully using tweezers for precise placement without touching the adhesive backing. Tweezers allow you to adjust positioning multiple times before committing to the final placement.
Smooth out air bubbles by gently pressing from the center of the sticker outward toward the edges. This technique prevents unsightly bubbles that can make your bow stickers appear unprofessional.
Trim excess sticker material that extends beyond your nail edges using small cuticle scissors. Clean edges create a polished appearance that mimics hand-painted bow designs.
Apply two thin top coat layers over your bow stickers to create a smooth, unified surface. The first layer seals the edges while the second adds shine and protection for extended wear.
Bold Statement Bow Nail Art Ideas

When we want our manicure to command attention, bold bow designs create the perfect dramatic impact. These striking patterns transform ordinary nails into conversation starters that showcase our artistic flair.
Oversized Bow Focal Points
Oversized bow designs make the most dramatic impact when we position them as the centerpiece of our manicure. Position one large bow across two or three nails on each hand to create a cohesive statement look. Scale these designs to cover roughly 70% of the nail surface for maximum visual impact.
Create depth with layered ribbon effects by building the bow in multiple stages. Apply the base ribbon shape first, then add shadow details underneath to make the bow appear lifted from the nail surface. Use contrasting colors like deep burgundy with gold edges or classic black with silver highlights for sophisticated drama.
Balance oversized elements with negative space to prevent the design from overwhelming smaller nail beds. Leave strategic areas unpainted around the bow to create breathing room and enhance the overall composition. This technique works particularly well on accent nails paired with coordinating solid colors on remaining fingers.
Neon Color Bow Designs
Neon bow patterns electrify any manicure with their vibrant energy and eye catching appeal. Choose electric pink, lime green, or bright orange as your primary bow color for maximum impact. These intense hues work best against neutral base colors like white, black, or clear polish.
Layer multiple neon shades within single bow designs to create rainbow effects that shimmer under different lighting. Start with the lightest neon shade as your base, then add darker neon accents for the ribbon tails and center knot. This gradient approach adds dimension while maintaining the bold neon aesthetic.
Combine neon bows with blacklight reactive topcoats for designs that transform under UV lighting. These specialty polishes make your bow art glow dramatically at parties, concerts, or nighttime events. Apply the reactive coat over completed neon bow designs for the most striking transformation effect.
Metallic Bow Accent Nails
Metallic bow accents add luxurious sophistication to any nail art design with their reflective shimmer. Choose rose gold, chrome silver, or copper tones to complement your base color palette. These metallic finishes catch light beautifully and create an upscale appearance perfect for special occasions.
Apply metallic leaf sheets over tacky base coats to achieve mirror like finishes on your bow designs. Press the leaf gently onto the bow shape, then seal with a quality topcoat to prevent chipping. This technique creates the most authentic metallic appearance compared to standard metallic polishes.
Incorporate holographic elements within metallic bow structures for multidimensional effects that shift colors in different angles. Use holographic powder dusted over wet metallic polish, or apply holographic strips as ribbon details within the bow pattern. These additions create depth and visual interest that makes each bow appear to move with light changes.
Conclusion
We’ve explored an incredible range of bow nail art ideas that can transform your manicures from ordinary to extraordinary. From elegant wedding designs to playful kawaii patterns and bold statement pieces there’s truly a bow style for every personality and occasion.
The beauty of bow nail art lies in its versatility – whether you’re reaching for minimalist everyday looks or dramatic 3D masterpieces with rhinestones and pearls. We’ve shown you that creating stunning bow designs doesn’t require professional skills and even beginners can achieve beautiful results with simple techniques like stamping or sticker applications.
Remember that seasonal adaptations keep your manicures fresh throughout the year while different color palettes and embellishments allow endless creativity. With these comprehensive ideas and techniques at your fingertips you’re ready to create bow nail art that perfectly expresses your unique style and makes every manicure a work of art.
Frequently Asked Questions
What makes bow nail art so popular?
Bow nail art combines charm and sophistication, making it perfect for enhancing any manicure. Its versatility allows for designs suitable for various occasions and skill levels, from simple painted ribbons to intricate 3D bows. You don’t need professional skills to create beautiful bow designs, making it accessible to everyone while encouraging creativity.
Can I incorporate bow designs into French tip manicures?
Absolutely! Bow accents can elevate traditional French manicures into timelessly elegant designs. Use white bow accents for subtle sophistication, or try colored French tips with complementary bow details. Position bows based on your nail shape and size, and finish with high-quality top coat for longevity and shine.
What are the best glitter bow nail art ideas for special occasions?
For special events, try rose gold glitter bow designs, holographic bow accents, or ombre glitter bow patterns. These designs transform ordinary manicures into dazzling showstoppers perfect for weddings, parties, and holiday celebrations. Each approach offers unique application techniques and stunning color combinations for maximum impact.
How can I create 3D bow nail art with rhinestones and gems?
Use crystal bow centerpieces, colored crystal arrangements, or crystal gradient effects for dimensional designs. Incorporate flat-backed pearls for classic elegance, or mix rhinestones and pearls for luxurious creations. Add metallic accents and textured base layering to create sophisticated depth and realistic, professionally crafted appearances.
Are there minimalist bow nail art options for everyday wear?
Yes! Try simple line art bow designs using thin brushes, negative space bow patterns utilizing natural nail color, or single accent bow nails on one finger. These understated approaches create elegant looks without overwhelming your nails, perfect for daily wear while maintaining sophistication.
How can I adapt bow nail art for different seasons?
Match your bow designs to seasonal colors and themes. Spring features pastel bows with floral elements, summer embraces vibrant tropical hues, fall celebrates rich earth tones with cozy motifs, and winter incorporates festive elements with cool tones. This keeps your manicures fresh and relevant year-round.
What are kawaii-style bow nail art ideas?
Kawaii bow designs bring adorable aesthetics with pastel rainbow bows, character-inspired patterns like Hello Kitty and Sailor Moon, and sweet candy-colored accents. Use dreamy pastel gradients, fluffy cloud bases, and playful arrangements to incorporate charming kawaii culture into your nail art.
How can I create elegant bow nail art for weddings?
For bridal manicures, try delicate white and lace bow designs positioned along the nail bed for elongation. Incorporate “something blue” with powder blue or navy accents, and use pearl and satin bow patterns with flat-backed pearls and satin finish polish for luxurious, cohesive wedding looks.
What are the best DIY bow nail art methods for beginners?
Start with basic bow drawing techniques using thin brushes, try easy stamping methods for consistent results, or use simple sticker applications. These beginner-friendly approaches guarantee stunning results with minimal effort, allowing newcomers to create professional-looking designs at home with proper tools and techniques.
How can I create bold statement bow nail art?
For dramatic impact, use oversized bows as focal points across multiple nails and layer ribbon effects for depth. Try neon color designs with gradient effects and blacklight reactive topcoats, or incorporate metallic bow accents with authentic metallic finishes and holographic elements for added sophistication and dimension.


