We’ve all been there – staring at our nails wondering how to achieve that perfect salon look without very costly or spending hours in a nail chair. Acrylic nails don’t have to be complicated or over-the-top to make a stunning statement. Simple acrylic designs can transform your everyday look while keeping maintenance manageable and your style effortlessly chic.
The beauty of simple acrylic nail ideas lies in their versatility and timeless appeal. Whether you’re heading to the office or a weekend brunch, these understated designs complement any outfit and occasion. We’re talking about clean lines, subtle colors, and minimalist patterns that pack maximum impact without the drama.
Ready to discover acrylic nail designs that’ll have everyone asking where you got them done? We’ve curated the most gorgeous yet achievable simple acrylic ideas that prove sometimes less really is more. Let’s jump into these game-changing looks that’ll elevate your nail game instantly.
Classic French Tip Acrylic Nails
French tip acrylics remain the quintessential choice for those seeking timeless elegance. These versatile designs offer endless possibilities while maintaining that sophisticated appeal we all love.
Traditional White Tips
White tips on nude or clear bases create the most recognizable French manicure style. We recommend choosing a creamy white polish that complements your skin tone rather than stark bright white. Oval and almond shapes work beautifully with traditional French tips, elongating fingers naturally. Professional nail technicians often use a steady hand technique or French tip guides to achieve those perfect crisp lines. The classic ratio involves covering about one third of the nail with white, leaving the majority in a natural nude shade.
Colored French Tips
Colored French tips transform the traditional look into something more playful and modern. We love soft pastels like baby pink, lavender, or mint green for a fresh spring vibe. Bold colors such as deep burgundy, navy blue, or emerald create striking statements for evening events. Metallic shades like rose gold, silver, or copper add glamorous touches to any outfit. Seasonal colors work wonderfully too—think warm oranges for fall or bright corals for summer. The application technique remains the same as traditional French tips, just with your chosen color replacing the classic white.
Thin Line French Manicure
Thin line French manicures feature delicate strips instead of the traditional thick white tips. We create these by using nail art brushes or thin striping tape to achieve precise narrow lines. The thin line can sit at the traditional tip position or move lower on the nail for a more modern placement. Multiple thin lines in different colors create stunning gradient effects across the nail bed. This technique works exceptionally well on shorter nails where thick French tips might overwhelm the nail shape. Steady hands and quality brushes make all the difference when executing these refined designs.
Solid Color Acrylic Nail Designs
 1")
Solid color acrylic nails offer endless possibilities for creating stunning manicures that suit any style preference. These monochromatic designs provide the perfect canvas for showcasing beautiful hues while maintaining the elegant simplicity that makes acrylic nails so versatile.
Neutral Nude Shades
Nude acrylic nails remain the ultimate choice for achieving effortless sophistication in any setting. We recommend selecting shades that complement your skin’s undertones, such as warm beiges for golden complexions or cool taupes for pink undertones. Popular nude options include “Ballet Slipper” pink, creamy vanilla, and soft camel tones that elongate fingers naturally.
These versatile shades work seamlessly with professional attire, casual outfits, and formal wear alike. Application requires building thin layers to achieve even coverage without streaking or patchiness. Many nail technicians suggest adding a subtle shimmer topcoat to nude acrylics for extra dimension and luminosity.
Bold Single Colors
Bold acrylic colors make powerful statements while maintaining the simplicity of monochromatic designs. Deep burgundy, rich emerald green, and classic black create dramatic looks that command attention without requiring intricate patterns or embellishments. These striking hues work particularly well on longer acrylic extensions where the color can truly shine.
Seasonal bold choices include vibrant coral for summer months, deep plum for autumn, and electric blue for spring celebrations. Application techniques for bold colors involve using high quality pigmented polishes that provide full coverage in two coats maximum. We suggest curing each layer properly to prevent chipping and ensure long lasting wear.
Pastel Acrylic Options
Pastel acrylic nails deliver soft femininity perfect for spring occasions, romantic dates, and everyday wear. Delicate lavender, mint green, baby pink, and powder blue create gentle looks that feel fresh and youthful. These lighter shades require careful application to avoid streaking and achieve smooth, even coverage across all nails.
Layering techniques prove essential when working with pastel acrylics since these colors often appear sheer initially. Building opacity gradually through multiple thin coats prevents bubbling while maintaining the soft, dreamy appearance pastels are known for. Many nail artists recommend using white base coats under pastels to enhance their true color and prevent any yellowing from the natural nail showing through.
Minimalist Geometric Acrylic Patterns
 2")
Geometric patterns transform simple acrylic nails into sophisticated works of art through clean lines and precise shapes. We’ll explore effortless designs that create maximum visual impact with minimal complexity.
Simple Line Designs
Vertical line accents create an elongating effect that makes acrylic nails appear even more elegant. Paint thin vertical stripes using a fine nail art brush or striping tape, positioning them asymmetrically across 1-2 accent nails for balanced visual interest. Choose contrasting colors like white lines on nude bases or gold stripes over deep burgundy backgrounds.
Horizontal stripe patterns offer a modern twist on traditional nail art techniques. Space 2-3 thin horizontal lines evenly across the nail surface, keeping them perfectly parallel for professional results. Metallic colors like rose gold or silver work exceptionally well against neutral acrylic bases.
Diagonal line arrangements add ever-changing movement to minimalist acrylic designs. Cross two diagonal lines to form subtle X patterns, or create single diagonal accents that sweep from corner to corner. We recommend using a steady hand technique with quality striping brushes for crisp, clean edges.
Triangle and Square Accents
Triangle tip designs reimagine the classic French manicure with geometric precision. Create small triangular shapes at nail tips using contrasting colors, maintaining consistent angles across all fingers. Soft pastels like lavender or mint green triangles over white bases create fresh spring looks.
Square negative space blocks introduce architectural elements to acrylic nail designs. Position small square cutouts near the cuticle area or nail tips, leaving the natural nail visible through geometric windows. This technique works beautifully with nude or clear base coats.
Corner triangle accents provide subtle geometric interest without overwhelming the overall design. Paint tiny triangles in opposite corners of accent nails using coordinating colors from your outfit palette. Limit this pattern to 1-2 nails per hand for optimal visual balance.
Negative Space Patterns
Circular negative space designs create modern artistic statements through strategic empty areas. Use circular stickers or nail guides to mask perfect circles, then paint around them with your chosen acrylic color. Remove the guides while polish remains wet for clean, professional edges.
Geometric cutout patterns combine multiple shapes for sophisticated negative space effects. Create combinations of triangles, squares, and lines that intersect to form complex yet minimalist designs. We suggest sketching patterns on paper first to perfect placement before applying to nails.
Half moon negative space updates the classic lunula design with contemporary geometric appeal. Leave the natural nail visible in precise half moon shapes at the base, then paint the remaining nail area with bold colors like deep teal or classic black for striking contrast.
Easy Gradient Acrylic Nail Art
 3")
Gradient acrylic nail designs create stunning visual depth through seamless color transitions. We’ll explore three essential techniques that make professional looking ombre effects accessible to everyone.
Ombre Color Blends
Creating smooth ombre transitions starts with selecting complementary colors that naturally flow together. We recommend choosing shades within the same color family, such as light pink to deep rose or soft blue to navy, for the most seamless blending effects.
Apply the lighter shade as your base coat across the entire nail surface. Working quickly while the polish remains wet, dab the darker color onto a makeup sponge and gently press it onto the nail tip. Blend downward using small tapping motions until the colors merge naturally.
Perfect the gradient by repeating the sponging technique 2-3 times, allowing each layer to partially dry between applications. This layering method builds color intensity gradually while maintaining smooth transitions throughout your acrylic nail surface.
Subtle Fade Techniques
Master the delicate fade by choosing colors with minimal contrast, such as nude to soft pink or cream to champagne. These gentle transitions create sophisticated looks that work beautifully for everyday wear and professional settings.
Use a dry brush method by loading minimal color onto your brush and sweeping it across the nail in light strokes. Start with the darkest shade at the base or tip, then gradually decrease pressure as you blend toward the lighter area.
Enhance subtle gradients with pearl or shimmer topcoats that reflect light differently across the color transition. This technique adds dimension without overwhelming the delicate fade effect you’ve created.
Two-Tone Gradient Effects
Bold two-tone combinations make dramatic statements using contrasting colors like black to silver or purple to gold. These high contrast gradients work exceptionally well on longer acrylic extensions where you have more surface area to showcase the transition.
Position colors strategically by placing the darker shade at the base and lighter at the tip, or vice versa depending on your desired effect. This placement creates visual length and draws attention to your nail shape.
Seal gradient designs with a high gloss topcoat to unify the color transition and protect your acrylic nail art. The glossy finish enhances color vibrancy while ensuring your two-tone gradient maintains its crisp appearance for weeks.
Simple Accent Nail Ideas
 4")
Transform your manicure with strategic accent placement that draws attention without overwhelming your overall look. We’ll show you how to master the art of selective enhancement through three essential accent techniques.
Single Statement Nail
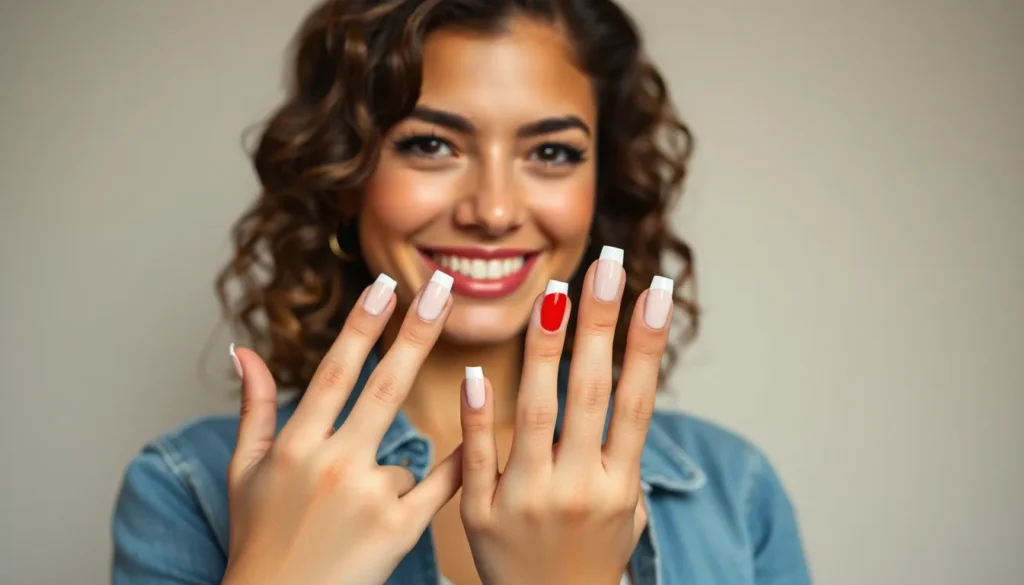
Choose one nail per hand to showcase your creative flair while keeping the remaining nails elegantly simple. Ring finger accents create the most balanced visual impact, drawing attention to your hands’ natural focal point. Bold metallic shades like rose gold or silver transform a neutral base into something special.
Feature nail designs work best when they contrast dramatically with your base color. White base nails paired with a single black accent create striking monochrome sophistication. Nude manicures gain instant elegance when you add a deep burgundy or navy statement nail.
Position your accent strategically to complement your nail shape and hand structure. Square shaped acrylics showcase geometric patterns beautifully on the statement nail. Coffin nails create perfect canvases for vertical stripe details that elongate your fingers.
Glitter Accent Options
Apply fine glitter polish to create subtle sparkle that catches light beautifully throughout the day. Silver glitter over nude bases delivers timeless elegance for professional settings. Gold glitter accents pair perfectly with warm toned polishes like coral or peach.
Layer different glitter sizes to achieve dimensional texture that elevates simple manicures instantly. Micro glitter creates smooth, sophisticated coverage that won’t interfere with daily activities. Chunky glitter pieces add dramatic flair when applied sparingly over solid colors.
Concentrate glitter placement at nail tips or cuticle areas for modern gradient effects. Glitter French tips modernize classic styles with contemporary sparkle elements. Reverse glitter gradients starting at the cuticle create unexpected visual interest.
Rhinestone Details
Place individual rhinestones at cuticle lines to frame your nails with elegant crystal accents. Clear crystals complement any color palette while maintaining sophisticated simplicity. Colored stones should match or complement your base polish for cohesive designs.
Create linear patterns using small rhinestones to add geometric interest without overwhelming the design. Three stone arrangements along the nail’s center line provide balanced visual weight. Corner placements at the tip create subtle luxury touches.
Secure rhinestones with strong nail adhesive to ensure long lasting wear throughout your manicure’s lifespan. Quality crystal placement prevents lifting and maintains professional appearance for weeks. Clear topcoat application over stones provides additional protection and smooth finish.
Basic Textured Acrylic Finishes
 5")
Textured acrylic finishes transform simple nail designs into sophisticated statements through strategic surface treatments. We’ll explore three fundamental finish techniques that add depth and visual interest to your acrylic nails.
Matte Acrylic Nails
Matte acrylic nails create an understated elegance that complements both casual and professional settings. We achieve this velvety finish by applying a high-quality matte topcoat over your chosen base color, instantly transforming glossy surfaces into modern sophistication.
Dark colors like deep burgundy, navy blue, and charcoal gray showcase matte finishes exceptionally well. These rich tones appear more dramatic and luxurious when paired with the flat texture that matte topcoats provide.
Neutral shades such as beige, taupe, and soft pink offer versatility for everyday wear when finished with matte texture. The subdued surface creates a refined appearance that works seamlessly with any outfit or occasion.
Application requires steady hands and quick movements since matte topcoats dry faster than traditional glossy formulas. We recommend working on one nail at a time to prevent streaking or uneven coverage that can compromise the smooth matte appearance.
Glossy Smooth Finish
Glossy smooth finishes represent the classic acrylic nail standard that delivers timeless appeal and maximum color vibrancy. We create this mirror-like surface using high-quality base coats, color applications, and multiple layers of glossy topcoat for professional salon results.
Traditional glossy finishes enhance color depth and create brilliant shine that catches light beautifully throughout the day. The reflective surface makes colors appear more saturated and creates visual dimension that adds sophistication to simple nail designs.
Maintenance becomes easier with glossy finishes since the smooth surface resists staining and allows for effortless cleaning. We find that glossy acrylic nails maintain their pristine appearance longer when properly sealed with quality topcoats.
Professional application techniques include thin, even coats that prevent bubbling and ensure consistent coverage across the entire nail surface. Allow each layer to dry completely before applying the next coat to achieve that perfect glass-like finish.
Light Shimmer Effects
Light shimmer effects add subtle sparkle to acrylic nails without overwhelming the overall design aesthetic. We incorporate fine shimmer particles through specialized topcoats or by mixing glitter directly into base colors for customized sparkle intensity.
Pearl shimmer creates an iridescent glow that shifts color subtly depending on lighting conditions. This elegant effect works particularly well with neutral base colors like champagne, soft pink, and ivory that complement the pearl undertones.
Silver shimmer provides cool-toned sparkle that enhances blue, purple, and gray base colors while maintaining sophistication. The metallic particles catch light beautifully and create movement that adds visual interest to simple acrylic designs.
Gold shimmer offers warm-toned elegance that pairs perfectly with coral, peach, and warm nude shades. We apply shimmer topcoats in thin layers to control sparkle intensity and achieve the desired level of glamour for any occasion.
Quick Floral Acrylic Designs
 6")
Floral patterns add feminine charm to acrylic nails without requiring advanced artistic skills. We’ll show you how to create beautiful flower designs that complement any simple acrylic base.
Simple Daisy Patterns
Daisy designs transform basic acrylic nails into cheerful spring statements with just white petals and yellow centers. We create these charming flowers by dotting five small white oval shapes around a central yellow dot using a detail brush or dotting tool.
White base colors work perfectly for daisy patterns, allowing the flowers to pop against nude or clear backgrounds. Position your daisies strategically on one or two accent nails to maintain the minimalist aesthetic we’ve established throughout our simple acrylic designs.
Placement techniques matter significantly for achieving balanced daisy patterns that don’t overwhelm your manicure. We recommend placing larger daisies near the cuticle area and smaller ones toward the tip, creating natural visual flow that draws the eye upward.
Minimalist Rose Designs
Rose outlines create sophisticated floral accents using simple curved lines and dots in soft pink or red tones. We achieve these elegant designs by drawing a small spiral center and adding three to four curved petal shapes around it using a thin nail art brush.
Monochromatic rose designs work beautifully when we use varying shades of the same color family for depth without complexity. Try deep burgundy roses on nude bases or soft pink variations on white acrylics for romantic appeal that matches our understated theme.
Single rose placement on the ring finger creates an elegant focal point that enhances rather than competes with your base color. We find this technique particularly effective when combined with our previously discussed solid color foundations or subtle gradient effects.
Single Flower Accents
One statement flower per hand creates maximum impact while maintaining the simplicity we’ve emphasized throughout our acrylic nail journey. We achieve this by selecting either the ring finger or middle finger for a detailed floral design while keeping remaining nails in complementary solid colors.
Mixed flower types allow creative expression when we combine different bloom styles across multiple manicures rather than within a single set. Alternate between cherry blossoms, small tulips, or tiny sunflowers to match seasonal preferences and outfit choices.
Color coordination ensures our single flower accents enhance rather than clash with our chosen base tones from previous sections. We recommend using flowers in colors that either complement or directly match elements from our gradient techniques or accent nail approaches for cohesive overall results.
Easy Striped Acrylic Nail Art
 7")
Striped acrylic nail designs offer endless versatility while maintaining the clean sophistication we’ve explored throughout our simple nail art journey. These linear patterns create visual interest through strategic line placement and contrasting color combinations.
Vertical Line Patterns
Vertical line patterns elongate the appearance of your nails while creating a sleek modern aesthetic. Start with a solid base color in nude or soft pink, then use a thin striping brush to paint two to three vertical lines down the center of each nail. Classic black lines on white bases create striking monochromatic effects, while metallic gold strips on navy blue backgrounds offer sophisticated contrast.
Spacing techniques make all the difference in achieving professional results. Leave equal gaps between each vertical line, approximately 2-3 millimeters apart, to maintain visual balance across all ten nails. Color coordination works best when you choose tones that are either complementary or within the same color family but different in intensity.
Application tips ensure clean execution every time. Use striping tape as guides for perfectly straight lines, removing it while the polish is still slightly wet to prevent peeling. Seal each design with a high quality topcoat to protect the lines and create a smooth unified surface.
Horizontal Stripe Designs
Horizontal stripe designs create width and bold visual impact across your acrylic extensions. These patterns work exceptionally well on longer nails where you have adequate space for multiple stripes. Two tone combinations like black and white or burgundy and gold deliver classic elegance that complements any outfit.
Stripe width variations add ever-changing interest to your manicure design. Alternate between thick stripes (4-5 millimeters) and thin lines (1-2 millimeters) to create rhythmic patterns that draw the eye. Three color schemes using neutrals like beige, cream, and taupe offer sophisticated options for professional settings.
Placement strategies determine the overall effect of your horizontal design. Position the boldest or darkest stripe near the cuticle area to frame the nail bed, then graduate to lighter tones toward the tip. Edge finishing requires careful attention to prevent smudging, so allow each stripe to dry completely before applying the next layer.
Diagonal Accent Stripes
Diagonal accent stripes bring ever-changing movement to your acrylic nail art through angled line placement. These designs work particularly well as single accent nails paired with solid colored companions, creating focal points without overwhelming the entire manicure. 45 degree angles provide the most visually pleasing diagonal effect across various nail shapes and lengths.
Color pairing strategies enhance the diagonal impact through strategic contrast choices. Pair soft pastels like lavender and mint green for spring inspired looks, or combine deep jewel tones like emerald and sapphire for evening elegance. Metallic accents in rose gold or silver create luxurious diagonal details that catch light beautifully.
Execution techniques require steady hand control and proper tool selection. Use angle brushes or striping tools to maintain consistent line width throughout each diagonal sweep. Layering methods allow you to create multiple diagonal stripes in different directions, forming geometric crosshatch patterns that add sophisticated complexity to simple acrylic bases.
Beginner-Friendly Dot Patterns
 8")
Dots offer the perfect entry point for creating stunning acrylic nail art without requiring advanced artistic skills. We’ll explore three versatile dot techniques that transform simple acrylic nails into eye-catching designs.
Polka Dot Designs
Classic polka dots create timeless charm on acrylic nails while remaining incredibly easy to achieve. We recommend starting with a solid base color like soft pink or classic white, then adding contrasting dots using a dotting tool or bobby pin. Small dots evenly spaced across the nail surface deliver a vintage inspired look that complements any outfit.
Medium sized dots work beautifully on longer acrylic extensions, creating bold visual statements without overwhelming the design. We suggest using metallic colors like gold or silver dots on dark bases for sophisticated evening looks. Large dots positioned strategically near the cuticle area or nail tips offer modern takes on traditional polka patterns.
Color coordination transforms basic dot patterns into cohesive designs. We find that monochromatic schemes using different shades of the same color family create subtle depth, while high contrast combinations like black dots on white bases deliver striking results.
Single Dot Accents
Strategic single dot placement creates elegant focal points that enhance simple acrylic designs without complexity. We position individual dots at the base of ring finger nails to create understated accent pieces that draw attention. Metallic dots in gold, silver, or rose gold tones add luxurious touches to neutral base colors.
Size variation in single dot accents allows for personalized expression. We apply small dots for delicate feminine looks or larger dots for bold statement effects. Placement near the cuticle line creates modern minimalist aesthetics, while dots positioned at nail tips offer contemporary French manicure alternatives.
Rhinestone dots elevate single accent designs to special occasion status. We secure individual crystals using nail glue for long lasting wear that catches light beautifully. Clear or AB crystals work universally, while colored stones should complement the base polish shade.
Clustered Dot Art
Grouped dot arrangements create artistic compositions that appear complex while remaining beginner friendly. We cluster three to five dots of varying sizes in triangle formations for balanced visual weight. Corner placements work especially well on square shaped acrylics, creating modern geometric interest.
Gradient dot clusters using different shades within the same color family produce stunning ombre effects. We start with the lightest shade and progress to deeper tones, creating natural flow across the nail surface. This technique works beautifully with sunset colors like coral, orange, and deep red.
Random cluster patterns offer organic artistic appeal that breaks away from structured designs. We vary dot sizes and positions within small grouped areas, creating unique compositions on each nail. This approach allows for creative freedom while maintaining cohesive overall aesthetics through consistent color choices.
Simple Holiday-Themed Acrylics
 9")
Transform your simple acrylic nails into festive masterpieces with seasonal designs that capture holiday magic. These holiday themed acrylic ideas prove you don’t need complex artwork to achieve stunning seasonal manicures.
Seasonal Color Schemes
Classic red and green combinations create instantly recognizable Christmas acrylics that complement any holiday outfit. We love pairing deep emerald green with metallic gold accents for an elevated seasonal look that feels both traditional and modern. Rich burgundy and cream combinations offer sophisticated alternatives to bright holiday colors while maintaining festive appeal.
Winter white and silver palettes bring elegant simplicity to your seasonal acrylic nails. These cool toned combinations work beautifully for New Year celebrations and winter weddings. Soft pastels like lavender and mint create unique holiday looks that stand out from traditional color choices.
Thanksgiving inspired earth tones including burnt orange, deep brown, and champagne gold provide warmth during autumn celebrations. These seasonal acrylic colors transition beautifully from Halloween through Christmas when paired with metallic details.
Basic Holiday Symbols
Simple snowflakes become stunning focal points when painted in white or silver on dark acrylic bases. We recommend starting with basic six pointed designs using thin nail art brushes or dotting tools for precision. Single snowflakes placed strategically on accent nails create balanced holiday themed looks without overwhelming the overall design.
Holly leaves offer another approachable holiday symbol that beginners can master quickly. Paint basic leaf shapes in green acrylic polish and add tiny red dots for berries using a dotting tool. These Christmas symbols work beautifully on neutral bases like nude or soft pink acrylics.
Candy cane stripes require only steady hands and patience to achieve professional results. Create vertical or diagonal lines using red and white polish applied with thin brushes or striping tape. We suggest limiting candy cane designs to one or two accent nails for optimal visual impact.
Festive Accent Ideas
Glitter gradients add instant holiday sparkle without requiring advanced techniques. Apply glitter polish starting from the tips and blend downward using a makeup sponge for seamless transitions. Gold and silver glitters work universally with most holiday color schemes while red glitter creates dramatic Christmas accents.
Metallic French tips elevate classic manicures with seasonal flair using gold, silver, or copper polish. These festive accents maintain the elegance of traditional French nails while incorporating holiday elements. We love combining metallic tips with solid holiday colors on remaining nails for balanced contrast.
Simple rhinestone placement transforms basic acrylic colors into glamorous holiday statements. Position single crystals near cuticles or along nail edges using nail glue for secure application. Clear or colored rhinestones complement any seasonal color scheme while adding festive dimension to your acrylic nails.
Conclusion
We’ve shown you that stunning acrylic nails don’t require complex techniques or professional training. These simple designs prove that beauty lies in thoughtful details and clean execution rather than elaborate artwork.
Whether you’re preparing for everyday wear or special occasions your acrylic nails can make a powerful statement through minimalist elegance. The techniques we’ve shared give you endless possibilities to express your personal style while maintaining that polished professional look.
Start with one design that speaks to you and gradually build your skills. Remember that practice makes perfect and even the simplest nail art can transform your entire appearance. Your journey to beautiful acrylic nails begins with these foundational techniques we’ve outlined.
Frequently Asked Questions
What makes simple acrylic nails better than complex designs?
Simple acrylic nails offer versatility, timeless appeal, and easier maintenance. They complement various outfits and occasions while requiring less time and skill to create. The “less is more” approach ensures your nails look polished and professional without being overwhelming or going out of style quickly.
How do I achieve the perfect French tip with acrylics?
Start with a clean base coat, then use tape or nail guides for precision. Apply white polish to the tips in thin, even strokes. For colored French tips, choose complementary shades. Thin line French manicures require a steady hand and fine brush for delicate, modern results.
What are the best solid colors for acrylic nails?
Classic choices include nude, white, black, and red for timeless elegance. Bold single colors like navy, emerald, or burgundy make striking statements. Seasonal hues such as pastels for spring or deep jewel tones for fall keep your manicure current and stylish.
How can beginners create geometric patterns on acrylics?
Start with simple shapes using tape as stencils. Try basic triangles, stripes, or squares in contrasting colors. Use dotting tools for circles and nail art brushes for clean lines. Practice on nail wheels first to build confidence before applying designs to your actual nails.
What are negative space nail designs?
Negative space designs intentionally leave portions of the natural nail visible, creating modern artistic effects. These patterns use the nail’s natural color as part of the design, often combined with geometric shapes, stripes, or cut-out effects for a contemporary, minimalist look.
How do I create gradient or ombre effects on acrylic nails?
Use a makeup sponge to blend two or more colors while they’re still wet. Start with the lightest shade as a base, then dab the darker color with the sponge, blending toward the center. Work quickly and seal with a top coat for smooth, professional-looking gradients.
What are some easy accent nail ideas for beginners?
Try painting one nail per hand in a contrasting color or add simple glitter to ring fingers. Small rhinestones, single dots, or thin stripes make effective accents. Keep it subtle with metallic tips or a single geometric shape on accent nails.
How do I add texture to simple acrylic nails?
Use matte top coat for a sophisticated finish, or try sand-textured polish for subtle dimension. Velvet powder creates luxurious texture, while sugar-effect polishes add sparkle. Apply texture products over completely dry base colors for best results.
What are the easiest floral designs for acrylic nails?
Start with simple five-petal flowers using dotting tools. Create roses with a toothpick by drawing curved lines from center outward. Single flower accents on ring fingers work well for beginners. Use contrasting colors and add small dots for flower centers to complete the look.
How do I create polka dot patterns on acrylics?
Use dotting tools or bobby pin ends dipped in contrasting polish. For uniform dots, maintain consistent pressure and polish amount. Try single dot accents on ring fingers, or create clustered patterns by grouping different-sized dots. Practice spacing on paper first for even results.
What colors work best for holiday-themed acrylic nails?
Classic red and green combinations are perfect for Christmas. Elegant winter whites and silvers suit New Year celebrations. For Thanksgiving, try earth tones like burgundy, gold, and brown. Pastels work for Easter, while orange and black are ideal for Halloween themes.
How can I add festive sparkle to simple acrylic designs?
Try glitter gradients starting from the cuticle or tips. Add metallic French tips in gold or silver for elegance. Place single rhinestones strategically as accents, or use holographic top coats over solid colors for subtle shimmer without overwhelming the design.


