The holiday season’s here and we’re all looking for ways to add some festive sparkle to our look without spending hours at the salon. Easy Christmas nail art has become our go-to solution for achieving that perfect holiday manicure at home – and trust us, you don’t need to be a professional nail artist to create stunning results.
We’ve discovered that the most beautiful Christmas nails often come from the simplest techniques. Whether you’re attending office parties, family gatherings, or cozy nights by the fireplace, having festive nails instantly elevates your entire holiday outfit. The best part? Most of these designs require just basic nail polish and tools you probably already have at home.
From elegant red and gold combinations to playful snowflake patterns, we’ll show you how to transform your nails into miniature Christmas masterpieces. These foolproof designs are perfect for busy schedules and beginner skill levels, proving that gorgeous holiday nails don’t have to be complicated or time-consuming.
Simple Red and Green Christmas Nail Designs
Red and green combinations create the most recognizable Christmas nail looks that work perfectly for beginners. These classic color schemes require minimal artistic skill while delivering maximum festive impact.
Classic Red and Green Stripes
Start with a solid red base coat on all nails and let it dry completely. Apply thin strips of green nail tape or use a thin brush to create vertical stripes down each nail. We recommend making the stripes uneven widths for a more natural, hand-painted appearance.
Remove the tape immediately after applying the green polish to prevent peeling. Clean up any messy edges with a small brush dipped in nail polish remover. Finish with a clear top coat to seal the design and add shine.
Alternate the pattern by making some nails primarily red with green stripes and others primarily green with red stripes. This creates visual interest without requiring complex techniques or steady hands.
Festive Holly Berry Accent Nails
Paint your base nails in a deep forest green shade and choose one or two accent nails per hand for the holly design. Use a small dotting tool or the end of a bobby pin to create three small red dots clustered together on each accent nail.
Add tiny green leaves using a thin brush or toothpick dipped in a slightly lighter green polish. Make small oval shapes around the red berries to mimic holly leaves. We find that imperfect shapes actually look more realistic than perfectly symmetrical ones.
Keep the remaining nails solid green to let your holly accent nails stand out. Apply a glossy top coat to make the berries appear more dimensional and berry-like.
Easy Candy Cane Patterns
Create diagonal stripes on a white base using red polish and a thin brush or striping tape. Start from one corner of the nail and work across at a 45-degree angle, leaving white spaces between each red stripe.
Make the stripes consistent in width but don’t worry about perfect spacing. Slightly uneven candy cane stripes actually look more charming and handmade. We suggest practicing the motion on paper first if you’re using a brush.
Apply this pattern to just your ring fingers or thumbs as accent nails while keeping other nails solid red or green. Seal everything with a fast-drying top coat to prevent smudging your careful stripe work.
Quick Christmas Tree Nail Art Ideas
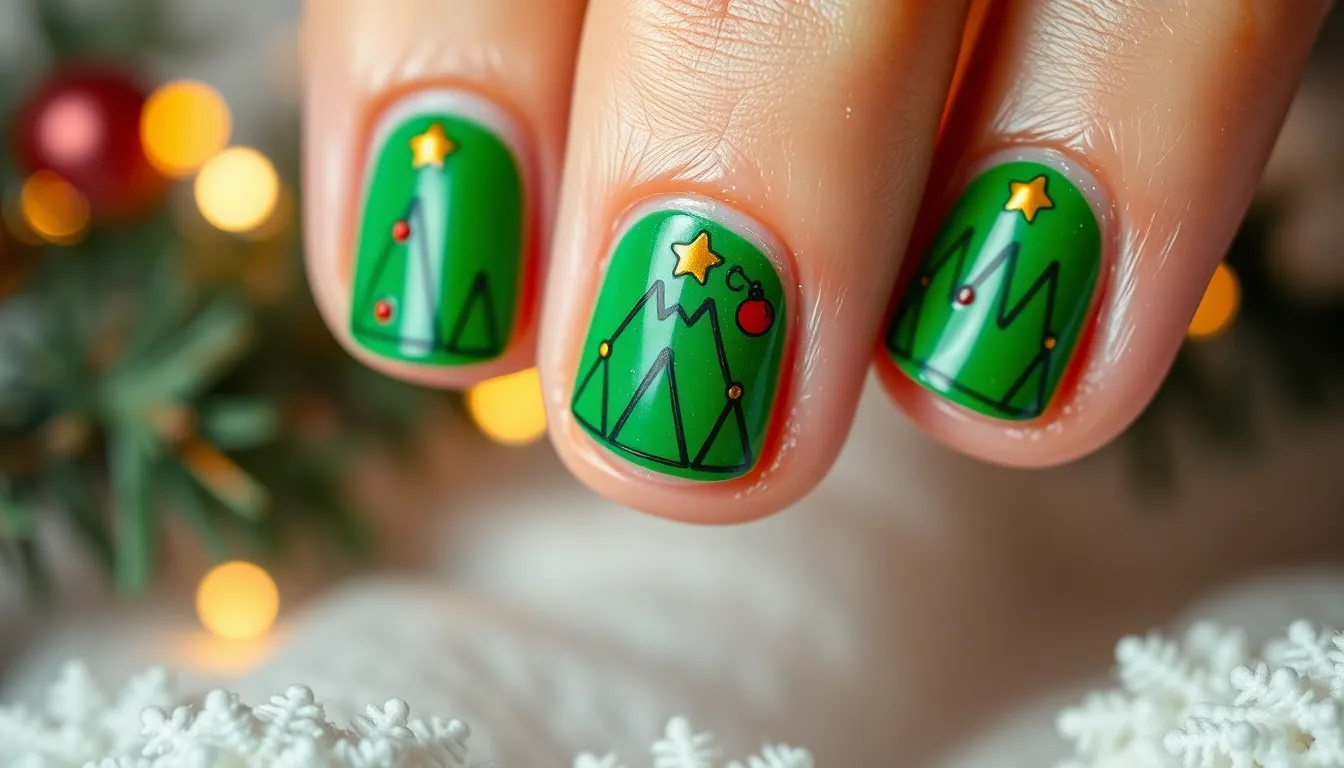
Christmas tree nail designs bring festive charm to your fingertips without requiring advanced artistic skills. We’ll show you three simple approaches that transform basic nail polish into stunning holiday manicures.
Simple Triangle Tree Design
Creating triangle Christmas trees starts with painting a solid base coat in nude or white polish. We recommend using a thin brush or toothpick to draw green triangles starting from the cuticle area and working toward the nail tip. Paint three stacked triangles in decreasing sizes to mimic the layered branches of a real Christmas tree.
Adding a small brown rectangle at the base completes the tree trunk effect. We suggest finishing with tiny dots of red or gold polish as ornaments scattered across the green triangles. This design works beautifully as an accent nail on your ring finger while keeping other nails in coordinating solid colors.
Glitter Christmas Tree Tips
Glitter French tips get a festive upgrade when shaped into Christmas tree points instead of traditional curves. We start by applying a clear base coat and allowing it to dry completely before proceeding. Use green glitter polish to create triangular tips that extend about one third down each nail.
Building up the glitter in thin layers prevents clumping and creates a more professional appearance. We recommend tapping off excess glitter between coats and sealing everything with a high quality top coat. Gold or silver glitter mixed with the green adds extra sparkle that catches light beautifully during holiday gatherings.
Minimalist Tree Silhouettes
Minimalist Christmas trees focus on clean lines and negative space for an elegant holiday look. We create these by painting thin vertical lines in dark green from cuticle to tip as the tree trunk. Short diagonal lines branch out from the trunk at regular intervals to suggest pine branches without overwhelming detail.
Using a fine nail art brush or striping brush ensures precise application of these delicate details. We keep the background nude or clear to let the simple tree design stand out against the natural nail color. This subtle approach works perfectly for professional settings where bold holiday nails might feel too dramatic.
Easy Snowflake Nail Art Tutorials

Snowflake patterns bring winter magic to your holiday manicure with delicate details that look complex but remain surprisingly simple to create. We’ll show you three foolproof methods that transform basic nail tools into snowflake masterpieces.
White Dotted Snowflakes
Create stunning snowflakes using just a dotting tool and white polish. Start with a dark blue or silver base coat to make your snowflakes pop against the winter night sky. Use a small dotting tool or the tip of a bobby pin to create the center dot of your snowflake.
Extend six lines outward from the center dot using thin brush strokes. Keep your lines roughly equal in length but don’t worry about perfect symmetry since real snowflakes have unique variations. Add smaller dots along each line to create the intricate branches that make snowflakes so captivating.
Finish each snowflake with tiny connecting dots between the main branches. This technique works beautifully on accent nails or across all ten fingers for a winter wonderland effect. We recommend practicing the pattern on paper first to build your confidence.
Silver Glitter Snowflake Accents
Transform ordinary manicures into sparkling winter scenes with silver glitter snowflakes. Mix fine silver glitter with clear top coat to create a paintable glitter mixture that’s perfect for detailed work. Apply this mixture using a thin brush to draw snowflake outlines over any base color.
Layer different sizes of glitter particles for dimensional snowflake effects. Use chunky silver glitter for the center points and fine glitter for the delicate branches. This creates depth and catches light beautifully under holiday party lighting.
Seal your glitter snowflakes with two coats of clear top coat. This prevents glitter from chipping and creates a smooth finish that won’t snag on clothing or accessories. Silver glitter snowflakes work especially well over deep purple or midnight blue base colors.
Simple Snowflake Stamps
Snowflake stamping plates make professional looking designs accessible to everyone. Choose stamps with various snowflake sizes to create natural looking winter scenes across your nails. Apply stamping polish to the plate and scrape excess away using a firm card or scraper.
Press the silicone stamper firmly onto the design to pick up the complete pattern. Roll the stamper across your nail in one smooth motion to transfer the snowflake without smudging. White stamping polish works beautifully over dark bases while silver creates elegant effects on lighter colors.
Combine multiple snowflake stamps on each nail for layered winter magic. Use different sized stamps and slightly offset their placement to mimic how real snowflakes fall and accumulate. This technique allows you to create complex looking designs in minutes rather than hours.
Beginner-Friendly Santa and Reindeer Nails
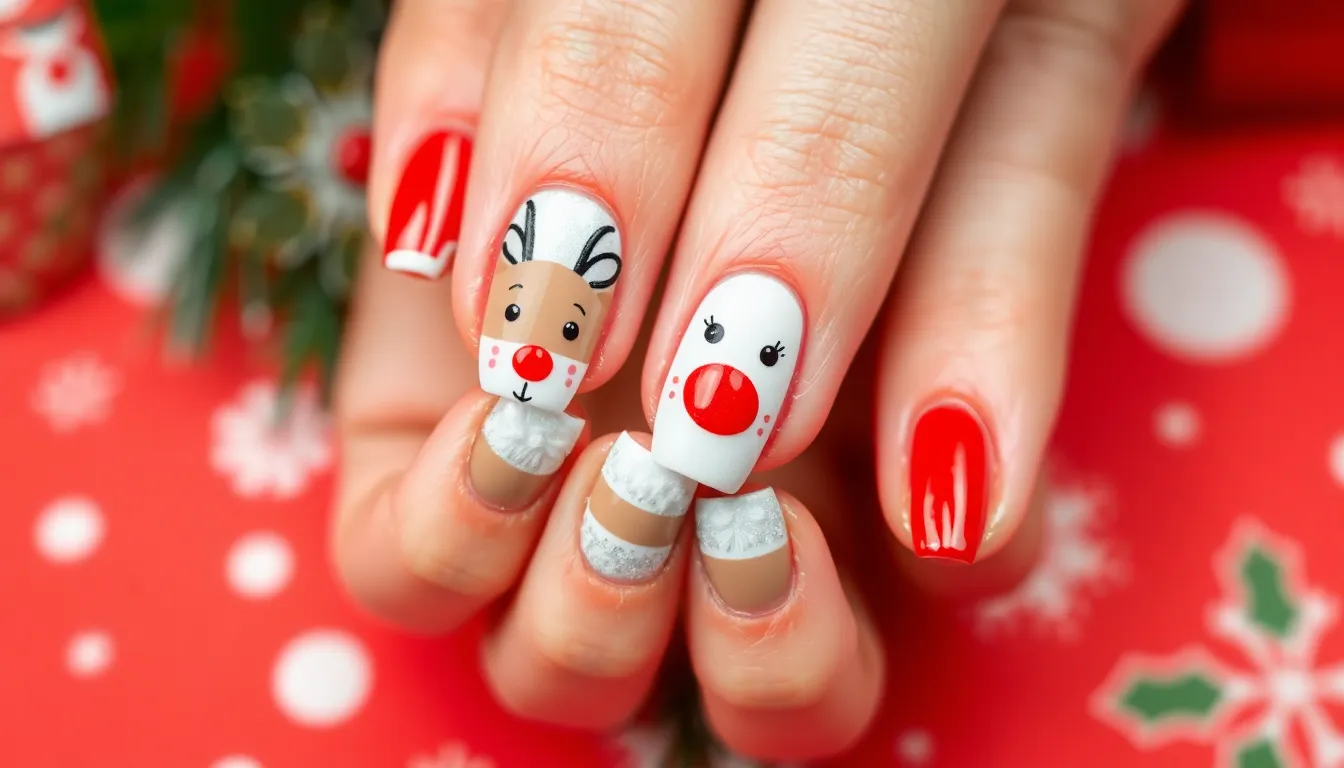
Santa and reindeer themed nail art brings beloved Christmas characters to your fingertips with surprisingly simple techniques. We’ll show you three adorable designs that capture holiday magic without requiring artistic expertise.
Santa Hat French Tips
Transform classic French manicures into festive Santa hat tips using just red and white polish. Start by applying a clear base coat to all nails, then paint the traditional white French tip area with bright red polish. Once the red dries completely, add a thin white line at the base of each red tip to create the hat’s trim. Finish each Santa hat with a tiny white dot at the very tip of your nail to represent the fluffy pom pom.
This design works beautifully on both short and long nails, making it perfect for anyone wanting subtle Christmas charm. We recommend using a steady hand and taking your time with the white details for the cleanest results. The entire process takes about 20 minutes including drying time between coats.
Simple Rudolph Red Nose Design
Create adorable reindeer faces using brown polish as your base and a single red dot for Rudolph’s famous nose. Paint your chosen accent nail with warm brown polish, allowing it to dry completely before adding details. Use a dotting tool or the rounded end of a bobby pin to place a bright red dot in the center of the nail for the nose.
Add two small white dots above the red nose for eyes, then use a black nail art pen or toothpick dipped in black polish to create tiny pupils. Simple curved lines drawn with brown polish can represent antlers extending from the top of your nail. This charming design typically takes just 10 minutes per nail and creates an instantly recognizable holiday character.
Easy Santa Beard Accent Nails
Santa’s fluffy white beard becomes the star of this simple yet effective nail art design. Begin with a nude or light pink base coat on your chosen accent nail, creating the perfect skin tone backdrop. Once dry, use white polish to paint a curved shape covering the bottom two thirds of your nail, mimicking Santa’s iconic beard.
While the white polish is still slightly tacky, gently dab a makeup sponge or cotton swab over the surface to create texture that resembles fluffy facial hair. Add two small black dots near the top of the nail for eyes and a tiny pink dot for the nose. Complete the look by painting a small red triangle or curved line at the very top to suggest Santa’s hat. This design requires minimal tools and creates maximum festive impact in under 15 minutes.
Festive Gold and Silver Christmas Manicures

Metallic finishes elevate your holiday nail game with elegant shimmer that catches every festive light. These sophisticated designs complement any holiday outfit while maintaining that perfect balance between glamorous and achievable.
Metallic Holiday Gradient
Gradient nails using gold and silver create stunning ombre effects that look professionally done. Start with a silver base coat on your entire nail, then use a makeup sponge to dab gold polish from the tip downward, blending about halfway down the nail.
Working quickly prevents the polish from drying too fast, so complete one nail at a time for the smoothest transition. Seal your gradient with a high-shine top coat to intensify the metallic effect and ensure your manicure lasts through all your holiday festivities.
Alternative gradient techniques include using gold as your base and blending silver toward the tips, or creating a vertical gradient from thumb to pinky finger. Each method produces unique reflective patterns that shimmer beautifully under holiday lighting.
Simple Gold Star Designs
Star accents transform plain manicures into celestial holiday masterpieces using just a thin brush or toothpick. Paint your nails with a deep navy, burgundy, or classic black base coat, then add small gold stars randomly across 2-3 accent nails.
Creating perfect stars requires drawing two overlapping triangles, but simple dots arranged in star patterns work equally well for beginners. Vary your star sizes by using different tools like the tip of a bobby pin for tiny stars or a small brush for larger focal points.
Position your stars asymmetrically for a natural, scattered look that mimics a starry winter night. Finish with clear top coat to protect your gold accents and add extra shine to your celestial design.
Silver Tinsel Effect Nails
Silver tinsel techniques recreate that magical Christmas tree shimmer directly on your nails. Apply a clear or nude base coat, then while it’s still slightly tacky, gently press actual tinsel strands or fine silver glitter strips onto select nails.
Alternatively, drag a fan brush loaded with silver polish in random directions across your base color to create organic tinsel streaks. This technique works beautifully over red, green, or deep purple bases for maximum holiday impact.
Layering different silver shades creates depth and dimension in your tinsel effect. Use a light silver first, then add darker metallic accents with a liner brush for authentic tinsel texture that catches light from multiple angles.
Christmas Cookie and Gingerbread Nail Art
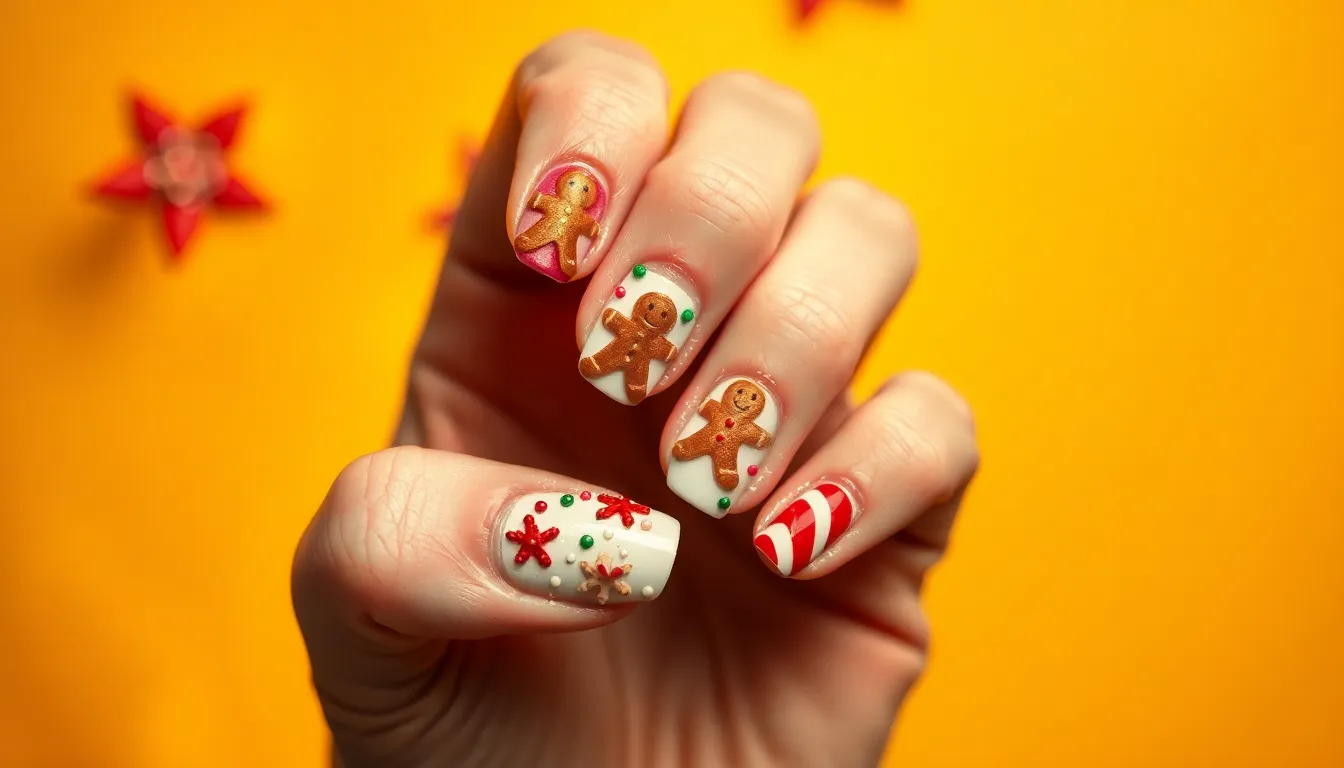
Sweet treats meet stylish nails with these delicious cookie-inspired Christmas designs. We’ll show you how to transform your manicures into edible-looking masterpieces using simple techniques and basic nail polish colors.
Easy Gingerbread Man Silhouettes
Creating adorable gingerbread man silhouettes starts with a warm brown base coat that mimics the rich color of baked cookies. Paint simple stick figure shapes using a thin nail art brush and darker brown polish for the outline. Add tiny white dots for buttons and small curved lines for smiling faces using a dotting tool. We recommend practicing on paper first to get comfortable with the proportions before painting on your nails.
Building dimension into your gingerbread designs becomes effortless when you layer different shades of brown polish. Use light brown for highlights on the gingerbread man’s arms and legs to create a realistic baked appearance. Apply thin white lines to represent classic icing details like zigzag patterns across the chest or decorative borders around the edges. The entire design takes about 15 minutes per hand and works beautifully as an accent nail paired with solid brown polish on other fingers.
Simple Cookie Sprinkle Design
Mimicking colorful cookie sprinkles requires nothing more than a light base coat and various bright nail polish colors in thin brush strokes. Start with a vanilla or cream colored base that resembles sugar cookie frosting. Create random short lines using pink, green, red, and yellow polish with a striping brush or the tip of a bobby pin. Scatter these “sprinkles” across each nail in different directions for an authentic look.
Achieving the perfect sprinkle density involves applying 8 to 12 small lines per nail for optimal visual impact without overcrowding. We suggest using a steady hand technique where you anchor your painting hand on a flat surface for better control. Allow each color to dry completely before adding the next layer of sprinkles to prevent smudging. Finish with a glossy top coat to seal the design and create that fresh from the bakery shine that lasts up to a week.
Candy Cane Cookie Patterns
Recreating classic candy cane cookies begins with a white base coat that serves as your cookie foundation. Paint diagonal red stripes across each nail using tape as a guide for perfectly straight lines. Remove the tape while the polish is still slightly wet to avoid peeling. The result mimics those beloved striped Christmas cookies found in every holiday bakery display.
Improving your candy cane cookie nails involves adding subtle cookie texture details using a makeup sponge dabbed in light brown polish. Gently press the sponge along the edges of each nail to create that slightly golden baked appearance. We recommend sealing everything with a matte top coat to replicate the actual texture of cookies rather than the glossy finish of traditional candy canes. This design works exceptionally well on shorter nails and takes approximately 20 minutes to complete both hands.
Quick Holiday Glitter and Sparkle Ideas

Nothing says Christmas glamour quite like glitter and sparkle nail designs. We’ll show you three stunning glitter techniques that transform ordinary manicures into dazzling holiday statements.
Ombre Christmas Glitter
Creating a holiday glitter ombre effect brings magical sparkle to your Christmas nail art. We recommend starting with a solid red or green base coat to establish your festive foundation. Apply fine glitter polish in a gradient pattern by dabbing the brush lightly at the tips of your nails and gradually working toward the cuticle area.
Glitter Ombre Color Combinations:
| Base Color | Glitter Shade | Effect |
|---|---|---|
| Deep red | Gold glitter | Classic Christmas elegance |
| Forest green | Silver sparkles | Winter wonderland shimmer |
| Burgundy | Rose gold | Sophisticated holiday glow |
Building up layers creates depth and dimension in your ombre design. We suggest applying three thin coats rather than one thick layer to achieve smooth blending. Finish with a high gloss top coat to seal the sparkle and prevent glitter fallout throughout your holiday celebrations.
Simple Sparkle French Tips
Transforming traditional French tips with holiday sparkle creates an elegant twist on classic nail art. We love replacing the standard white tip with festive glitter colors like gold, silver, or red sparkles. Start by painting your nails with a nude or clear base coat for the perfect canvas.
French Tip Sparkle Variations:
- Gold glitter tips with nude base for sophisticated Christmas elegance
- Red sparkle tips with clear base for bold holiday glamour
- Silver glitter tips with pale pink base for winter wonderland vibes
Apply the glitter polish to just the tip area using steady strokes from one side to the other. We recommend using nail guides or tape to create crisp, clean lines that look professionally done. Each sparkle French tip takes only 15 minutes to complete and pairs beautifully with any holiday outfit.
Easy Glitter Accent Nails
Creating stunning glitter accent nails adds just the right amount of sparkle without overwhelming your entire manicure. We suggest choosing one or two nails per hand to highlight with festive glitter while keeping the remaining nails in solid Christmas colors.
Popular Accent Nail Combinations:
- Ring finger with gold glitter over deep red base nails
- Thumb and ring finger with silver sparkles over green manicure
- Middle finger with red glitter over nude or white base
Press glitter polish onto accent nails using a dabbing motion rather than brushing to achieve maximum sparkle coverage. We find that layering different glitter sizes creates texture and visual interest in your accent design. Complete your glitter accent nails with extra top coat to smooth the surface and ensure your sparkles stay put through all your holiday festivities.
DIY Christmas Wreath Nail Designs
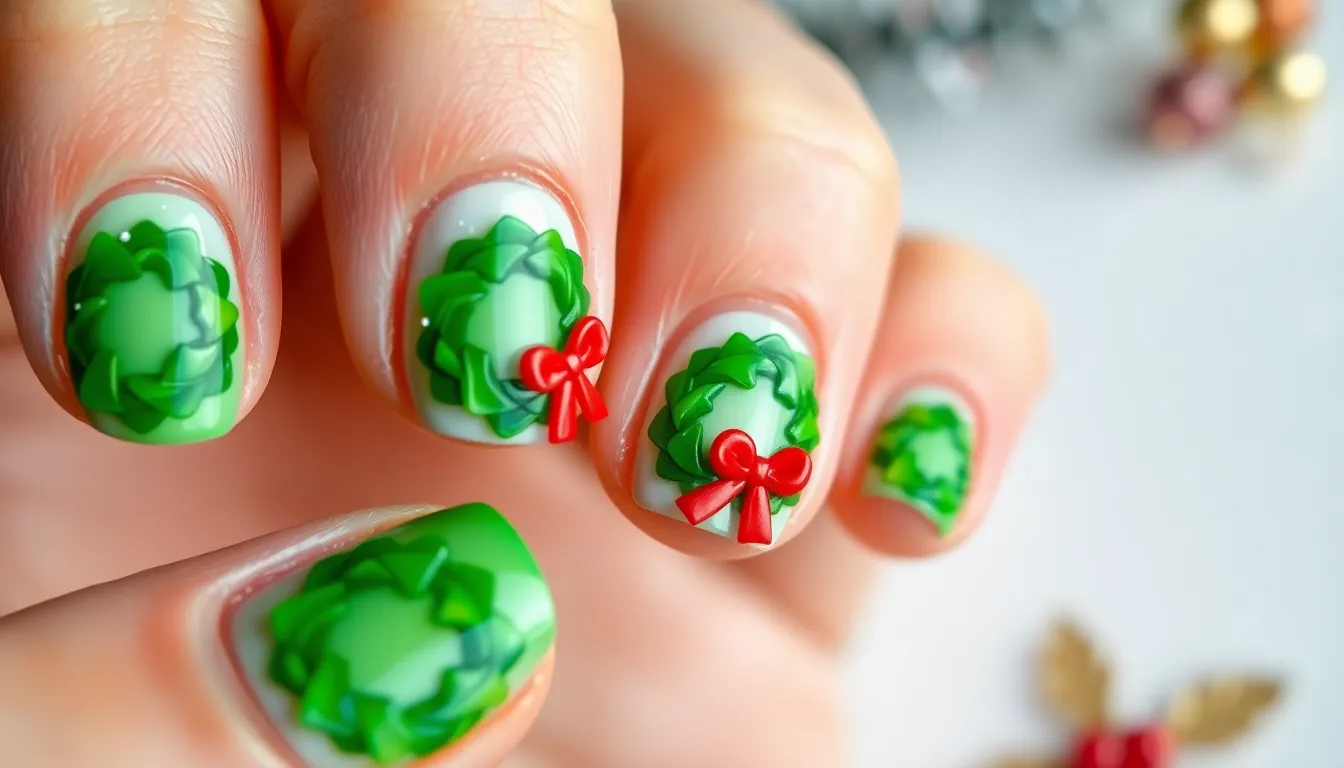
Creating Christmas wreath nail art brings the festive charm of traditional holiday decorations directly to your fingertips. We’ll show you three simple wreath techniques that capture the essence of these beloved holiday symbols without requiring advanced artistic skills.
Simple Green Wreath Outlines
Green wreath outlines form the foundation of beautiful Christmas nail art using basic circular motions and steady strokes. Start with a clear base coat, then use a thin nail art brush or toothpick to create a circular outline using forest green polish. Make your circles slightly imperfect for a natural, handcrafted wreath appearance that mimics real evergreen branches.
Layer multiple green shades like emerald, pine, and sage to create depth within your wreath outline. Apply darker green polish first, then add lighter green dots or small strokes around the circle’s perimeter. This technique creates the illusion of layered evergreen branches without complex blending skills.
Position your wreath outlines strategically on each nail for maximum visual impact. Place larger wreaths on thumb and ring finger nails, while creating smaller versions on remaining fingers. We recommend keeping the wreaths thin enough to leave space for bow details and other festive accents.
Easy Red Bow Accent Details
Red bow accent details transform simple green wreaths into complete Christmas decorations using just a few strategic brush strokes. Create the bow shape by painting two small triangular sections at the top of your wreath outline using classic red polish. Add a small rectangular center piece between the triangles to complete the bow illusion.
Use a dotting tool or small brush to add tiny red ribbon tails extending downward from your bow center. Paint these tails as thin curved lines that flow naturally from the bow’s base. This detail adds movement and authenticity to your wreath design without requiring precise artistic techniques.
Enhance your bow details with subtle shading using darker red polish along the edges of each bow section. Apply burgundy or deep red polish sparingly to create shadow effects that make your bows appear three dimensional. We find this technique particularly effective when combined with a glossy top coat for added shine.
Minimalist Wreath Patterns
Minimalist wreath patterns focus on clean lines and negative space to create elegant holiday nail art with maximum visual impact. Paint simple green circles using just the outer edge, leaving the center completely clear to showcase your natural nail or base color underneath. This approach creates sophisticated wreaths that work beautifully for professional holiday settings.
Create geometric wreath variations by using small green dots arranged in perfect circles instead of continuous lines. Space these dots evenly around your imaginary circle, using approximately 8 to 12 dots per wreath depending on your nail size. This dotted approach gives your wreaths a modern, stylized appearance that’s incredibly easy to execute.
Add single red dot accents at the top of each minimalist wreath to suggest a bow without overwhelming the clean design aesthetic. Place these accent dots precisely at the 12 o’clock position on your wreath circles. We recommend using this technique when you want festive nail art that remains subtle enough for conservative dress codes while still celebrating the holiday season.
Conclusion
Creating beautiful Christmas nails doesn’t have to be complicated or time-consuming. With these simple techniques and designs we’ve shared you can transform your everyday manicure into a festive masterpiece using items you likely already have at home.
Whether you’re drawn to classic red and green combinations sparkling metallics or playful character designs there’s something here for every skill level and style preference. The key is starting with basic techniques and building your confidence as you experiment with different patterns and colors.
This holiday season embrace the joy of DIY nail art and let your creativity shine. Your festive nails will be the perfect finishing touch for all your holiday celebrations making every gesture a little more magical throughout the season.
Frequently Asked Questions
Can I create beautiful Christmas nail art at home without professional skills?
Absolutely! The article emphasizes that stunning holiday manicures can be achieved using simple techniques and basic tools you likely already have. Classic designs like red and green stripes, holly berry accents, and candy cane patterns are perfect for beginners and require no advanced skills.
What are some easy Christmas nail designs for beginners?
Simple red and green Christmas designs are ideal for beginners. Try red and green stripes using tape, festive holly berry accent nails with red dots and green leaves, or easy candy cane patterns with diagonal stripes on a white base for a charming handmade look.
How can I create Christmas tree nail art quickly?
Three quick approaches work well: simple triangle tree designs using green triangles to mimic layered branches, glitter Christmas tree French tips with green glitter, or minimalist tree silhouettes focusing on clean lines and negative space for an elegant appearance.
What’s the easiest way to make snowflake nail art?
Use a dotting tool with white polish against a dark blue or silver base coat. Alternatively, create silver glitter snowflakes by mixing fine glitter with clear top coat, or use snowflake stamping plates for professional-looking designs with minimal effort.
How long do Santa and reindeer nail designs take to complete?
These beginner-friendly designs typically take between 10 to 20 minutes each. Popular options include Santa Hat French Tips, Simple Rudolph Red Nose Design with brown base and red dot, or Easy Santa Beard Accent Nails with textured white details.
Can I create elegant holiday nails with metallic colors?
Yes! Try metallic holiday gradient techniques blending gold and silver for stunning ombre effects, simple gold star designs on plain bases, or silver tinsel effect nails that recreate the magical shimmer of Christmas trees for glamorous results.
What are some fun cookie-inspired Christmas nail designs?
Create easy gingerbread man silhouettes using warm brown base with simple outlines, cookie sprinkle designs mimicking colorful sprinkles on light base coats, or candy cane cookie patterns with diagonal red stripes and texture details for realistic appearance.
How do I add glitter and sparkle to my holiday nails?
Try holiday glitter ombre effects with solid base coats and fine glitter polish, simple sparkle French tips replacing traditional tips with festive glitter colors, or easy glitter accent nails adding sparkle to select nails while keeping others solid.
Are Christmas wreath nail designs difficult to create?
Not at all! Start with simple green wreath outlines using circular motions and various green shades, add easy red bow accents for enhancement, or try minimalist wreath patterns focusing on clean lines and negative space for sophisticated looks.
What basic tools do I need for DIY Christmas nail art?
Most designs require only basic supplies you likely have: regular nail polish in holiday colors, dotting tools, tape for clean lines, brushes, and clear top coat. Some advanced looks may benefit from glitter polish or stamping plates.

