Gold nails have become the ultimate statement of luxury and sophistication in today’s beauty industry. Whether you’re preparing for a special occasion or simply want to elevate your everyday look, gold nail designs offer endless possibilities that’ll make your fingertips absolutely stunning.
We’ve curated the most gorgeous gold nail ideas that range from subtle elegance to bold glamour. From shimmering gold foils and intricate geometric patterns to chic minimalist accents and dazzling glitter combinations, these designs will transform your manicure game completely.
The beauty of gold lies in its versatility – it complements every skin tone and pairs beautifully with any outfit. You’ll discover how easy it’s to recreate these professional-looking designs at home while achieving that coveted salon-quality finish that’ll have everyone asking about your nails.
Classic Gold French Manicure Ideas
Elevating the timeless French manicure with golden accents creates an elegant upgrade that’s perfect for any occasion. We’ve curated these sophisticated gold variations that maintain the classic appeal while adding luxurious metallic shine.
Traditional Gold Tips
Replace white tips with shimmering gold polish for an instant glamorous transformation. We recommend using a fine nail art brush to create precise golden tips that mirror the classic French shape. Apply a base coat followed by your preferred nude or clear polish before adding the gold tips for better adhesion.
Choose between matte gold finishes for subtle sophistication or high shine metallics for maximum impact. We suggest using foil nail wraps for ultra smooth gold tips that won’t chip easily. Perfect this technique by using striping tape to create clean lines before applying your gold polish.
Reverse French with Gold Base
Start with a rich gold base color covering the entire nail bed for this modern twist on French styling. We love how this technique makes the natural nail tips pop against the metallic background. Create clean white or nude tips over the gold base using a steady hand or French tip stickers.
Experiment with different gold shades like rose gold, champagne, or antique gold to match your personal style. We find that reverse French manicures work exceptionally well with shorter nail lengths. Seal your design with a high quality top coat to maintain the gold’s brilliance and prevent tarnishing.
Double French Gold Lines
Draw two thin gold lines across your nails instead of one thick tip for this sophisticated variation. We position the first line at the traditional French tip location and add a second line closer to the nail bed. Use a fine liner brush or nail art pen to achieve perfectly parallel gold stripes.
Space the lines evenly for the most polished appearance, typically about 2-3mm apart depending on your nail length. We recommend practicing this technique on a nail wheel before applying to your actual nails. Combine this style with neutral base colors like soft pink or champagne for maximum elegance.
Minimalist Gold Accent Nail Designs
 1")
Sometimes the most striking gold nail art comes from embracing simplicity. We’ve discovered that minimalist approaches create sophisticated looks that complement any style without overwhelming your overall aesthetic.
Single Gold Stripe Details
Single gold stripes transform ordinary manicures into elegant statements with minimal effort. We recommend placing thin gold lines vertically down the center of each nail for a modern approach that elongates fingers. Horizontal stripes across the nail bed create geometric interest while maintaining clean lines.
Diagonal gold stripes offer ever-changing visual movement across your nails. Position these angled lines from one corner to the opposite edge for maximum impact. We suggest using nail tape or striping brushes to achieve perfectly straight edges every time.
Multiple single stripes on select accent nails create balanced focal points. Apply two or three parallel gold lines on your ring fingers while keeping other nails in neutral tones. This technique draws attention without creating visual chaos across your hands.
Gold Dot Patterns
Gold dots arranged in simple patterns deliver maximum impact with minimal complexity. We love creating triangular formations using three small dots placed strategically on each nail. Linear dot arrangements along the nail bed edge provide subtle shimmer that catches light beautifully.
Graduated dot sizes from large to small create compelling visual flow. Start with a prominent gold dot at the base and decrease sizes toward the tip. This technique works exceptionally well on longer nail shapes where you have adequate canvas space.
Random scattered gold dots mimic constellation patterns for cosmic elegance. We apply varying sizes of dots across neutral base colors to create organic layouts. This approach feels effortless while adding luxurious metallic touches to your manicure.
Subtle Gold Foil Touches
Delicate gold foil fragments pressed onto select areas create textural interest without bold coverage. We apply small pieces near the cuticle area or along one side of each nail for asymmetrical appeal. These fragments catch light differently than polish, adding dimensional sparkle.
Gold foil half moons at the nail base update classic lunar manicures with metallic flair. Position thin foil strips to follow your natural cuticle shape for polished results. We find this technique works beautifully over nude or clear base coats.
Strategic foil placement on accent nails maintains overall design balance. Apply larger foil sections to ring fingers while keeping thumbs and other digits minimal. This creates intentional focal points that enhance rather than compete with your natural nail beauty.
Glamorous Full Gold Coverage Styles
 2")
Full coverage gold styles create maximum impact and transform your nails into stunning statement pieces. These bold techniques provide complete metallic coverage that catches light from every angle.
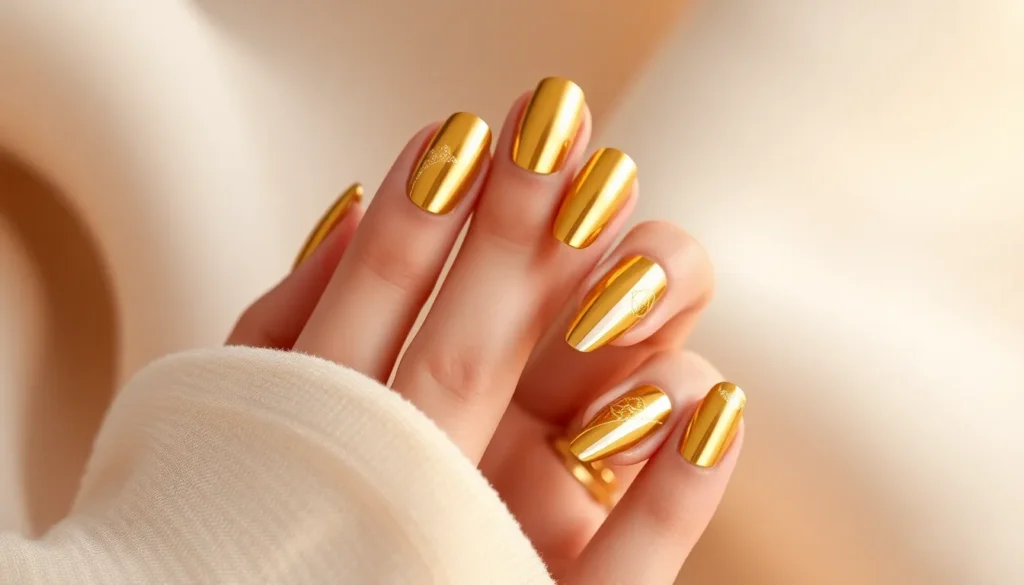
Solid Gold Chrome Finish
Chrome finishes deliver an ultra reflective surface that mirrors light beautifully across the entire nail. We recommend applying a black base coat first to intensify the chrome effect and create deeper dimension. Professional chrome powders work best when buffed into a tacky gel topcoat for seamless coverage.
The mirror like finish requires exact application techniques to avoid streaks or uneven patches. Start with thin base layers and build up gradually rather than applying one thick coat. Seal the chrome powder with a high quality topcoat to prevent chipping and maintain the brilliant shine.
Chrome gold nails pair exceptionally well with evening wear and special occasions when you want maximum glamour. The finish creates an almost liquid metal appearance that moves and shifts with hand gestures.
Textured Gold Leaf Application
Gold leaf creates organic textures and irregular patterns that catch light differently than smooth polish finishes. We apply real gold leaf fragments over a slightly tacky base to ensure proper adhesion and dimensional effects. Each nail develops unique characteristics since leaf application creates natural variations.
The application process requires patience as leaf pieces need careful placement with a soft brush or tweezers. Press gently to avoid tearing the delicate material while ensuring complete contact with the base layer. Multiple leaf pieces can overlap to create richer texture and eliminate any gaps.
Seal textured leaf designs with a thick topcoat to smooth the surface and protect the fragile metal. The final result combines luxury materials with artistic irregularity for truly unique nail art.
Matte Gold Polish Options
Matte gold finishes offer sophisticated elegance without the high shine of traditional metallics. We achieve this look using specialized matte topcoats over regular gold polish or choosing pre formulated matte metallics. The subdued finish creates vintage inspired charm that works for both casual and formal settings.
Application techniques for matte finishes require steady hands since brush strokes show more easily than with glossy polishes. Work quickly and avoid going over the same area twice to prevent streaking. Allow each coat to dry completely before adding additional layers.
Matte gold coordinates beautifully with earth tones and jewel colors in your wardrobe while maintaining the luxurious appeal of metallic nails. The finish photographs particularly well under natural lighting conditions.
Mixed Metal Gold Combinations
 3")
We’re seeing an exciting evolution in nail art where gold harmoniously blends with other precious metal tones. These sophisticated combinations create dimension and visual interest that surpasses single-metal designs.
Gold and Silver Pairings
Alternating finger patterns create stunning contrast when we apply gold polish to accent nails and silver to the remaining fingers. This technique works exceptionally well with ring and middle fingers showcasing gold while thumbs, index, and pinky fingers feature silver metallics.
Striped combinations deliver geometric elegance by painting thin silver lines over gold bases or creating chevron patterns that incorporate both metals. We recommend using nail tape to achieve crisp, professional-looking borders between the metallic sections.
Ombré blending produces seamless transitions from gold at the cuticle to silver at the nail tips. This gradient effect requires careful layering with makeup sponges and creates an ethereal finish that catches light beautifully from every angle.
Rose Gold and Yellow Gold Mix
Warm metal harmony emerges when we combine rose gold’s pinkish undertones with traditional yellow gold’s rich warmth. These complementary shades create sophisticated depth without competing for attention on the nail surface.
Marbled effects showcase both gold tones swirled together using a small brush or toothpick while the polish remains wet. We achieve the most striking results by applying rose gold as the base and dragging yellow gold through it in organic patterns.
Half-moon designs feature rose gold crescents at the cuticle with yellow gold covering the remaining nail area. This technique creates elegant contrast while maintaining the luxurious appeal of precious metal finishes.
Gold with Copper Accents
Earthy metallic combinations pair gold’s brilliance with copper’s warm, reddish-brown undertones for autumn-inspired elegance. These metals complement each other naturally and create rich, sophisticated color stories.
Geometric copper details work beautifully as thin lines or small triangular shapes placed strategically over gold bases. We find that copper accent lines along the nail edges or diagonal stripes create particularly striking visual impact.
Textural mixing combines smooth gold polish with copper leaf fragments or copper glitter for dimensional interest. This approach adds tactile elements while maintaining the warm metallic theme throughout the manicure design.
Seasonal Gold Nail Art Patterns
 4")
Seasonal gold nail designs allow us to celebrate different times of the year while maintaining that luxurious metallic appeal. These themed patterns combine gold with complementary seasonal colors to create truly captivating manicures.
Holiday Gold and Red Themes
Holiday gold and red nail designs capture the festive spirit of winter celebrations with classic color combinations. Rich burgundy polish serves as an elegant base while delicate gold snowflake patterns create winter wonderland effects across each nail.
Candy cane inspired stripes alternate between gold and deep red in diagonal or vertical patterns. Thin nail art brushes help us achieve precise lines while metallic gold tape creates perfectly straight edges for professional results.
Poinsettia flower motifs feature golden centers surrounded by deep red petals painted with detailed brushwork. Small gold rhinestones placed strategically enhance the dimensional effect and add extra sparkle to holiday party looks.
Gradient ombré effects blend warm gold tones into rich cranberry shades for sophisticated seasonal transitions. Makeup sponges dabbed gently across wet polish create seamless color blending from cuticle to tip.
Summer Gold Beach Vibes
Summer gold beach nail art incorporates tropical elements with warm metallic tones for vacation ready manicures. Turquoise accents paired with gold create stunning ocean inspired color combinations reminiscent of crystal clear waters.
Seashell and starfish designs feature golden outlines around coral pink or pearl white shapes. Fine detail brushes allow us to paint delicate shell ridges while gold foil fragments add realistic textural elements.
Palm tree silhouettes showcase black tree shapes against golden sunset backgrounds with orange and pink gradient effects. Tiny gold dots represent distant stars or sand particles for authentic beach scene details.
Wave pattern abstracts use flowing gold lines over aqua blue bases to mimic ocean movements. Metallic gold polish applied with curved brushstrokes creates ever-changing wave formations that catch light beautifully.
Fall Gold and Burgundy Combinations
Fall gold and burgundy nail designs celebrate autumn’s rich color palette with sophisticated metallic accents. Deep wine burgundy serves as the perfect backdrop for intricate gold leaf patterns and harvest themed decorations.
Maple leaf stencils create perfect autumn shapes when filled with shimmering gold polish over burgundy bases. Gold veining details painted through leaf centers add realistic botanical touches to seasonal manicures.
Plaid pattern inspirations alternate thin gold lines with burgundy sections in traditional tartan arrangements. Nail art tape helps us achieve crisp intersecting lines while maintaining consistent spacing throughout the design.
Gradient fade techniques transition from deep burgundy at the cuticle to warm gold at the nail tips. Multiple thin coats blended while wet create smooth color transitions that mirror autumn sunset skies perfectly.
Geometric Gold Design Ideas
 5")
Geometric shapes bring modern sophistication to gold nail art, creating clean lines and structured patterns that elevate any manicure. We’ll explore three geometric approaches that transform your nails into contemporary masterpieces.
Gold Triangle Patterns
Triangle formations create sharp, modern aesthetics that command attention with their precise angular design. We recommend starting with negative space triangles near the cuticle area, leaving your natural nail visible while outlining with thin gold striping tape. Layered triangle designs work beautifully when you alternate sizes, placing a larger gold triangle at the nail base with smaller ones ascending toward the tip.
Geometric triangle clusters offer endless creative possibilities by arranging multiple triangles in asymmetrical patterns across each nail. We suggest using different gold finishes like chrome, matte, and glitter within the same triangular composition for added depth. Inverted triangle tips provide a fresh twist on traditional French manicures, replacing curved lines with sharp geometric points that create an edgy, fashion-forward appearance.
Chevron Gold Details
Chevron patterns deliver ever-changing movement through their distinctive zigzag formations that draw the eye across your nails. We create these designs using thin gold striping brushes or nail tape to achieve perfectly straight lines that meet at precise angles. Alternating chevron directions on different fingers creates visual rhythm, with some pointing toward the cuticle and others toward the nail tip.
Graduated chevron sizes add dimensional interest by starting with wide gold chevrons at the base and tapering to thinner ones near the tip. We recommend using a steady hand and quality gold nail pens for the cleanest results. Double chevron outlines enhance the pattern’s impact by creating both filled and outlined versions, with some chevrons solid gold and others featuring just gold borders around negative space.
Abstract Gold Line Art
Flowing abstract lines break away from rigid geometric rules while maintaining sophisticated metallic elegance throughout your manicure design. We encourage experimenting with curved gold strokes that mimic organic shapes like waves or flowing ribbons across your nail surface. Intersecting line networks create contemporary art effects when gold lines cross and overlap at various angles and intervals.
Minimalist abstract strokes prove that simple can be stunning, featuring just one or two bold gold lines that sweep dramatically across each nail. We suggest varying line thickness within the same design to create visual hierarchy and movement. Random geometric fragments combine structured elements with artistic freedom, incorporating gold dots, dashes, and angular shapes that appear spontaneously placed but create harmonious overall compositions.
Glittery Gold Statement Nails
 6")
Sparkle takes center stage when we want our nails to command attention and radiate pure glamour. These dazzling designs transform your fingertips into captivating focal points that catch light from every angle.
Chunky Gold Glitter Coverage
Bold glitter particles create maximum impact when we apply them densely across the entire nail surface. Large hexagonal and square gold flakes deliver stunning dimension while smaller round glitters fill gaps between bigger pieces. We recommend starting with a black or deep gold base coat to make the glitter particles pop dramatically. Application requires patience as we build up coverage in thin layers, pressing each coat gently with a silicone tool to ensure even distribution.
Sealing becomes crucial for chunky glitter manicures since rough textures can snag on clothing and hair. We apply two coats of high quality topcoat, allowing complete drying between layers. Removal demands special care using acetone soaked cotton balls wrapped around each nail for five minutes before gently pushing off softened glitter.
Ombre Gold Sparkle Effect
Graduated sparkle intensity creates breathtaking visual flow from subtle shimmer to full glitter coverage. We begin with fine gold particles at the nail base, gradually increasing density toward the tips using a makeup sponge for seamless blending. Color transitions work beautifully when we incorporate champagne gold at the cuticle area, building to rich golden yellow, then finishing with bronze gold glitter at the tips.
Blending technique requires gentle dabbing motions rather than wiping to maintain smooth color transitions. We work quickly while the base coat remains tacky, adding glitter in sections and immediately blending edges. Professional results emerge when we seal each layer before building the next intensity level, creating depth without muddying the sparkle effect.
Gold Glitter Gradient Fade
Soft sparkle transitions deliver elegance while maintaining maximum shimmer impact across the nail surface. We create subtle fades by mixing different gold glitter sizes, starting with ultra fine particles and progressing to medium sized flakes. Placement strategy involves concentrating the finest glitter near cuticles, building density gradually toward the center, then tapering to scattered accents at the tips.
Vertical and horizontal gradients offer different aesthetic appeals for various occasions and nail shapes. We achieve vertical fades by working from one side of the nail to the other, while horizontal gradients flow from base to tip. Perfect execution demands using a fan brush to blend harsh lines, creating seamless sparkle transitions that appear professionally airbrushed. The final result showcases dimensional gold that shifts and moves with every hand gesture.
Gold Nail Shape and Length Variations
 7")
Different nail shapes and lengths unlock unique possibilities for showcasing gold’s luxurious appeal. Each variation offers distinct advantages for creating stunning metallic manicures.
Short Gold Nail Designs
Short nails provide an elegant canvas for sophisticated gold applications that complement everyday activities. We recommend focusing on high-impact techniques like solid gold chrome coverage or delicate gold foil accents that maximize visual appeal within the compact surface area. Geometric gold patterns work exceptionally well on shorter lengths, creating clean lines that elongate the nail bed visually.
Minimalist gold dots arranged in triangular formations deliver maximum elegance without overwhelming the smaller nail space. Subtle gold French tips enhance the natural nail shape while adding a touch of luxury that’s perfect for professional settings. Matte gold polish creates a refined finish that appears more substantial on shorter nails than glossy alternatives.
Long Coffin Gold Styles
Coffin shaped nails offer an expansive surface for creating dramatic gold statement pieces. The tapered rectangular shape provides ideal proportions for showcasing ombré gold glitter effects that transition from intense sparkle at the tips to subtle shimmer at the base. We’ve found that gold and burgundy combinations look particularly striking on coffin nails during fall seasons.
Textured gold leaf application creates organic patterns that follow the nail’s natural curves beautifully. Abstract gold line art can flow across the entire nail surface, incorporating negative space elements that highlight the coffin shape’s architectural appeal. Double French gold lines positioned at varying distances from the tip create sophisticated layered effects.
Stiletto Gold Nail Art
Stiletto nails transform into show-stopping accessories with the right gold applications. The dramatic pointed shape naturally draws attention, making it perfect for chunky gold glitter coverage that creates maximum impact. We recommend using gold and silver mixed metal combinations to emphasize the stiletto’s sharp angles through contrasting metallic tones.
Gold chevron patterns positioned strategically along the nail’s length create ever-changing visual movement that complements the pointed tip. Marbled rose gold and yellow gold effects produce stunning organic textures that soften the stiletto’s angular appearance. Holiday themed gold snowflakes or tropical gold accents can be scaled appropriately to fit the stiletto’s elongated proportions while maintaining artistic balance.
Professional Gold Manicure Techniques
 8")
Professional gold manicures require exact techniques and specialized care to achieve that coveted salon-quality finish we’ve been exploring throughout our gold nail journey.
At-Home Gold Application Tips
Base preparation determines the longevity and smoothness of your gold manicure. We recommend starting with a thorough cuticle push-back and gentle buffing to create an even surface. Clean nails with rubbing alcohol to remove any oils that might interfere with polish adhesion.
Primer application creates the foundation for professional-looking results. Apply a thin layer of nail dehydrator followed by a quality base coat, allowing each layer to dry completely. This step prevents chipping and extends wear time by up to 5 days.
Gold polish application requires exact brushwork for optimal coverage. Use three thin coats rather than two thick ones, painting down the center first, then along each side. We suggest using a fan brush for glitter application to achieve even distribution without clumping.
Temperature control affects the finish quality of metallic polishes. Keep gold polishes at room temperature before application, as cold polish creates streaky coverage. Roll the bottle between your palms instead of shaking to prevent air bubbles.
Sealing techniques preserve the metallic shine and prevent premature wear. Apply topcoat in thin layers, wrapping the tips to seal the edges. For textured gold designs like foil or glitter, use two topcoat layers for maximum protection.
Salon Gold Treatment Options
Professional chrome application delivers that ultra-reflective mirror finish we discussed in full coverage styles. Salons use specialized chrome powders applied over gel base coats and cured under UV lights. This process creates the most durable and brilliant chrome effect available.
Gel gold manicures offer extended wear time of 2-3 weeks without chipping. We’ve seen clients maintain their geometric gold patterns and mixed metal combinations for extended periods through professional gel application. The curing process bonds the gold particles directly to the nail surface.
Dip powder gold systems combine durability with stunning metallic finishes. Salons apply multiple dip layers to build thickness and depth, particularly effective for textured gold leaf looks. This technique provides chip resistance while maintaining the dimensional quality of our featured gold designs.
Airbrushing creates seamless ombré effects and gradient fades that are difficult to achieve at home. Professional airbrush systems deliver the smooth transitions we showcased in glittery statement nails and mixed metal combinations. Technicians can blend multiple gold tones for custom effects.
Hand-painted nail art by professionals elevates geometric patterns and abstract designs to gallery-worthy pieces. Salon artists use specialized brushes and high-quality gold leaf sheets to create the intricate seasonal patterns and minimalist accents we’ve explored.
Gold Nail Care and Maintenance
Daily protection preserves the brilliance of your gold manicure investment. We recommend wearing gloves during cleaning tasks and applying cuticle oil daily to maintain flexibility around nail edges. This prevents lifting and extends wear time significantly.
Weekly maintenance rituals keep gold designs looking fresh and professional. Gently buff any minor chips with a fine-grit file and apply a fresh topcoat layer. For textured designs like foil applications, use a soft brush to remove debris from crevices.
Proper removal techniques protect nail health between gold manicures. Soak nails in acetone-free remover for gel applications, or use the foil wrap method for stubborn glitter designs. Never peel or scrape gold polish, as this damages the natural nail surface.
Nail strengthening treatments prepare nails for future gold applications. We suggest using protein-based strengtheners between manicures, especially after wearing heavy glitter or textured designs. This maintains nail integrity for continued gold nail artistry.
Storage considerations for gold polishes ensure consistent application quality. Keep bottles upright in a cool, dark place and replace brushes annually for precise application. Quality gold polishes maintain their metallic properties for 18-24 months when stored properly.
Conclusion
We’ve explored the limitless possibilities that gold brings to nail art – from minimalist accents to show-stopping glitter statements. Whether you’re drawn to subtle elegance or dramatic glamour gold adapts beautifully to every style preference and occasion.
The beauty of gold nail designs lies in their universal appeal and versatility. They effortlessly elevate any look while complementing every skin tone and outfit choice.
With the right techniques and proper care your gold manicure can maintain its luxurious shine for weeks. Remember that practice makes perfect so don’t hesitate to experiment with different textures finishes and application methods.
Transform your nails into golden masterpieces and embrace the confidence that comes with wearing such a timeless sophisticated color. Your fingertips deserve nothing less than pure luxury.
Frequently Asked Questions
What makes gold nails a popular trend in the beauty industry?
Gold nails have become a symbol of luxury and sophistication in the beauty industry. Their universal appeal stems from gold’s versatility – it complements all skin tones and outfits. From subtle minimalist accents to bold statement pieces, gold offers endless design possibilities that can elevate any manicure into a glamorous, professional-looking finish.
Can I create professional-looking gold nails at home?
Yes, you can achieve salon-quality gold nails at home with proper techniques. Start with thorough base preparation, apply a primer for better adhesion, and use thin layers for optimal coverage. Focus on proper brushwork, seal with a high-quality topcoat, and allow adequate drying time between layers for the best results.
What are the best gold nail design ideas for beginners?
Beginners should start with simple designs like single gold stripe accents, gold dot patterns, or subtle foil touches. These minimalist approaches create striking looks without requiring advanced skills. Gold French manicure tips or scattered gold dots are also excellent starting points that deliver elegant results with minimal complexity.
How do I achieve a perfect gold chrome finish?
For chrome nails, apply a black base coat first to enhance the reflective effect. Use thin layers of chrome powder or polish, working quickly for even coverage. Seal immediately with a high-quality topcoat designed for chrome finishes. The key is smooth application and proper sealing to maintain the ultra-reflective surface.
What nail shapes work best with gold designs?
All nail shapes can showcase gold beautifully, but each offers unique advantages. Short nails work well with solid chrome coverage and geometric patterns. Long coffin shapes allow for dramatic ombré effects and textured applications. Stiletto nails create show-stopping looks with chunky glitter and mixed metal combinations.
How do I maintain gold nails and prevent chipping?
Protect gold nails with daily glove use during cleaning activities. Apply cuticle oil weekly and use a strengthening base coat. Avoid harsh chemicals and excessive water exposure. For removal, use gentle acetone-based removers and follow up with nail strengthening treatments to maintain nail health.
Can gold nails work for different seasons?
Absolutely! Gold adapts beautifully to seasonal themes. Winter calls for gold snowflakes and holiday reds, summer works with tropical gold accents, and fall combines gold with burgundy and leaf patterns. Spring can feature gold with pastels. Gold’s versatility makes it perfect for year-round wear.
What’s the difference between matte and shiny gold finishes?
Matte gold offers a sophisticated, understated luxury that coordinates beautifully with various wardrobe colors. Shiny gold provides maximum impact with reflective surfaces that catch light dramatically. Matte finishes require special topcoats and careful application, while shiny finishes typically use traditional glossy topcoats for enhancement.


