We’ve all been there – staring at our plain nails and wishing we could create those stunning designs we see on Instagram. The good news? You don’t need to be a professional nail artist or spend hours perfecting intricate patterns to achieve gorgeous results.
Whether you’re rushing to get ready for a special occasion or simply want to elevate your everyday look, simple nail designs can make all the difference. From classic French tips with a twist to trendy minimalist patterns, there are countless ways to transform your nails using basic tools you probably already have at home.
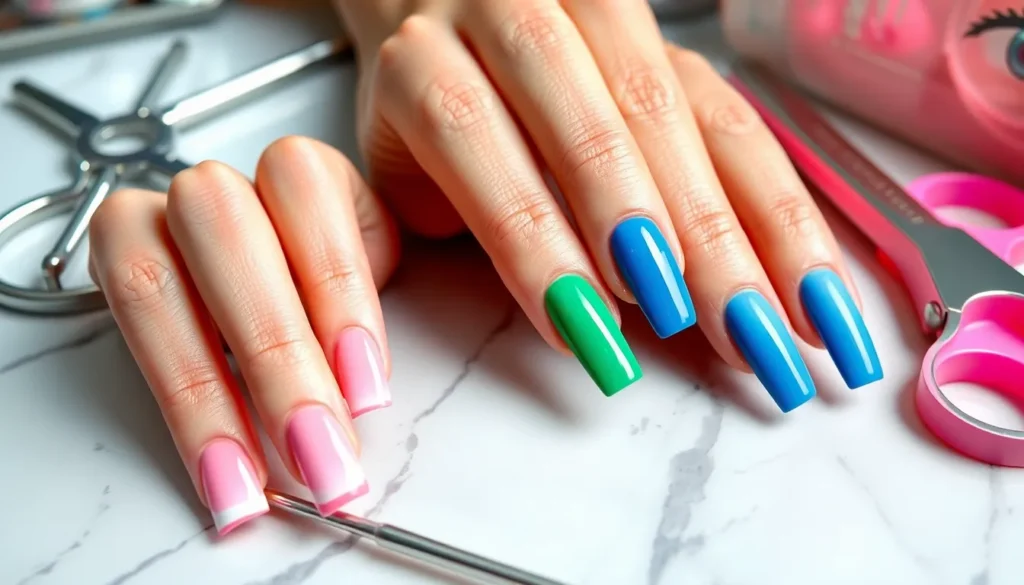
Simple Solid Color Designs That Make a Statement
Solid colors offer endless possibilities for creating stunning nail designs with minimal effort and maximum impact.
Classic French Manicure Variations
Classic French tips transform instantly with simple color swaps that modernize this timeless look. We love switching the traditional white tips for soft pink, nude, or even bold black polish to create fresh variations. Reverse French manicures place the accent color at the base of the nail instead of the tip, giving you a contemporary twist that’s perfect for any occasion.
Colored French tips work beautifully with seasonal palettes like coral for summer or deep burgundy for fall. You can create these designs using nail tape or steady hands with a thin brush, making them accessible even for beginners. The technique remains the same while the color choices let your personality shine through.
Bold Monochromatic Looks
Bold single colors create dramatic impact without requiring complex techniques or artistic skills. We recommend choosing rich, saturated shades like emerald green, royal blue, or classic red that command attention and complement your skin tone. These statement colors work exceptionally well for special events or when you want your nails to be the focal point of your look.
Dark colors like black, navy, or deep purple offer sophisticated elegance that pairs beautifully with both casual and formal outfits. Bright neons such as electric pink, vibrant orange, or lime green make perfect summer statements that energize any ensemble. Two coats of quality polish ensure full opacity and professional looking results that last longer.
Pastel Perfect Shades
Pastel colors provide subtle elegance that enhances your natural beauty without overwhelming your overall aesthetic. We find that soft shades like lavender, mint green, baby pink, and powder blue create delicate, feminine looks perfect for everyday wear. These gentle hues complement spring and summer wardrobes while remaining appropriate for professional settings.
Cream based pastels offer better coverage than sheer formulas, giving you that perfect milky finish in just two coats. Mixing different pastel shades on each nail creates a rainbow effect that’s playful yet sophisticated. The key to stunning pastel manicures lies in proper base coat application and allowing adequate drying time between layers.
Easy Geometric Patterns for Beginners
 1")
Geometric patterns offer the perfect introduction to nail art design without requiring advanced skills. We’ll show you three simple techniques that create stunning geometric looks using basic tools you probably already have.
Striped Nail Art Using Tape
Stripes create clean geometric lines that instantly elevate your nail game. We recommend using painter’s tape or nail striping tape to achieve perfectly straight lines every time.
Start by applying your base color and allowing it to dry completely. Place tape strips vertically horizontally or diagonally across each nail leaving gaps where you want your contrasting color to show. Press down the tape edges firmly to prevent bleeding then paint over the entire nail with your second color.
Remove the tape while the polish is still slightly wet for the cleanest lines. Classic combinations like black and white navy and gold or pink and silver create striking stripe patterns that work for any occasion.
Experiment with different stripe widths by using various tape sizes. Thin stripes create elegant subtle looks while thick stripes make bold modern statements.
Simple Polka Dot Designs
Polka dots bring playful charm to your nails and require only a dotting tool or bobby pin. We love how this pattern transforms basic manicures into eye catching designs.
Apply your base color first and let it cure completely. Dip your dotting tool or bobby pin head into contrasting polish and gently press onto each nail to create uniform circles. Start with larger dots using the round end of a bobby pin then add smaller accent dots with a toothpick tip.
Space your dots evenly across each nail or cluster them at the base for an ombre effect. Popular color combinations include white dots on red nails black dots on nude base or metallic gold dots on deep purple.
Create different sized dots by varying the pressure and tool size. Light pressure produces smaller delicate dots while firm pressure creates bold statement circles.
Triangle and Square Accents
Angular shapes add modern sophistication to your nail design repertoire. We find that triangles and squares create striking focal points when placed strategically on accent nails.
Use small pieces of tape to mask off triangle or square shapes on your dried base coat. Position triangles at nail tips for a geometric French manicure look or place them at the cuticle area for reverse designs. Square accents work beautifully when positioned off center or layered in different sizes.
Paint over the exposed areas with your accent color then carefully remove the tape while polish remains tacky. Metallic shades like rose gold and copper create stunning geometric accents against neutral bases.
Mix triangle and square shapes on different nails within the same hand for ever-changing geometric nail art. Alternate between filled shapes and outline only designs to add visual interest and depth to your manicure.
Quick Gradient and Ombre Effects
 2")
Gradient and ombre nail designs create stunning visual effects that transition smoothly between colors. These techniques offer professional-looking results with surprisingly simple application methods.
Two-Color Fade Techniques
Select complementary colors that blend naturally together for the most seamless gradient effect. We recommend choosing shades within the same color family like light pink to deep rose or cream to chocolate brown for foolproof results.
Apply the lighter base color across your entire nail and allow it to dry completely before beginning the gradient process. This foundation ensures even coverage and prevents streaking during the blending phase.
Work quickly with wet polish by applying the darker shade to the nail tip and immediately blending downward with gentle brush strokes. The key lies in maintaining wet polish throughout the blending process to achieve that smooth transition.
Build layers gradually rather than attempting to create the perfect fade in one application. Each thin layer adds depth and richness to the final gradient effect.
Sponge Gradient Methods
Choose a makeup sponge with fine texture for the smoothest color transitions and minimal visible sponge marks on your finished design. Wedge-shaped cosmetic sponges work exceptionally well for nail gradient techniques.
Paint both colors directly onto the sponge in parallel stripes before pressing onto your nail surface. This method creates an instant gradient without requiring advanced blending skills.
Dab the sponge gently onto your nail using a bouncing motion rather than dragging or wiping motions. Multiple light applications produce better results than heavy pressure that can create uneven coverage.
Clean the sponge edges between applications to prevent unwanted color mixing that could muddy your gradient effect.
Glitter Ombre Tips
Start with glitter placement at the nail tips and gradually decrease density toward the cuticle area for classic ombre sparkle. Heavy glitter concentration at the tips creates dramatic impact while maintaining wearable elegance.
Layer different glitter sizes by applying larger pieces first followed by fine glitter to fill gaps and create depth. This technique produces professional salon-quality results using drugstore materials.
Use a fan brush to blend the glitter edges seamlessly into your base color for smooth transitions. The bristles naturally feather the glitter particles for that perfect fade effect.
Seal with clear topcoat applied in thin layers to prevent glitter pieces from catching on clothing or hair while maintaining long-lasting wear.
Effortless Floral and Nature Designs
 3")
Nature inspired nail art brings organic beauty to your fingertips without requiring advanced artistic skills. These botanical designs offer a refreshing alternative to geometric patterns while maintaining simplicity.
Simple Daisy Patterns
Creating adorable daisy designs starts with a white or pale yellow base color that serves as your canvas. We recommend using a dotting tool or toothpick to create five small white petals around a central yellow dot. Position daisies randomly across two or three nails for a scattered meadow effect that looks naturally effortless.
Varying the daisy sizes adds visual interest and prevents your design from appearing too uniform. Large daisies work beautifully as accent pieces on ring fingers while smaller blooms fill space on remaining nails. Mix white daisies with soft pink ones to create a spring garden theme that complements any outfit.
Finishing your daisy nails requires a thin topcoat to seal the design and prevent chipping. We suggest adding tiny green dots near some flowers to represent leaves without overwhelming the delicate floral pattern.
Easy Leaf Accents
Drawing simple leaf shapes involves creating curved lines that meet at pointed tips using a thin nail art brush or steady hand. Start with forest green polish and paint leaves vertically along the sides of your nails for an elegant botanical border. These leafy accents work particularly well over nude or light pink base colors.
Branching leaf patterns can transform a single accent nail into a nature masterpiece using just two colors. Apply light green leaves first then add darker green ones on top to create depth and dimension. We find that odd numbers of leaves create more natural looking arrangements than symmetrical patterns.
Seasonal leaf variations let you adapt this design throughout the year by changing colors. Autumn inspired leaves use burnt orange amber and deep red shades while spring versions feature bright greens and yellow highlights.
Minimalist Rose Designs
Painting simplified roses requires only circular motions and layering technique rather than detailed petal work. Begin with a small circle of deep pink or red polish then spiral outward to create the rose shape. We suggest practicing this motion on paper before applying it to your nails.
Single rose accents make elegant statement pieces when placed on ring fingers with neutral bases on remaining nails. Position roses slightly off center rather than directly in the middle for a more sophisticated asymmetrical look. Add tiny green strokes beneath each rose to suggest stems without cluttering the design.
Miniature rose clusters work beautifully for special occasions when you want subtle romance. Group three small roses together using different shades of pink from light blush to deep magenta. These clustered arrangements create focal points that draw attention without appearing overwhelming or busy.
Fast Textured Nail Ideas
 4")
Textured nail designs offer an instant way to elevate your manicure without requiring advanced artistic skills. These techniques create visual depth and tactile interest that transforms ordinary polish into stunning statement nails.
Matte Finish Techniques
Matte topcoats instantly transform any glossy polish into a sophisticated velvet-like finish that’s perfect for modern nail looks. We recommend applying your base color as usual, then sealing it with a matte topcoat for an effortless upgrade. Darker shades like burgundy, navy, and charcoal create particularly striking matte effects that work well for both casual and formal occasions.
Creating contrast between matte and glossy sections adds visual interest without complicated designs. Apply matte topcoat to most of the nail, then use regular topcoat on accent areas like tips or geometric shapes. This technique works beautifully with neutral colors and creates a professional appearance that’s suitable for any setting.
Matte gradients combine the best of both texture techniques by blending glossy and matte finishes seamlessly. Start with your base color, then apply matte topcoat to the tips while leaving the base glossy for a unique ombre texture effect.
Salt Water Texture Effects
Salt creates an organic, crystalline texture that mimics natural stone patterns with minimal effort required. Mix coarse sea salt into wet nail polish immediately after application, then remove the salt once the polish dries completely. This technique works best with darker base colors like deep blues, greens, and purples that showcase the textural contrast effectively.
Creating layered salt effects involves applying multiple thin coats with salt between each layer for enhanced dimension. We suggest using different salt grain sizes to achieve varied texture patterns that catch light beautifully. Fine table salt creates subtle texture, while coarse kosher salt produces more dramatic crystalline effects.
Color combinations enhance salt texture effects when you layer complementary shades before adding the salt treatment. Try applying a dark base color, then brush on a lighter shade in the same color family before sprinkling salt for complex depth and visual interest.
Simple Marble Patterns
Water marble techniques create elegant stone-like patterns using just a cup of room temperature water and two contrasting polish colors. Drop alternating colors into the water, create patterns with a toothpick, then dip your nail through the design for instant marble effects. We recommend using colors within the same family or high-contrast combinations like black and white for the most striking results.
Dry brush marble effects offer easier control than water techniques while still achieving beautiful stone-like patterns. Apply your base color, then drag a nearly dry brush loaded with contrasting polish across the nail in irregular patterns. This method works particularly well with metallic accents over matte base colors for luxurious marble appearances.
Saran wrap techniques produce organic marble textures by pressing plastic wrap into wet polish for natural stone patterns. Apply your base color, add drops of contrasting polish, then press crumpled plastic wrap over the wet surface and lift carefully. This creates unique patterns that vary with each nail for an authentic marble look that’s impossible to replicate exactly.
Beginner-Friendly Holiday and Seasonal Designs
 5")
Seasonal nail designs let us celebrate special occasions and changing weather with festive flair that requires minimal artistic skill. We can transform our nails into themed masterpieces using simple techniques and seasonal color palettes.
Christmas and Winter Themes
Snowflake patterns create magical winter wonderlands using white polish and a toothpick for delicate details. Start with a light blue or silver base color and add small white dots in clustered formations. Connect the dots with thin lines radiating outward to form snowflake shapes across your nails.
Candy cane stripes bring festive cheer through alternating red and white diagonal lines created with tape guides. Apply white base polish and let it dry completely before placing thin strips of tape at diagonal angles. Paint red polish over the exposed areas and remove tape while the polish remains wet for clean stripes.
Holiday sparkle transforms basic colors into celebration ready designs using glitter polish as accent pieces. Choose traditional colors like deep green, burgundy, or navy as your base and apply gold or silver glitter to the tips or ring finger. We recommend using a sponge to dab glitter polish for controlled sparkle placement.
Spring and Summer Motifs
Fresh flower designs capture spring essence through simple five petal blooms created with dotting tools. Paint small circles in bright colors like pink, yellow, or purple on a white or nude base. Add darker center dots and thin green stems using a nail art brush for completed garden looks.
Ocean wave patterns bring summer vibes using blue gradient techniques combined with white foam details. Create horizontal waves by blending light blue at the cuticle into darker blue at the tips. Apply thin white lines using a nail art pen to simulate ocean foam and movement.
Tropical fruit accents add playful summer elements through simple geometric shapes in vibrant colors. Paint small triangular watermelon slices using green, white, and pink layers with tiny black seeds. Create orange circles with green tops for simple citrus designs that capture vacation moods.
Halloween and Fall Patterns
Autumn leaf designs celebrate fall colors through simple leaf shapes painted in warm seasonal tones. Use orange, red, and yellow polish to create small teardrop shapes with pointed ends. Add brown stems and simple vein details using a thin brush for realistic autumn foliage effects.
Spooky silhouettes create Halloween atmosphere through black shapes against bright colored backgrounds. Paint simple bat wings, spider shapes, or ghost outlines using black polish over orange or purple bases. We suggest using stencils or nail vinyls for perfectly shaped Halloween icons.
Pumpkin patch themes bring October festivities through orange base colors with simple carved face details. Apply bright orange polish as your base and use black nail art pens to draw triangle eyes and zigzag mouths. Add green polish to the cuticle area to create pumpkin stem effects for completed jack o’lantern nails.
Quick Accent Nail Techniques
 6")
Accent nails offer the perfect solution for adding visual interest without committing to a full nail art design. We’ll explore targeted techniques that highlight exact fingers for maximum impact.
Single Statement Nails
Bold contrast colors create instant drama when applied to just one nail per hand. We recommend choosing your ring finger as the statement nail and painting it in a vibrant shade like electric blue or cherry red while keeping the remaining nails neutral. This technique works exceptionally well with black base colors paired with metallic gold or silver accents.
Textured statement nails add dimensional interest through specialized polish finishes. Apply glitter polish to your chosen accent nail while maintaining solid colors on the others, creating a sophisticated sparkle effect. Caviar beads, rhinestones, or small studs can transform a single nail into a focal point that catches light beautifully.
Pattern mixing allows you to experiment with different designs on one nail. Create polka dots using a contrasting color on your statement nail while keeping others in solid shades. Alternatively, add thin stripes or geometric shapes to create visual tension that draws attention without overwhelming your overall look.
Ring Finger Focus Designs
Classic ring finger accents emphasize the traditional jewelry placement finger. We suggest using metallic shades like rose gold or platinum on your ring finger while painting the remaining nails in complementary nude tones. This approach mimics the elegance of wearing statement rings and creates natural hand symmetry.
Glitter gradient effects work beautifully when concentrated on ring fingers. Apply your base color to all nails, then create a glitter fade from the cuticle to the tip on ring fingers only. This technique adds glamour without appearing overdone and photographs beautifully for special occasions.
Seasonal ring finger themes allow you to celebrate holidays with minimal commitment. Paint tiny snowflakes on winter ring fingers, small hearts for Valentine’s Day, or autumn leaves during fall months. These delicate designs require only basic tools like dotting tools or thin brushes to achieve professional-looking results.
Thumb Accent Ideas
Geometric thumb designs use the thumb’s larger surface area for mini masterpieces. Create simple triangles, squares, or diamond shapes using contrasting colors while keeping fingernails uniform. The thumb’s visibility during hand gestures makes it an ideal canvas for showcasing your creativity.
Miniature floral accents transform thumbs into tiny garden displays. Paint small daisies, roses, or leaf patterns using basic nail art brushes and dotting tools. We recommend starting with simple two-color flowers before advancing to more complex botanical designs as your skills develop.
Textural thumb treatments add tactile interest through specialized application techniques. Apply matte topcoat only to thumbs while keeping other nails glossy, or create salt texture effects for organic appeal. These contrasting finishes create visual depth and make your thumbs the conversation starter of your manicure.
Time-Saving Tools and Shortcuts
 7")
Professional-looking nail designs don’t require hours of practice when you have the right tools and shortcuts at your disposal. These innovative answers deliver stunning results in minutes rather than the traditional lengthy application process.
Nail Stickers and Decals
Adhesive nail stickers transform plain manicures into intricate masterpieces without any artistic skill required. We simply peel these pre-designed elements from their backing and press them onto dry base color for instant sophistication. Popular options include geometric patterns, floral motifs, and seasonal themes that would take hours to paint freehand.
Water transfer decals offer even more versatility for creating complex designs with minimal effort. Place these thin film decals in warm water for 10-15 seconds until they slide easily from their backing paper. Position them carefully on your nail surface and seal with top coat for professional durability.
French tip guides eliminate the guesswork from classic French manicures by providing perfectly curved lines every time. Apply your base color first, position the guides along your nail tips, then paint over them with your chosen tip color for flawless results.
Stamp Plate Designs
Metal stamping plates feature hundreds of etched designs that transfer onto nails using a silicone stamper and special polish. Cover the desired pattern with stamping polish, scrape away excess with a plastic card, then roll the stamper across the design to pick up the image. Press the stamper firmly onto your nail to create crisp, detailed artwork in seconds.
Double-sided plates maximize your design options by offering complementary patterns on each side. Seasonal collections provide holiday themes, while everyday plates include florals, geometrics, and text designs for versatile styling options.
Stamping polish flows differently than regular nail polish to ensure clean transfers and opaque coverage. We recommend keeping a few essential colors like black, white, and metallic gold for maximum design flexibility across different base colors.
Press-On Accent Options
Individual press-on nails work perfectly as accent pieces when you want dramatic flair on just one or two fingers. These pre-decorated options come in various lengths and shapes, allowing you to mix textures and patterns with your regular manicure.
3D embellishments attach instantly using nail glue for dimensional interest without drying time. Rhinestones, pearls, and metal studs create luxury looks that would typically require professional application and curing equipment.
Magnetic accent strips contain tiny metal particles that create mesmerizing patterns when exposed to a magnetic wand during polish application. Apply magnetic polish to your accent nail, hold the magnet above the wet surface for 10-15 seconds, then watch unique designs emerge automatically.
Conclusion
We’ve shown you that creating stunning nail designs doesn’t require professional training or expensive salon visits. With the techniques and tools we’ve covered you can transform your nails from ordinary to extraordinary using items you likely already have at home.
The beauty of these easy nail design ideas lies in their versatility and accessibility. Whether you’re preparing for a special event or simply want to add some personality to your everyday look these simple methods allow you to express your creativity without stress or time pressure.
Remember that practice makes perfect and even the most basic designs can look incredibly polished with the right approach. Start with the techniques that appeal to you most and gradually experiment with different colors patterns and textures as your confidence grows.
Frequently Asked Questions
Can I create beautiful nail designs without professional skills?
Absolutely! Simple nail designs can significantly enhance your look without requiring professional expertise or extensive time investment. Using basic tools commonly found at home, you can create stunning designs ranging from classic French tips to trendy minimalist patterns. The key is starting with simple techniques and building your confidence over time.
What are the easiest nail designs for beginners?
Start with solid color designs, classic French manicures with color variations, and simple geometric patterns like stripes or polka dots. These designs require minimal tools and can be created using painter’s tape, dotting tools, or even bobby pins. Pastel shades and monochromatic looks are also beginner-friendly options that make a statement.
How can I create gradient and ombre effects at home?
Use the sponge gradient method with fine-textured makeup sponges for effortless application. Apply a lighter base color first, then work quickly with wet polish to achieve smooth transitions. Choose complementary shades within the same color family for seamless blending, and consider adding glitter ombre effects for dramatic flair.
What tools do I need for basic nail art?
Essential tools include painter’s tape for clean lines, dotting tools or bobby pins for polka dots, thin brushes for details, and makeup sponges for gradients. You can also use nail stickers, decals, stamping plates, and 3D embellishments to create professional-looking designs without artistic skill.
How do I create simple floral designs?
For easy daisies, use a white or pale yellow base and create petals with a dotting tool. Leaf shapes can be painted using a thin brush, while simplified roses require only circular motions. These designs work beautifully as accent nails and can be adapted for different seasons.
What are accent nails and how do I use them?
Accent nails involve decorating just one or two nails (typically the ring finger) with bold designs while keeping others simple. Use contrasting colors, textured finishes like glitter, or geometric patterns. This technique adds visual interest without the commitment of a full design on every nail.
Can I create seasonal nail designs easily?
Yes! Simple seasonal designs include snowflake patterns and candy cane stripes for winter, fresh flowers and ocean waves for summer, and autumn leaves for fall. Use basic techniques like dots, lines, and simple shapes to capture seasonal themes without complex artistic skills.
How do I achieve textured nail effects?
Try matte finish techniques by applying matte topcoat over glossy polish, or create salt water textures by mixing coarse sea salt into wet polish. Simple marble patterns can be achieved using water marble techniques, dry brush methods, or saran wrap for elegant stone-like designs.


