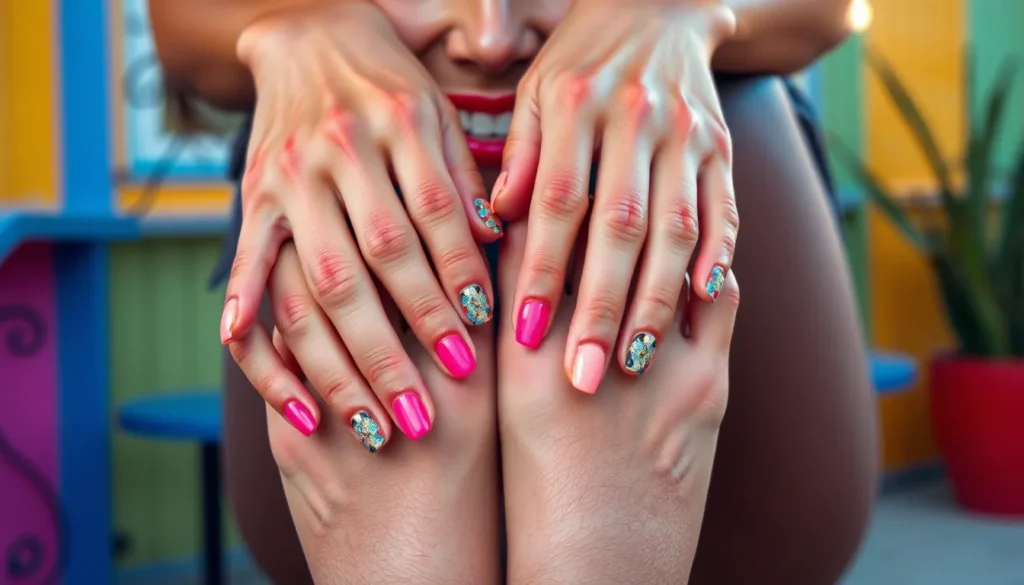
We’ve all been there – staring at our hands and feet wondering how to transform them into stunning works of art. Whether you’re preparing for a special occasion or simply want to treat yourself to some self-care, the perfect nail and toe design can boost your confidence and express your unique personality.
From classic French tips to bold geometric patterns, the industry of nail art offers endless possibilities for creativity. We’ll explore trendy color combinations that complement each season, innovative techniques that’ll make your manicure and pedicure stand out, and simple DIY approaches you can master at home.
The best part? You don’t need to be a professional nail technician to achieve salon-worthy results. With the right inspiration and a few essential tools, we’ll show you how to create eye-catching designs that’ll have everyone asking where you got your nails done.
Classic French Manicure and Pedicure Ideas
French manicures remain timeless for good reason. We’ve perfected these elegant techniques that work beautifully on both fingers and toes.
Traditional White Tips with Clear Base
Perfect the classic white tip by starting with a nude or clear base coat that matches your natural nail tone. We recommend using quality nail tape or guides to create sharp, even lines across all ten fingers. Apply thin coats of white polish, building opacity gradually rather than trying to achieve full coverage in one stroke.
Clean application requires steady hands and proper brush control. We suggest practicing the curved motion on paper before touching your nails. Professional nail artists often use a striping brush for precise edges, especially on shorter nails where standard brushes feel too wide.
Maintain your French tips by applying a high quality top coat every three days. We’ve found that this simple step extends wear time from one week to nearly two weeks. Touch up small chips immediately with a thin brush dipped in white polish.
Colored French Tips for Modern Twist
Experiment with bold colors like coral pink, mint green, or lavender purple instead of traditional white. We love how these shades complement different skin tones while maintaining the sophisticated French silhouette. Neon yellows and electric blues create striking summer looks that photograph beautifully.
Layer metallic shades like rose gold, champagne, or silver for special occasions. We recommend applying these over a white base to enhance their reflective properties. Glitter French tips using holographic or iridescent polishes add dimension without overwhelming the classic shape.
Match your pedicure colors to seasonal trends or outfit coordination. We often pair burgundy French tips with fall wardrobes or bright coral with summer dresses. Dual toned French tips using complementary colors create unique gradient effects.
Reverse French Manicure Styles
Create reverse French nails by painting the half moon area near your cuticles instead of the tips. We start with a base color that contrasts nicely with the accent shade at the nail bed. This technique works especially well with nude bases and metallic accents.
Shape the reverse French curve using reinforcement stickers or freehand techniques. We find that practicing the curve motion helps achieve consistent results across all fingers. Leave the natural nail showing for a minimalist approach or fill with complementary colors.
Combine reverse and traditional French techniques for double French manicures. We alternate the placement on different fingers or layer both styles on the same nail for maximum impact. This advanced technique requires precision but creates stunning editorial looks.
Bold and Vibrant Color Combinations

Moving beyond classic styles, we’re diving into electrifying color combinations that make powerful statements. These ever-changing nail and toe designs transform your look with fearless hues that demand attention.
Neon Summer Shades
Neon colors create instant energy with their electric intensity and youthful vibrancy. We love pairing hot pink nails with lime green toes for a playful contrast that screams summer fun. Electric blue combined with neon orange delivers a bold statement that works perfectly for pool parties and beach vacations.
Gradient neon effects blend multiple fluorescent shades seamlessly from one nail to another. Start with neon yellow on your thumb and gradually transition through orange, pink, and purple across each finger. This ombre technique creates stunning visual flow that catches light beautifully.
Safety considerations matter when working with neon polishes since they often contain stronger pigments. Apply a quality base coat to prevent staining and use thin layers to avoid streaking. Neon shades typically require two to three coats for full opacity and vibrant color payoff.
Jewel Tone Elegance
Jewel tones bring sophistication with their rich, saturated depths that mirror precious gemstones. We recommend emerald green nails paired with deep sapphire blue toes for an elegant combination that works year round. Amethyst purple with ruby red creates luxurious contrast perfect for special occasions.
Metallic accents enhance jewel tones by adding glamorous shine that elevates the overall look. Try adding gold foil strips to emerald nails or silver glitter tips to deep burgundy toes. These metallic touches create depth and dimension that catches light from every angle.
Seasonal versatility makes jewel tones perfect for transitioning between seasons effortlessly. Deep garnet red works beautifully for fall gatherings while maintaining elegance through winter holidays. Sapphire blue transitions from summer ocean vibes to autumn sophistication with ease.
Matching Sets vs. Contrasting Colors
Matching nail and toe colors create cohesive elegance that’s perfect for formal events and professional settings. We suggest choosing one stunning shade like deep plum or rich teal and applying it to both hands and feet. This monochromatic approach ensures your look remains polished and intentional.
Contrasting combinations offer creative freedom to express multiple personality facets through different color stories. Pair soft lavender nails with bold coral toes for sweet and spicy contrast. Try mint green hands with hot pink feet for a playful combination that shows your fun loving side.
Balance considerations help determine which approach works best for your lifestyle and personal style preferences. Matching sets work wonderfully when wearing open toed shoes with visible nail beds. Contrasting colors allow more experimentation since toes often remain hidden in closed shoes throughout different seasons.
Seasonal Nail and Toe Design Inspirations

Seasonal nail art transforms our manicures and pedicures into celebrations of each time of year. We’ll explore how to capture the essence of every season through carefully chosen patterns colors and techniques.
Spring Floral Patterns
Spring floral patterns celebrate nature’s awakening with delicate blooms and fresh pastels. We achieve stunning cherry blossom designs by dotting light pink polish over a nude base then adding tiny white highlights with a detail brush. Daisy patterns work beautifully on both nails and toes using white petals around yellow centers on soft green backgrounds.
Botanical prints require steady hands but create impressive results when we layer different flower sizes across our nail beds. Small roses complement larger peonies while baby’s breath fills empty spaces with tiny white dots. Watercolor effects enhance floral designs when we blend colors while they’re still wet creating dreamy bleeding effects.
Spring coordinates perfectly with pastel French tips featuring lavender sage green or soft coral instead of traditional white. We recommend practicing flower shapes on paper before attempting them on nails to build confidence with brush control.
Summer Beach Themes
Summer beach themes transport us to tropical paradise through ocean inspired designs and vibrant coral reef colors. We create stunning wave patterns using white and blue polish applied with a fan brush to mimic ocean movement. Seashell details work perfectly on accent nails using iridescent topcoats over pink or peach bases.
Sunset gradients capture summer’s golden hour magic when we blend orange pink and purple polishes with makeup sponges. Palm tree silhouettes add tropical flair to our beach themed sets while anchor designs provide nautical charm. We achieve realistic sand textures by mixing fine glitter with clear base coat.
Tropical fruit patterns celebrate summer’s bounty through miniature pineapples watermelons and flamingo designs. Neon accents enhance beach themes when we add bright pink or electric blue details to otherwise neutral designs. Seashell stickers simplify complex designs while maintaining professional looking results.
Fall Autumn Leaves
Fall autumn leaves showcase nature’s dramatic color transformation through rich burgundies golden yellows and burnt oranges. We create realistic leaf patterns using nail art brushes to paint maple oak and elm shapes with gradient coloring techniques. Metallic accents enhance fall designs when we add bronze or copper highlights to leaf edges.
Pumpkin spice inspired colors dominate autumn nail art through warm cinnamon shades paired with deep chocolate browns. We achieve stunning ombre effects by blending these seasonal colors from light to dark across our nail beds. Plaid patterns capture cozy fall fashion when we use thin brushes to create intersecting lines in complementary autumn colors.
Thanksgiving themed designs celebrate gratitude through turkey feathers acorns and cornucopia patterns. We recommend using fall colors for base coats then adding seasonal details with contrasting shades. Matte topcoats enhance autumn designs by reducing shine and creating sophisticated velvet finishes.
Winter Holiday Sparkle
Winter holiday sparkle transforms our nails into festive celebrations through glitter snowflakes and metallic accents. We create stunning snowflake designs using white polish and fine detail brushes over dark blue or black backgrounds. Silver and gold glitter gradients add luxury to holiday manicures when applied from nail tips downward.
Christmas themes shine through candy cane stripes holly leaves and reindeer silhouettes painted on accent nails. We achieve professional looking results by using nail tape for straight lines and stencils for complex shapes. Red and green combinations create classic holiday looks while silver and blue offer elegant winter alternatives.
New Year designs celebrate fresh beginnings through champagne bubbles created with different sized dotting tools and metallic polishes. We recommend adding rhinestones or nail gems for extra glamour during holiday parties. Glitter topcoats finish winter designs with spectacular shine that catches light beautifully.
Winter whites create sophisticated monochromatic looks when we layer pearl and silver accents over cream bases. Icicle designs work perfectly on longer nails using clear polish with silver striping brushes to create hanging crystal effects.
Minimalist and Understated Nail Art

Sophistication doesn’t require complexity when it comes to nail and toe designs. We’ll explore how subtle elements create powerful visual impact while maintaining elegance.
Single Accent Nail Designs
Single accent nails create focal points without overwhelming your overall look. We recommend choosing your ring finger for accent placement on hands and big toe for pedicures.
Metallic accents transform simple manicures into statement pieces. Apply gold or silver polish to one nail while keeping others in nude or clear base colors. Rose gold works particularly well with warm skin tones.
Textured finishes add dimension through strategic placement. Matte topcoat on your accent nail creates contrast against glossy base colors. Velvet powder or sand texture polish provides tactile interest.
Glitter placement sparkles without excess when applied thoughtfully. Choose fine glitter for sophisticated shimmer or chunky glitter for weekend glamour. Apply glitter polish only to accent nails while maintaining neutral bases.
Negative space designs showcase natural nail beauty through intentional gaps. Create thin lines or small shapes using nail tape then paint around them. Remove tape while polish is slightly wet for clean edges.
Subtle Geometric Patterns
Linear designs offer clean sophistication through simple line work. We suggest using striping tape to create parallel lines across nail beds. Thin brushes help achieve freehand straight lines with practice.
Triangle accents provide modern edge without overwhelming detail. Place small triangles near cuticle lines or nail tips using contrasting but muted colors. Metallic triangles against nude bases create perfect balance.
Dot patterns deliver playful minimalism through strategic placement. Use dotting tools to create small circles along nail edges or in corner arrangements. Varying dot sizes adds visual interest while maintaining simplicity.
Half moon designs frame cuticle areas with gentle curves. Apply base color then use reinforcement stickers to mask half moon shapes. Paint exposed areas in complementary shades for subtle contrast.
Grid patterns create structured beauty through intersecting lines. Draw vertical and horizontal lines to form small squares or rectangles. Keep colors within the same tone family for cohesive results.
Nude and Neutral Palettes
Nude base colors enhance natural nail beauty while providing polished appearance. We recommend selecting nudes that complement your skin undertones. Cool undertones pair with pink based nudes while warm undertones suit beige or peachy shades.
Neutral coordination between nails and toes creates seamless sophistication. Match exact shades for formal occasions or choose tones from the same color family for everyday wear. Seasonal adjustments help maintain year round relevance.
Layering techniques build depth within neutral palettes without adding bold colors. Apply sheer polishes in multiple coats to achieve desired opacity. Mixing different neutral tones creates custom shades perfect for your preferences.
Matte finishes transform ordinary neutrals into contemporary statements. Top neutral colors with matte topcoat for modern sophistication. Combine matte and glossy finishes on different nails for textural contrast.
Pearl effects add luminosity to neutral bases through subtle shimmer. Choose pearl polishes with minimal color shift to maintain understated elegance. Apply over nude bases or use pearl polishes alone for natural enhancement.
Glitter and Metallic Glamour Options

We’re elevating our nail and toe designs with the captivating sparkle of glitter and the luxurious shine of metallics. These glamorous finishes transform simple manicures and pedicures into stunning statement pieces that catch light beautifully.
Gold and Silver Foil Accents
Gold foil accents create instant luxury on our nails and toes with their mirror-like finish and sophisticated appeal. We apply these delicate sheets over tacky base coats or nail glue for maximum adhesion, pressing gently with a cuticle pusher to eliminate air bubbles. Torn foil pieces work better than cut shapes because they create organic, artistic edges that blend seamlessly into the design.
Silver foil complements cooler skin undertones and pairs beautifully with navy blue, deep purple, or classic black base colors. We recommend using foil specifically designed for nail art rather than create foil, as it adheres better and lasts longer. Application techniques include creating geometric patterns, accent nail designs, or delicate striping effects across the nail bed.
Mixing gold and silver foils together produces a striking contrast that works especially well for special occasions and holiday designs. We seal these metallic accents with two coats of clear top coat to prevent chipping and maintain their brilliant shine.
Holographic and Chrome Finishes
Holographic polishes display rainbow color shifts that change dramatically with movement and lighting conditions. These magical finishes work best over dark base colors like black or deep purple, which intensify the prismatic effect. We apply holographic polishes in thin, even coats to prevent streaking and maintain optimal color payoff.
Chrome powder applications require gel base coats cured under UV or LED lights for proper adhesion. We rub the fine powder directly onto the tacky layer using eyeshadow applicators or silicone tools, creating that perfect mirror finish. Popular chrome shades include rose gold, silver, copper, and rainbow chrome that shifts between multiple metallic tones.
Maintenance tips for holographic and chrome finishes include avoiding harsh chemicals and wearing gloves during cleaning tasks. We recommend applying cuticle oil daily to maintain flexibility and prevent cracking around the nail edges.
Gradient Glitter Effects
Sponge application techniques create stunning gradient glitter effects by building density from the nail tip toward the cuticle. We dab makeup sponges into glitter polish and press repeatedly along the nail, creating smooth color transitions. Three color gradients work particularly well, moving from fine glitter at the base to chunky glitter at the tips.
Glitter placement strategies include concentrating sparkle at the smile line for French manicure updates or creating ombre effects that fade from intense to subtle. We mix different glitter sizes within the same color family to add depth and visual interest to our gradient designs.
Removal preparation becomes crucial with heavy glitter applications, so we always use peel-off base coats under gradient designs. Setting techniques require multiple thin top coat layers, allowing each to dry completely before applying the next to prevent glitter displacement.
Artistic and Creative Pattern Ideas

Let’s jump into the industry of artistic expression where your nails and toes become miniature canvases for stunning creative masterpieces. These pattern ideas push beyond traditional designs to showcase your unique artistic vision.
Abstract Art Inspired Designs
Create flowing brushstrokes using multiple polish colors for an authentic painted canvas effect. We recommend starting with a white base and adding spontaneous strokes of complementary colors like turquoise, coral, and gold. Apply each color while the previous layer remains slightly wet to achieve natural blending and organic movement.
Experiment with splatter techniques using a small brush or toothbrush for Jackson Pollock inspired designs. Mix bright colors like electric blue, hot pink, and sunny yellow over neutral backgrounds for maximum visual impact. Protect surrounding skin with tape and work in well ventilated areas for best results.
Design geometric abstract patterns using painter’s tape to create sharp lines and defined shapes. Combine bold triangles, circles, and rectangles in contrasting colors such as black and white with accent pops of neon green. Remove tape while polish remains slightly tacky to prevent peeling and maintain crisp edges.
Animal Print Variations
Master classic leopard spots using a dotting tool and layering technique for authentic texture. Start with a nude or tan base, then add irregular brown spots followed by smaller black dots for realistic depth. We suggest practicing the pattern on paper first to perfect your technique.
Transform traditional zebra stripes into modern nail art using curved lines instead of straight patterns. Apply white polish as your base, then create flowing black stripes that follow the natural curve of your nail shape. Vary stripe thickness and spacing for a more ever-changing and contemporary appearance.
Explore snake skin patterns using a makeup sponge and metallic polishes for sophisticated reptilian designs. Layer gold, bronze, and copper tones over a dark base to create realistic scale effects. Blend colors while wet to achieve seamless transitions that mimic natural snake skin textures.
Marble and Stone Textures
Achieve elegant marble effects using the water marbling technique with contrasting polish colors. Drop alternating colors into room temperature water, create patterns with a toothpick, then dip your nail through the design. We recommend using white and gray for classic marble or experiment with colored variations like pink and gold.
Create granite textures using a sea sponge and multiple earth tone polishes for natural stone appearance. Layer beige, brown, and black colors with dabbing motions to build realistic granite patterns. Seal with matte top coat to enhance the authentic stone texture and eliminate unwanted shine.
Develop geode inspired designs using glitter placement and metallic accents for crystalline effects. Start with a dark base color, then add concentrated glitter in the center to represent crystal formations. Surround the glitter with thin metallic lines in gold or silver to create natural geode ring patterns that radiate outward.
Special Occasion Nail and Toe Themes

Celebrating life’s milestone moments deserves nail and toe designs that match the significance of these cherished occasions. We’ll transform your fingertips and toes into stunning accessories that complement your most important celebrations.
Wedding Day Elegance
Bridal designs require sophistication that photographs beautifully and complements your gown perfectly. We recommend classic French manicures with subtle pearl accents or delicate lace patterns created using nail stamps. Ivory and champagne bases offer timeless elegance while maintaining that bridal glow throughout your ceremony.
Accent nails can feature tiny rhinestones or hand painted flowers without overwhelming your overall look. Consider adding a single crystal at the base of your ring finger to catch the light during ring exchanges. Nude pink bases with white tips create photogenic results that won’t clash with any dress style.
Pedicure designs should coordinate with your manicure while considering your wedding shoes. Open toe options call for subtle French pedicures or soft pearl finishes. Pearl dust mixed with clear topcoat creates an ethereal shimmer that photographs beautifully in wedding portraits.
Longevity becomes crucial for your wedding day nail art since touch ups aren’t always possible. Apply base coat, two thin color coats, and seal with a high quality topcoat for maximum durability. Schedule your nail appointment 1-2 days before the wedding to ensure everything looks fresh without risking last minute chips.
Holiday Celebration Styles
Christmas celebrations call for festive reds and greens combined with metallic gold accents. We suggest alternating red and green nails with tiny gold snowflakes or holly leaf designs. Glitter gradients from the cuticle create a sparkling effect that catches holiday lights beautifully.
New Year’s Eve designs should sparkle with metallic chrome or holographic finishes. Silver bases with black accent stripes create sophisticated party ready looks. Champagne gold with rose gold tips offers elegant countdown ready nails that photograph well in party lighting.
Halloween themes allow for creative expression through orange and black color combinations. Spider web patterns using fine brushes or stamping plates create spooky effects. Matte black bases with glossy orange accents provide striking contrast for costume parties.
Valentine’s Day romance shines through soft pinks and passionate reds with heart accents. Gradient effects from pink to red create romantic ombre looks. Tiny heart shaped rhinestones or hand painted heart designs add sweet touches without appearing childish.
Date Night Romance Looks
Sultry burgundy and deep wine shades create intimate evening ready nails and toes. These rich colors photograph beautifully in candlelight and complement most outfit choices. Burgundy bases with subtle gold shimmer add depth without appearing overdone.
Classic red remains the ultimate romantic choice for special dinner dates. We recommend testing different red undertones against your skin to find your perfect shade. Blue based reds suit cool skin tones while orange based reds flatter warm undertones.
Nude bases with rose gold accents offer understated romance that works with any outfit. Thin rose gold lines at the cuticle or single accent nails create elegant touches. Pearl effects mixed into nude polishes provide subtle luminosity perfect for intimate settings.
Matching your pedicure to your manicure creates a cohesive romantic look. Consider your footwear choice when planning pedicure designs for date nights. Closed toe shoes allow for bolder pedicure colors while open toe options should coordinate with your overall romantic theme.
DIY-Friendly Techniques and Tools

We’ll explore the essential supplies and methods that make creating stunning nail and toe designs achievable at home. Professional results become attainable when you have the right tools and follow proven techniques.
Essential Nail Art Supplies
Base and top coats form the foundation of every successful nail and toe design. We recommend investing in high quality formulas that provide chip resistance and glossy finish. Professional grade base coats prevent staining and create smooth application surfaces for your color choices.
Precision brushes enable detailed work on both fingernails and toenails. Fine liner brushes work perfectly for creating thin lines and intricate patterns. Flat brushes help achieve smooth color coverage while fan brushes create unique textural effects for artistic designs.
Dotting tools create perfect circles and decorative patterns with consistent results. We suggest purchasing various sizes to achieve different dot dimensions for your nail art projects. Toothpicks serve as budget friendly alternatives for creating smaller dots and detailed accent work.
Nail tape and stencils produce crisp geometric lines and professional looking patterns. Striping tape works excellently for creating French tip guides and angular designs. Adhesive stencils simplify complex patterns like chevrons and intricate geometric shapes for both nails and toes.
Quality polish collection should include versatile colors that work across seasons and occasions. We recommend building your collection with classic nudes, bold statement shades, and metallic accents. Fast drying formulas save time during application and reduce smudging risks.
Step-by-Step Application Methods
Preparation steps ensure long lasting results for your nail and toe designs. Clean nails thoroughly with acetone to remove oils and residue that interfere with polish adhesion. Push back cuticles gently and file nails to your desired shape using smooth strokes in one direction.
Base coat application requires thin even layers that cover the entire nail surface. We apply base coat from cuticle to tip using three strokes for complete coverage. Allow each coat to dry completely before proceeding to color application for optimal results.
Color layering techniques create depth and vibrancy in your designs. Apply polish in thin coats rather than thick applications to prevent bubbling and uneven coverage. Build color gradually with multiple light layers for smooth professional looking results on both nails and toes.
Detail work methods require steady hands and patience for precise results. Rest your working hand on a stable surface to minimize shaking during intricate pattern creation. Use small amounts of polish on brushes to maintain control and prevent bleeding outside intended areas.
Top coat finishing protects your design and adds professional shine to completed looks. Apply top coat over completely dry color to seal and protect your nail art. Refresh top coat every few days to maintain glossy appearance and extend design longevity.
Maintenance and Longevity Tips
Daily care routines preserve your nail and toe designs between salon visits or touch up sessions. Wear gloves during cleaning tasks and household chores to prevent chipping and premature wear. Apply cuticle oil daily to maintain healthy nail beds and flexible cuticle areas.
Touch up strategies extend the life of your designs without complete reapplication. Keep matching polish colors accessible for quick chip repairs on high wear areas. Focus touch ups on nail tips and stress points where wear naturally occurs first.
Removal techniques protect nail health while preparing for new designs. Soak cotton pads with acetone and place them on nails secured with aluminum foil for efficient polish removal. Avoid peeling or scraping polish off nails as this damages the nail surface and creates weakness.
Storage answers maintain polish quality and extend product life significantly. Store nail polishes upright in cool dry places away from direct sunlight to prevent color changes. Roll bottles between palms rather than shaking to mix settled pigments without creating air bubbles.
Tool maintenance ensures consistent performance and prevents bacterial growth in your nail art supplies. Clean brushes immediately after use with appropriate solvents to prevent bristle damage. Replace worn tools regularly and sanitize reusable items between uses for optimal hygiene and results.
Trending Social Media Nail Inspirations

Social media platforms continue to shape nail and toe design trends, offering endless inspiration for creative expression. We’ve curated the hottest viral styles that are taking feeds by storm and turning ordinary manicures into statement pieces.
Instagram-Worthy Photo Ideas
Flatlay photography transforms your nail designs into stunning visual content. Position your hands against textured backgrounds like marble surfaces, velvet fabrics, or fresh flowers to create depth and interest. Natural lighting from a window provides the most flattering illumination for capturing true colors and intricate details.
Ring displays enhance the overall aesthetic of your nail photography. Stack delicate gold or silver bands alongside statement rings to complement your manicure colors. Minimalist jewelry works beautifully with bold nail designs, while chunky pieces pair perfectly with understated neutral tones.
Props elevate simple nail photos into professional looking content. Coffee cups, books, crystals, and seasonal elements like autumn leaves or seashells add storytelling elements to your images. Match your prop colors to your nail palette for a cohesive, magazine worthy appearance.
Symmetrical hand positioning creates balanced and pleasing compositions. Place both hands parallel to each other with fingers slightly curved, or create interesting angles by overlapping your hands naturally. Close up shots focusing on individual nail details showcase intricate artwork and textures more effectively than full hand photos.
TikTok Viral Nail Trends
Jelly nails dominate TikTok feeds with their translucent, glass like appearance. This trend uses sheer colored polishes layered over a clear base to create a juicy, dimensional effect. Popular jelly colors include coral, lavender, and mint green, often enhanced with small glitter particles or dried flowers embedded within the layers.
Chrome powder nails create mesmerizing mirror effects that perform beautifully on camera. Rose gold, silver, and holographic chrome powders rubbed over gel polish bases produce stunning reflective surfaces. These designs particularly shine under ring lights, creating the dramatic visual impact that makes videos go viral.
Textured bubble nails offer a unique three dimensional element that’s perfect for close up videos. Created using thick gel or acrylic applications, these designs feature raised bumps and organic shapes. Pastel colors work exceptionally well for this trend, creating soft, dreamy effects that contrast beautifully with the bold texture.
Oil slick nails showcase rainbow reflections that shift and change in movement videos. This technique involves layering holographic top coats over dark bases to create an iridescent petroleum like effect. Black, deep purple, and navy blue bases provide the most dramatic color shifts when filmed under different lighting angles.
Celebrity-Inspired Looks
Hailey Bieber’s glazed donut nails set the standard for elegant simplicity across social platforms. This look combines nude pink bases with pearl or champagne chrome powders to create a subtle luminous finish. We recommend using a pink tinted base coat followed by chrome application for the most authentic recreation.
Billie Eilish’s bold black and green combinations inspire edgy geometric designs. Her signature neon lime green paired with matte black creates striking contrast effects. These colors work particularly well in negative space designs, checkerboard patterns, or simple accent nail combinations.
Kylie Jenner’s long stiletto shapes with vibrant colors influence current nail length trends. Hot pink, electric blue, and sunset orange in glossy finishes dominate her manicure choices. Almond and coffin shapes offer similar dramatic impact for those preferring slightly shorter lengths.
Dua Lipa’s metallic accents and textured finishes showcase how to incorporate luxury elements. Gold leaf details, silver foil strips, and mixed metal combinations create her signature glamorous aesthetic. These elements work beautifully over both neutral bases and bold color choices, adding sophistication to any design.
Professional Salon vs. At-Home Options

Choosing between professional salon services and DIY nail treatments depends on your budget, skill level, and design complexity. We’ll explore the advantages of each approach to help you make informed decisions about your nail and toe care routine.
When to Visit a Professional
Complex designs require professional expertise when you’re attempting intricate patterns like detailed marble effects, hand-painted florals, or multi-dimensional nail art. Salon technicians possess specialized tools and years of training that enable them to execute challenging techniques with precision and consistency.
Gel and acrylic applications work best under professional supervision because they require UV lamps, proper ventilation, and expert knowledge of chemical interactions. We recommend visiting salons for these services since improper application can damage your natural nails or cause allergic reactions.
Special occasions deserve professional treatment when you need flawless results for weddings, photo shoots, or important events. Salon professionals can create lasting designs that photograph beautifully and withstand extended wear without chipping or lifting.
Nail health issues need expert attention if you’re dealing with fungal infections, ingrown toenails, or damaged cuticles. Licensed technicians can safely address these problems while providing therapeutic treatments that promote healing.
Time constraints make salons practical when you’re managing busy schedules or preparing for last-minute events. Professional services typically take 60-90 minutes for complete manicures and pedicures, delivering consistent results without the learning curve.
Cost-Effective Home Alternatives
Basic manicures save important money when performed at home, costing approximately $5-15 in supplies versus $25-50 per salon visit. We suggest investing in quality base coats, polishes, and top coats that provide professional-looking results for multiple applications.
Simple nail art techniques work perfectly for DIY enthusiasts using tools like dotting pens, nail tape, and small brushes. These methods allow you to create French tips, geometric patterns, and accent nails without expensive equipment or specialized training.
Regular maintenance becomes more affordable when you handle routine tasks like cuticle care, filing, and polish touch-ups at home. This approach extends the time between professional visits while keeping your nails and toes looking polished.
Experimentation costs less in home settings where mistakes don’t result in wasted appointment fees. We encourage trying new color combinations, seasonal designs, and trending techniques like chrome powder or gradient effects using affordable drugstore products.
Subscription services offer convenience by delivering nail supplies monthly, ensuring you always have fresh polishes and tools available. These services often cost $15-25 per month, providing excellent value for frequent nail art enthusiasts.
Safety and Hygiene Considerations
Sterilization protocols matter most in both salon and home environments to prevent bacterial infections and cross-contamination. We recommend verifying that salons use hospital-grade disinfectants and disposable tools, while home users should clean instruments with rubbing alcohol between uses.
Proper ventilation protects your health during nail treatments, especially when using acetone, gel polishes, or acrylic products. Salons typically provide adequate air circulation, but home users need to work near open windows or use fans to disperse chemical fumes.
Chemical sensitivities require careful product selection regardless of where you receive treatments. We suggest patch testing new polishes, removers, and treatments on small skin areas before full application to identify potential allergic reactions.
Tool quality affects safety outcomes when choosing between professional and home options. Salon-grade implements undergo regular inspection and replacement, while home users should invest in stainless steel tools and replace them when they become dull or damaged.
Knowledge gaps can create risks if you attempt advanced techniques without proper training. We recommend starting with simple designs at home and gradually building skills before attempting complex procedures that could damage your natural nails or surrounding skin.
Conclusion
We’ve explored a industry of possibilities for transforming your nails and toes into stunning canvases of self-expression. Whether you’re drawn to timeless elegance or bold artistic statements you now have the knowledge and inspiration to create designs that reflect your unique personality.
The beauty of nail and toe art lies in its accessibility – you can achieve professional-looking results from the comfort of your home with the right tools and techniques. Remember that practice makes perfect and every design is an opportunity to develop your skills further.
Your nails and toes are more than just beauty accessories; they’re powerful tools for boosting confidence and making memorable impressions. We encourage you to experiment fearlessly combine different styles and most importantly have fun with the creative process. The perfect design is the one that makes you feel amazing.
Frequently Asked Questions
What are the best nail art styles for beginners?
Start with classic French manicures, single accent nails, or simple geometric patterns using nail tape. These designs require minimal tools and techniques while still looking professional. Focus on mastering basic application methods like proper base coat preparation, steady hand positioning, and clean finish techniques before advancing to more complex designs.
How do I make my nail art last longer?
Use high-quality base and top coats for chip resistance and apply thin, even layers. Allow each coat to dry completely between applications. Seal your design with a glossy top coat and reapply every few days. Avoid using nails as tools and wear gloves when cleaning to preserve your nail art.
What tools do I need for DIY nail art at home?
Essential tools include precision brushes, dotting tools, nail tape for clean lines, and quality base and top coats. Additional helpful items are makeup sponges for gradient effects, toothpicks for detailed work, and nail foil for metallic accents. Start with basic tools and expand your collection as you develop your skills.
How do I choose nail colors that complement my skin tone?
For warm undertones, choose coral, gold, and orange-based shades. Cool undertones look best with blue-based reds, purples, and silver metallics. Neutral undertones can wear most colors. Test colors near your cuticles in natural light to see how they complement your skin before committing to a full manicure.
When should I go to a professional salon instead of doing my nails at home?
Seek professional help for complex designs like intricate nail art, gel or acrylic applications, special occasions requiring flawless results, or when dealing with nail health issues. Professionals also save time for busy schedules and provide proper sterilization. Choose DIY for basic manicures, simple designs, and regular maintenance.
What are the current trending nail art styles on social media?
Popular trends include jelly nails with translucent effects, chrome powder finishes, textured bubble nails, and oil slick designs with rainbow reflections. Celebrity-inspired looks from Hailey Bieber’s glazed donut nails, Billie Eilish’s bold styles, and minimalist geometric patterns are also trending across Instagram and TikTok platforms.
How do I create gradient or ombre nail effects?
Use a makeup sponge to blend two or more colors. Apply the lightest shade as your base, then dab darker colors onto the sponge and gently press onto your nails. Work quickly while polish is wet and blend upward or downward depending on your desired gradient direction. Finish with top coat for smooth results.
What’s the difference between matte and glossy nail finishes?
Glossy finishes provide shine and depth, making colors appear more vibrant and helping designs stand out. Matte finishes offer a sophisticated, modern look that’s currently trending and can make bold colors appear more subtle. You can transform any glossy polish into matte using a matte top coat for versatile styling options.
How do I safely remove glitter nail polish?
Soak cotton balls in acetone-based nail polish remover and place them on each nail. Wrap fingertips in aluminum foil and let sit for 10-15 minutes. The foil creates heat that helps dissolve stubborn glitter. Gently push off polish with an orange stick rather than scraping, which can damage your natural nails.
Can I mix different nail art techniques in one design?
Absolutely! Combining techniques creates unique, personalized designs. Try pairing French tips with geometric accents, adding glitter to gradient effects, or incorporating negative space into floral patterns. Start with two complementary techniques and gradually experiment with more complex combinations as your skills develop. Balance is key to avoiding overwhelming designs.


